Showing posts with label Dinner. Show all posts

Sunday, July 24, 2022

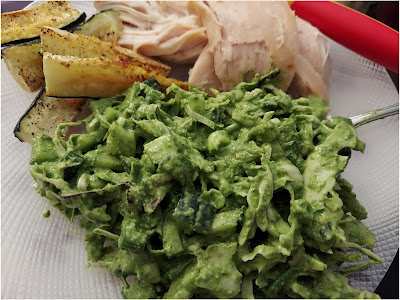
Green Goddess Salad for Summer-Time


This summer is the first summer I've ever had a CSA box.  A friend and I are sharing a mini box and it's been an adventure!  This week I needed to find something to use up a variety of the green-goodness-veggies that came in my box.  In particular I had chives and basil to use.  Since I also had cucumbers, I decided to try that Green Goddess salad that seemed to take over the internet a few months back (or was it longer?  Who knows!)

The recipe that I worked off of was this one.  I ate it as a side with a dinner and with some chicken stirred in for a hearty summer lunch, and the original author says she eats it with tortilla chips (like salsa) or on sandwiches or tacos.  I'm also pretty sure lots of things could be swapped out.  I did happen to have nutritional yeast, for example, but could see swapping that with grated parmesan (it wouldn't be vegan then, but would probably be good!).  Also, I swapped the "one head green cabbage" with a bag of pre-made cole slaw mix.  Totally worked and saved time and mess.  

Ingredients

Salad

  • 1 bag cole slaw
  • 1+ large cucumbers (I used about 1.5 medium cukes)
  • 1/4 cup chives
  • 1 bunch green onions or scallions

Dressing 

  • 1 cup basil leaves
  • 1 cup fresh spinach
  • 2 cloves garlic (or equivalent)
  • 1 smallish shallot
  • 2 lemons, juiced (about 6 to 8 Tbsp)
  • 1/4 cup olive oil
  • 1/4 cup nuts of your choice  (I used unsalted cashews and pistachios.  Original author also recommends walnuts as an option) 
  • 1/3 cup nutritional yeast
  • 1 tsp salt
  • 2 Tbsp rice vinegar 
  • Any extra chives you have on hand (optional)


Directions

  1. Wash and chop all of the salad ingredients.
  2. Place in a large bowl with plenty of room to stir
  3. Add olive oil, lemon juice, and rice vinegar to the blender first
  4. Then add the other dressing ingredients to the blender
  5. Blend until it is all blendy, and a pourable dressing.  
  6. Pour dressing into bowl and mix.

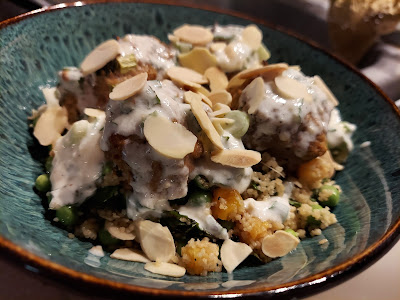
Moroccan Couscous Bowls with Meatballs


In past years, my work has sponsored field trips to various historic sites for the staff each spring or summer.  It was a sort of morale event--there was lunch, transportation, etc.  Last year, however, Covid-19 made this impossible.  But we did have a virtual event in its place: a cooking class


The institution hired a very cool chef/company called Roots for the Soul and sent participants ingredient lists. We all cooked together, and finished in time for eating at a regular dinner time.  I had a really nice time, and made a very tasty meal@  

I saved the recipe and I'm thinking I should make it again soon.  It was a very springy-summery meal!


Ingredients:

Yogurt Sauce:

  • 1 cup plain whole-milk yogurt (not Greek) 
  • 3 scallions, trimmed & finely sliced 
  • 1/4 cup mint leaves 
  • 1 garlic clove, minced 
  • 1/4 tsp red pepper flakes 
  • Salt & pepper, to taste 

Couscous:

  •  8 dried apricots, cut into bits 
  • 1/4 cup white wine vinegar or red wine vinegar 
  • 1/4 cup warm water 
  • 3 scallions, trimmed & finely sliced 
  • 1/2 cup mint leaves, lightly packed 
  • 2 cups peas, fresh or frozen 
  • 1/2 cup almonds, toasted 
  • 1 cup couscous 
  • Juice of 1/2 lemon, other half reserved for garnish 
  • 1/4 cup extra-virgin olive oil 
  • Salt & pepper, to taste

Meatballs:

  • 1 lb ground meat (I used turkey, but could be lamb, beef, impossible meat, etc.)  
  • 3 scallions, trimmed & finely sliced/chopped 
  • 1/4 cup mint leaves 
  • 1 tsp cumin, ground 
  • 1.5 tsp kosher salt 
  • 1/8 tsp cayenne 
  • 1 Tbsp dry white wine or white wine vinegar 
  • 1/4 cup breadcrumbs 
  • 1 egg 
  • Extra-virgin olive oil 

Directions:
  • BEFORE YOU START COOKING 
    1. Place apricots in small bowl with vinegar & warm water. 
    2. Soak until they are plump, about 30 minutes, then drain and rinse (if desired). 
    3. Slice and soak all scallions in ice water for 20 minutes then drain. 
  • MAKE THE YOGURT SAUCE
    1. Mix yogurt, scallions, mint, garlic and red pepper flakes in a bowl with salt & pepper, to taste. Adjust red pepper flakes, salt and pepper as needed. 
    2. Set sauce aside to let flavors develop, for at least 30 minutes. 
  • START THE COUSCOUS
    1.  Bring 1 cup of water to boil
    2. Remove from heat and mix couscous into water with a spoon. 
    3. Cover with lid and let absorb for 5-10 minutes. 
    4. Fluff with fork, add lemon juice, 1/4 cup of olive oil and generous amount of salt and pepper. 
    5. Toss throughly, let cool to room temperature. 
  • MAKE THE MEATBALLS

    1. Preheat oven to 450℉. 
    2. Gently blend ground meat, scallions, mint, cumin, salt, cayenne, wine and breadcrumbs with fingers, or wooden spoon. Be as gentle as possible to not over process meat, which will make it tough. 
    3. Once mixed well, take a small piece and fry it in small skillet. Taste cooked sample for seasoning, add more spices if needed. The meatballs should be highly seasoned. 
    4. If seasonings are to your liking, mix egg with a glue of olive oil, then add to the meat mixture gently until fully-combined. 
    5. Using a tablespoon, or scooper, shape the meat mixture into total of 16 meatballs. 
    6. Arrange all meatballs on lined baking sheet. 
    7. Bake meatballs for 8-10 minutes, or until fully cooked.  
  • FINISH THE COUSCOUS: 
    1. While the meatballs cook, gently add apricots, scallions, mint, shelled peas, and almonds to the couscous. 
    2. Adjust seasoning and add more salt, pepper, lemon and olive oil as needed. 
       
  • TO SERVE: 
    1. Divide couscous into four bowls
    2. Top each portion with four meatballs, a drizzle of yogurt sauce and lemon wedge. 
    3. Serve additional sauce on table. 


Makes 4 servings, each with 4 meatballs.  

Sunday, February 13, 2022

Buffalo Cauliflower Bites


I first made this recipe in the summer, and it was a bit too spicy for me.  I made it again today in the spirit of the Super Bowl.  This time, I added a bit more honey this time and liked it better.  Note for future: watch it towards the end, so that the extra sauce on the pan doesn't burn.   

Ingredients:

  • ¾ cup all-purpose flour
  • 1 teaspoon paprika
  • 2 teaspoons garlic powder
  • 1 teaspoon salt
  • ½ teaspoon pepper
  • ¾ cup milk
  • 1/2 to 1 head cauliflower (depending on size)
  • ¼ cup buffalo sauce
  • 2 tablespoons vegetable oil
  • 1 to 2 tablespoons honey

Directions:

  1. Preheat the oven to 450˚F. 
  2. Line a baking sheet with parchment paper.
  3. In a large bowl, add flour, paprika, garlic powder, salt, pepper, and milk, and whisk until well-combined.
  4. Break the head of cauliflower into florets, about 1½-inches wide. 
  5. Add the cauliflower florets to the batter, making sure each piece is evenly coated. 
  6. Arrange the coated cauliflower on the baking sheet. 
  7. Bake for 10 minutes, flip, and bake 10 more minutes. 
  8. In a small bowl, combine the buffalo sauce, oil, and honey and stir until evenly combined (warm for 20 seconds in microwave if necessary). 
  9. Brush the buffalo sauce mixture on the cauliflower and bake for another 20 minutes.


  10. Serve with ranch dip or dressing

Wednesday, January 26, 2022

Slow Cooker Ham Tetrazini with Mushrooms and Peas


Did I base this recipe off of something from Taste of Home? Yeah, I did.  But did I completely change most things about it?  Also yeah.  I had to.  There were circumstances beyond my control, and I went with it.  It turned out pretty good, though, and made 6 generous portions of creamy comfort food for a cold winter day, so I have leftovers for lunches/dinners later!

Ingredients

  • 2 cans (10-3/4 ounces) condensed cream of mushroom soup, undiluted (I used the low fat, low sodium kind)
  • 3 cans sliced mushrooms, drained (or you could use 2 cups of sliced fresh mushrooms, *if you can find any at your store*)  
  • 2 cups fully cooked ham, cubed (I used two 8 oz. ham steaks and diced them up, because little hams that used to be pretty cheap were $25 at my store)
  • 1 can evaporated milk (fat free or 2%)
  • about 2 teaspoons spicy brown mustard
  • 1 package (16 oz) spaghetti (will cook before putting in slow cookr, at the end)
  • 1/2 cup shredded Parmesan cheese
  • 1 package of frozen peas (warmed/steamed before putting in slow cooker, at the end)
  • Pepper, to taste

Directions

  1. Combine the soup, mushrooms, ham, milk, mustard in the slow cooker.

     
  2. Cover and cook on low for 4 hours.
  3. Cook spaghetti according to package directions; drain. 
  4. Cook/steam peas according to package directions. 
  5. Add the spaghetti, peas, and cheese to slow cooker, then toss/stir.


Thursday, January 20, 2022

Honey Thyme Pork Tenderloin with Roasted Potatoes and Broccoli


This recipe is from another delicious Hello Fresh meal that was gifted to me in November. 

Like the pork chop meal I posted before, this felt like a lot to do for just me on a weeknight, but both recipes are a testiment to how much a good sauce can elevate a meal. Also I've done potatoes like this several times since, and they were even tastier when I used a rosemary-infused olive oil.   

Ingredients:

  • 12 oz. Yukon Gold potatoes
  • 1/2 clove garlic (or more, to taste)
  • 12 oz. pork tenderloin
  • 8 oz. broccoli
  • 1 tsp dried thyme
  • chicken stock concentrate (2 servings?)
  • 2 tsp honey
  • 1 Tbsp vegetable oil
  • 1 tsp olive oil
  • 1 Tbsp butter
  • salt and pepper

Directions:

  1. Roast potatoes
    • Adjust oven racks to middle and top positions
    • Preheat oven to 450 degrees
    • Wash and dry produce
    • Dice potatoes into 1/2 inch pieces
    • Toss on baking sheet with a drizzle of oil, salt, and pepper
    • Roast on top rack for 20 to 25 minutes--tossing halfway through--until lightly browned and tender
  2. Sear pork and prep
    • While potatoes roast, pat pork dry with paper towels
    • Season all over with salt and pepper
    • Heat a drizzle of oil in a large pan over a medium heat
    • Add pork and sear, turning occassionally, until browned all over (4 to 8 minutes)
    • Meanwhile, peel and mince garlic
    • Once pork is browned, transfer to one side of second baking sheet
  3. Toss broccoli
    • Cut broccoli into bite-sized pieces if they are not already
    • On opposite side of baking sheet from the pork, toss with a drizzle of olive oil and a pinch of salt and pepper
  4. Roast pork and broccoli
    • Put baking sheet with pork and broccoli on middle rack. 
    • Roast until pork is cooked through and broccoli is tender (12-15 minutes)
    • Once pork is done, transfer to cutting board to rest, then thinly slice crosswise
  5. Make sauce
    • Heat drizzle of oil in pan used for pork, over medium heat 
    • Add minced garlic and thyme
    • Cook until fragrant, about 30 seconds
    • Stir in stock concentrate, honey, and 1/4 cup water
    • Simmer, scraping up any browned bits from bottom of pan, until sauce has reduced and thickened (2-3 minutes)
    • Stir in 1 Tbsp. butter until melted
    • Season with salt and pepper
    • If sauce seems too thick, stir in a splash or two of water
  6. Serve
    • Divide pork, potatoes, and broccoli between two plates
    • Drizzle pork with sauce

Tuesday, January 18, 2022

Oven-roasted Butternut Squash


Ok, so I fully recognize that roasting small chunks of squash isn't at all hard.  But I know that later on I will wonder about the time and oven temp, so it gets a blog post! (Made this on Sunday afternoon/evening, 1/16.  So this is actually something new.) 

Ingredients: 

  • 1 large butternut squash
  • about 3 Tbsp. olive oil (or less)--I used a rosemary-infused oil and it was great!
  • salt and pepper

Directions:

  1. Preheat oven to 400 degrees F
  2. Put parchment paper on a baking sheet
  3. Peel and seed squash
  4. Cut into 1/2 to 1 inch chunks
  5. Put sqaush on baking sheet 
  6. Drizzle with oil, and sprinkle on salt and pepper
  7. Toss with clean hands and arrange in one layer on the pan
    • Note: I had to do two batches, because it wouldn't all fit on the pan at once.  It made a total of 4 containers like the two pictured above.   


  8. Roast for 25 to 30 minutes, tossing/turning once with a spatula, until squash is tender


Makes: about 4 servings

Monday, January 17, 2022

Brown Sugar Bourbon Apple Pork Chops with Mashed Potatoes and Roasted Green Beans


A meal from late 2021 that is worthy of recording and making again...

A friend who gets Hello Fresh meal prep kits had put her subscription on hold for a while, but then forgot to select meals for her first week of it coming back on line in November. When they selected meals for her, they included pork, which she doesn't eat.  So I was the lucky recipient of two meal kits for 2!  

Unlike Local Crate, the Hello Fresh folks include the measurements for all the ingredients, and they specified the spice/seasoning mix.  This means that I should be able to easily recreate the recipe on my own, which I look forward to doing.  This was kind of a lot of work for a dinner for just me--especially on a workday--but I can see doing different parts of it with different short-cut meals components.  

I really liked everything about this meal, and I felt kinda fancy when it was all done.  

Ingredients:

  • 12 oz. Yukon Gold potatoes
  • 6 oz. green beans
  • 1 apple
  • 2 scallions
  • 12 oz. pork chops
  • 10.8 g McCormick Grill Mates seasoning (Brown Sugar Bourbon flavor)
  • Chicken stock concentrate (1 serving?)
  • 2 Tbsp. sour cream 
  • 1 tsp vegetable oil 
  • 1 tsp olive oil
  • 1/2 tsp white sugar
  • 2 Tbsp butter 
  • salt and pepper

Directions:

  1. Cook Potatoes
    • Adjust oven rack to middle position and preheat oven to 425 degrees
    • Dice potatoes--1/2 inch pieces.  
    • Place in pot with enough salted water to cover by 2 inches
    • Bring to a boil and cook until tender (15-20 minutes)
    • Save 1/2 cup potato liquid, then drain and return potatoes to the pot
    • Keep off heat but covered until time to mash
  2. Cook Pork
    • While potatoes cook, pat pork dry with paper towels
    • Season all over 
    • Heat a drizzle of oil in a large pan over medium-high heat
    • Add pork and cook until browned and fully cooked through, 4 to 6 minutes per side (reduce heat to medium if browning too quickly)
    • Turn off heat, transfer pork to plate to rest, wipe out pan
  3. Roast beans and prep apples/scallions
    • While pork cooks, trim green beans if necessary
    • Toss on baking sheet with a drizzle of olive oil, salt, and pepper
    • Roast in oven on middle rack for 12 to 15 minutes
    • While bean are in the oven, halve, core, and dice  apple into 1/4-inch pieces
    • Trim and thinly slice scallions, separating whites from greens
  4. Make sauce
    • Melt 1 Tbsp butter in pan used for pork, over medium-high heat
    • Add apple and scallion whites
    • Season with salt and pepper
    • Cook, stirring occassionally, until golden (4 to 6 minutes)
    • Whisk together stock concentrate, 1/2 cup water, 1/2 tsp sugar.  
    • Add to pan and cook until sauce is thickened and apple is tender (5-7 minutes)
    • In the last 2 minutes, return pork to pan until warmed through 
    • Season with salt and pepper
    • Turn off heat
  5. Mash potatoes
    • Mash potatoes until mostly smooth
    • Stir in scallion greens, sour cream, 1 Tbsp butter, and a splash of the potato water.
    • Season with salt and pepper
  6. Serve
    • Divide pork, mashed potatoes, and green beans between two plates. 
    • Top pork with apple pan sauce


Thursday, January 14, 2021

Southwestern Black Bean Burgers


The original for this recipe was from America's Test Kitchen.  I saw it on their Instagram feed and when I clicked I could actually see the whole recipe!  It just looked so tasty, so I copied it right away before they could change their mind and put it behind a paywall of some kind.  I didn't make the mayonnaise sauce that they recommended, figuring I'd try the burgers with regular toppings and then make the sauce some other time if I feel like it.     

I did make a mistake and started putting them together right when I wanted to cook them.  Unfortunately, they need at least an hour for the ingredients to sort of meld together.  It meant I was really hungry by the time they were finished that evening.  Here's a reminder to, you know, read whole recipes before you start them.  Also, I don't have a food processor, so I chopped/mashed everything by hand.  It wasn't hard at all.  

Also, I don't usually have tons of hot sauces in the house, and the recipe was a little sparse with the details on what kind of hot sauce to use.  I used Frank's Red Hot, but I might put in more next time or switch up the sauce.  It was good, just not particularly spicy if that's your thing.  

I cooked 3 at once, and froze the other 3 patties for later.  The pre-cooked ones reheated nicely in the microwave for lunches, too. (The leftovers were better than beef burgers and cheaper, too.)

Ingredients:

  • hot sauce (or more, to your taste)
  • ground cumin

Directions:

  1. Spread rinsed beans onto rimmed baking sheet lined with triple layer of paper towels and let drain for 15 minutes. 
  2. In large bowl, whisk eggs and flour into uniform paste, then stir in scallions, minced cilantro, garlic, hot sauce, cumin, coriander, and salt.
  3. Crush up tortilla chips until relatively fine (I crushed them in a bag).  
  4. Mash up black beans (I smooshed mine with a fork on a cutting board) and stir in chip crumbs. 
  5. Stir egg mixture in until combined. 
  6. Cover and refrigerate, for at least an hour and up to 24 hours.  
  7. Divide bean mixture into 6 equal portions. Using lightly moistened hands, tightly pack each portion into ½-inch-thick patty. 
  8. To freeze patties (for up to a month): transfer to parchment paper and stack (w/ parchment between layers).  Wrap in plastic wrap and place in zipper-lock freezer bag. Thaw patties completely before cooking.)
  9. Heat oil in a skillet on a medium heat until shimmery (or, like me, use some Pam spray).  Cook patties until well browned on one side, 5 to 7 minutes.  Then flip and cook until the other side is well-browned and crisp.  
  10. Serve with your favorite toppings--I did a cheese slice, tomatoes, pickles, avocado slices, ketchup, and mustard.  

Saturday, October 24, 2020

Asiago Mashed Cauliflower: A Birthday Side Dish Fit for a Steak


My birthday was this month, and due to the awfulness of Covid-19 I stayed home and celebrated alone.  It was a pretty big bummer, especially for such a milestone year.  But in an effort to not be so down about it, I decided to make myself a nice dinner.  Step one was looking up "best side dishes with steak recipes."

This is the first of the two new recipes I picked: asiago mashed cauliflower.  Super simple--made even easier by cutting out the "use a food processor" step, since I don't have one--and absolutely tasty in the end.  The leftovers were good both warm and cold, by the way. 

Ingredients:

  • One head of raw cauliflower
  • 1/2 tsp salt
  • 4 oz. cream cheese (I actually used 1/3 reduced fat Philadelphia Neufchâtel cheese.)
  • 1/2 cup asiago cheese, shredded
  • 2 Tbsp. butter
  • 1/4 tsp black pepper (or more if to your taste)
  • 1/2 tsp salt (or more if to your taste) 
  • Optional parsley, or whatever 

[The original recipe called for parsley, but I didn't have any.  And while I didn't miss that in the final product, I did throw in a few dashes of Penzey's Roasted Garlic.  It was a great addition, but I wouldn't recommend regular or raw garlic, as that might overpower the cheesy-ness.] 

Directions:

  1. Clean and rinse cauliflower
  2. Chop into smaller pieces, cutting out any really thick stalk bits (I probably had 6 to 8 big-ish chunks.  Nothing smaller than 1.5 inches for sure)
  3. Place cauliflower and salt in large pan/pot and add water until  it covers the veggies
  4. Bring to a boil and cook until very tender--12 to 15 minutes
  5. Drain and then cool slightly
  6. Add cream cheese, asiago, butter, pepper, salt, and whatever other optional herbs/spices you want to add
  7. Mash and stir everything all together.  I used a big whisk and that worked great!  

Monday, August 31, 2020

Peanut Sauce


This recipe is based on a Local Crate box that I got several months ago.  What annoys me about them is that they don't tell you how much of each ingredient you are getting, so you can't recreate the recipe easily later on by yourself.  Boo!

Instead of giving up, though, I eye-balled what they gave me in my box.  And then experimented.  I like this combo, but it is very rich and makes for a sauce-y, big serving.  You could use the same amount of sauce for more food, cut the ingredients, etc.  

The key seems to be 2 parts peanut butter to 1 part rice vinegar to 1 part soy sauce.  Then add garlic and other flavors for depth.  And be careful if you add the ginger--a little bit goes a long way and I had one bowl that was very, very ginger-forward!


Ingredients:
  • 2 Tbsp. Peanut Butter
  • 1 Tbsp. Rice Vinegar
  • 1 Tbsp. Soy Sauce
  • 1+ tsp. minced garlic
  • 1/2 tsp. (or to taste) sambal oelek (or other hot sauce type thing)
  • 1/4 tsp (or to taste) fresh ginger (do not use powdered! I have some in a squeezy jar that works nicely)
  • water, as needed to thin sauce

Directions:
  1. Add peanut butter to a bowl and heat in microwave for 30 seconds or so, warm enough to get softened to be puddle-y or a bit runny, and easy to stir.
  2. Add all ingredients except water and stir together

  3. Stir in a bit of water if you think the sauce is too thick.
  4. Stir in cooked noodles (rice noodles or just spaghetti noodles both work fine),veggies, and protein.  (pictured here is steam-in-bag vegetable mix, cut up Morning Star Farms chix pattie, and some unsalted roasted peanuts).   


Thursday, August 6, 2020

Creamy Pumpkin-Alfredo Pasta Sauce

Some people love PSL season (Pumpkin Spice Latte--and it is apparently coming up soon!).  I like the cinnamon and nutmeg and other spices, but I also like stuff with actual pumpkin.  And because you can get canned pumpkin all year, using it shouldn't be limited to the cool months.  I found this simple recipe for a creamy pasta sauce and gave it a try.  I didn't bother with the fancy fettuccine nests they used, instead tossing it with regular spaghetti.  It turned out pretty good, particularly with broccoli, some cheesy turkey sausage, and a generous sprinkling of Parmesan cheese.  

Ingredients: 
  • 2 tablespoons butter/margarine
  • 3 to 5 tsp. pre-minced garlic (or 5 cloves garlic)
  • 1 cup canned pumpkin
  • 2 1/2 cups half-and-half (original recipe used heavy cream, but this worked pretty well) 
  • 1/2 cup grated Parmesan cheese
  • salt and pepper

Directions:
  1. Reserve 1 cup of the cooking liquid from your pasta, to thin out sauce if needed. 
  2. Heat the butter over medium heat in a saucepan. 
  3. Saute garlic until soft and fragrant. 
  4. Add the pumpkin and cream/half-and-half. 
  5. Simmer until slightly thickened. 
  6. Add the cheese, salt, and pepper
  7. Stir, then thin with pasta water (if needed) 
  8. Toss the pasta in the sauce and thin as needed using the reserved cooking liquid.


Monday, August 3, 2020

Vegetarian Mushroom "Meatballs"


As a kid I ate mushrooms in only three forms: on pizza, in pasta sauce, or in cream of mushroom soup.  I've significantly expanded my appreciation of the cute little fungi as an adult, but I really only love them when they are cooked.  (I'm not gonna lie, I can only eat a few raw mushrooms at a time...and then it is usually in a salad or with dip.  The texture isn't my favorite when they are uncooked.)

This mushroom-heavy, vegetarian recipe is one that is good on pasta or as the filling of a meatball sandwich, and the original recipe claims it makes good burger patties, too. (The original is in a book called "The Clueless Vegetarian."  I posted my version of the Spicy Peanut Pasta from this book earlier).   

The choice of mushrooms is yours.  I used white button once and a mix of button and portbellos once.  This most recent time was just the button ones, and I even used the pre-sliced 'shrooms.  I just chopped them up more--it was a timesaver and they were cheaper than the whole ones when I was at the store. 

I've done the meatball version twice now, each time slightly differently because of what ingredients I had in the house at the time.  But, hey, I liked it both times!  The secret is to get to a consistency that sticks together.  I also highly recommend letting the mix sit in the fridge overnight.  The ingredients meld together and the oats are less obviously oat-y that way.  

Also, it looks like a lot of instructions, but this takes only one skillet, one bowl, and one cookie sheet.  It could be summed up as: cook veggies, cool, mix into a mush, let it sit, roll into balls, bake. 

Makes: about 23 to 24 meatballs 

Ingredients:
  • 1 to 1.5 pounds mushrooms* 
  • 0.5 to 1 medium onion
  • 2+ cloves garlic
  • 2/3 to 3/4 cup bread crumbs**
  • 2/3 to 3/4 cup oats (I used old fashioned--also called rolled--oats)
  • 1/2 cup grated Parmesan cheese
  • 2 eggs, lightly beaten
  • 1 tsp. salt
  • black pepper, to taste (1/4 to 1/2 tsp.)
  • other herbs/spices, if you want them. 

* When I had 1.5 pounds of mushrooms I used half an onion, but when I had only 1 pound of mushrooms I used the whole onion.  It still worked. 

**For oats and breadcrumbs, use 2/3 cup of one and 3/4 cup of the other.  The original calls for more of the breadcrumbs, but I ran out of breadcrumbs making the most recent version and only had 2/3 cup.  So I just used more oats.  It was completely fine.  Seriously.  This isn't rocket science.  

Directions:
  1. Chop mushrooms fairly small, but doesn't have to be minced or anything
  2. Chop onion smaller than mushrooms, in the diced/minced range. 
  3. Mince garlic (or use it out of a jar, if you are me!)
  4. Heat a large skillet, on medium-high heat and spray with non-stick spray (or use oil, whichever you prefer)
  5. Add the mushrooms, onion, and garlic. 

  6. Cook, stirring often, for about 10 minutes.  The key is to cook everything until all the liquid is released from the mushrooms AND that liquid has evaporated.  


  7. Transfer veggies to a medium bowl and let cool.  (This is important...otherwise you will cook your eggs and they won't hold your meatballs together!)
  8. Add bread crumbs, oats, cheese, eggs, salt, and pepper. 
  9. Mix until everything is combined and all mushy
  10. Cover and put in fridge (The original says "at least 15 minutes or as long as overnight."  I'd say several hours or overnight is best--see above in description)
  11. Preheat oven to 375 degrees F
  12. Spray a cookie sheet with non-stick spray
  13. Roll mixture into 1 inch balls and place on cookie sheet
  14. Lightly spray tops with non-stick spray

  15. Bake for 15 minutes,then turn over and bake 10 to 15 minutes more, until browned and sizzling. 
     
  16. Leftovers can be refrigerated and reheated the oven.  You can also reheat them in sauce or the microwave, but they lose the oven-cooked texture