Monday, July 24, 2017

Yellow Squash, Zucchini, and Tomato Gratin


This year on Amazon Prime Day I bought a mandolin; not the musical instrument, but the thing that cuts food into evenly-sized slices.  It was on sale for something like only $11, which meant that I basically needed to get it.  And once I have a new kitchen gadget, I obviously have to use it.  

Since the season for all three main ingredients is upon us, I decided to try a version of this.  Yeah, it looks all fancy, and it would be a great side-dish for company.  But when I made it, I ate it as a main part of my meal and I had some pretty yummy leftovers for other lunches and dinners. It doesn't have to be fussy and the mandolin made my slices quickly, easily, and uniformly!  

In fact, the mandolin worked so well, that I'm psyched to try it with apples for fancy pies/tarts this Fall.    

Ingredients:

  • 2 onions, sliced
  • sliced mushrooms (1/2 or more of a package)
  • 1 medium green pepper (optional)
  • 4 cloves garlic minced or 2+ tsp already-minced garlic
  • 2 zucchini, cut into slices
  • 2 summer squash, cut into slices
  • 4+ small tomatoes, cut into ¼" slices
  • salt
  • fresh ground black pepper
  • Italian seasoning
  • 2.5+ ounces goat cheese, crumbled (I used an herbed chevre from Trader Joe's)
  • grated Parmesan cheese
  • Panko breadcrumbs
  • 3 tablespoons extra virgin olive oil (I actually used a rosemary-infused olive oil, because that's what I had.)


Directions:


  1. Preheat oven to 375 degrees. 
  2. Spray bottom of 13x9x2 inch casserole dish with nonstick spray
  3. Heat large skillet. Add onions and peppers, and saute.  After a few minutes, add mushrooms and cook until onions are translucent and peppers are soft
     
  4. Add garlic and saute another minute
  5. Transfer onion/mushroom/pepper/garlic mixture to casserole dish and spread to cover the bottom of the dish. 
  6. Slice other veggies.
  7. On top of bottom veggies, layer in zucchini, summer squash and tomato.  The original recipe called for one slice of each, but that is pretty darned fussy.  Go with a few and make it uneven. It'll still look great and it'll taste fine!  
  8. Drizzle olive oil on top and season with salt, ground black pepper, and Italian seasoning.
      
  9. Cover dish with foil and bake for 40 minutes
  10. Uncover dish, sprinkle goat cheese, Panko crumbs, and Parmesan cheese on top and continue baking, for another 30-35 minutes, until browned.
       
  11.      Serve warm


Rustic Fruits-of-the-Summer Galette


Once a year my book club--The Amazing Book Club of Doom--has a book/movie combo.  We read a book made into a movie (or vice-versa), watch the movie together, and discuss both.  In previous years it was Agatha Christie's Murder on the Orient Express and the classic 1974 film, or Ian Fleming's Casino Royale followed by the 2006 movie.  This year we read the graphic novel of The League of Extraordinary Gentlemen vol. 1, then watched the 2003 movie.

The other notable thing about this book/movie meeting is that we also usually eat pie.  I'm not sure why or where the pie-thing came from, 'cause it pre-dates my membership in the club.  But it is almost certainly our best meeting of the year.  This year there was pizza and sweet pies.  Someone brought a cherry, another brought blueberry/frangipane, and another was chocolate cream.  Someone else brought peach/cream mini pies made in wonton wrappers. They were all really awesome.

My contribution was a rustic fruit galette--Fruits of the Summer--and it gave me an opportunity to try a new technique.  It was incredibly easy, especially because I used a store-bought crust...and it turned out great!

[Oh, and I based my version on a recipe from a blog called Gimme Some Oven.]  

Ingredients:
  • 1 (9 inch) refrigerated pie crust (I used Pillsbury)
  • 2 Tbsp. sugar, plus extra for sprinkling on crust
  • 1 Tbsp. cornstarch
  • 1 large egg, beaten
  • 3 cups of fresh fruit, cut into bite-sized pieces (I used peaches, strawberries, and blueberries...because that's what I had in my house)

Directions:
  1. Preheat oven to 425 degrees. 
  2. Unroll pie crust and put it out flat on a parchment-lined baking sheet
  3. In a medium bowl or really big measuring cup, mix together fruit, sugar, and cornstarch. (The recipe I looked at suggested that if there's a lot of extra juice, you should pour the whole fruit mixture into strainer. I didn't have to this time, though.) 

  4. Put the mixture in the center of the unfolded pie crust, with a 1 1/2- to 2-inch border.
  5. Fold up the uncovered border over the edge of the fruit and pinch into pleats.
  6. Brush the egg onto the crust, and sprinkle crust and top of fruit with sugar.
  7. Bake in preheated oven until crust is lightly browned, 12 to 15 minutes.
  8. Serve warm or at room temperature (or, if you happen to have left-overs, you could serve it cold from the fridge).


Monday, May 1, 2017

Slow Cooker Beef Stew


I've been working on trying new recipes on my days off.  One of the things I've been looking for in particular are relatively healthy recipes that I can make in my Crock Pot.  The one-dish aspect of it is obviously appealing.  As summer approaches, being able to make a full-on meal without turning on the oven or slaving over a hot stove also seems like a great idea.  (Although, to be honest, it snowed today.  One the first day of May.  Because I live in Minnesota.  It could snow at any given moment!)

Due to the nature of slow cookers, almost anything made in one pretty much becomes comfort food.  But in this case, beef stew is already comfort food, so all's well.  Plus, this made my house smell fantastic all day and it's relatively veggie-packed for a beef stew.

This recipe is based on a one from Taste of Home.  Within the framework of their recipe, I changed it quite a bit, with changes based on the ingredients I had, comments people left on the original recipe...and the fact that I wanted it to have mushrooms in it.  Yum!

I think it turned out quite good and it made a completely full Crock Pot's-worth of stew.  I had a generous bowl for dinner, will freeze some, and will put some in the fridge for dinners this week.


Ingredients

  • About 1 1/4 lbs. of stew meat (or boneless beef chuck roast) cut into around 1-inch-sized pieces
  • 3 medium potatoes, peeled and cubed (I used 2 small, 1 medium, and 1 large red potato)
  • 3 cups water
  • almost an entire 1 lbs. package of baby carrots (I kept out a handful to eat!)
  • 1 can (10-3/4 ounces) Campbell's condensed golden mushroom soup, undiluted
  • 1 medium onion, chopped
  • 1 piece celery, chopped (probably don't need this, actually.  But now I have celery for snacks this week)
  • 2 tablespoons Worcestershire sauce
  • 2 teaspoons beef bouillon granules
  • 1 garlic clove, minced
  • 3/4 teaspoon salt
  • 1/4 teaspoon pepper
  • 1/3 cup cornstarch
  • slightly less than 1/3 cup cold water
  • 1 16-ounce package of frozen peas, thawed
  • 1 larger-sized can of mushrooms


Directions

  1. Place the beef, potatoes, water, carrots, soup, onion, celery, Worcestershire sauce, bouillon, garlic, salt, and pepper in slow cooker and stir. 
  2. Cover and cook on low for 6-8 hours or until meat is tender.  (I cooked it on low for about 3 hours, realized I was never going to eat dinner at this rate, then cooked it on high for nearly 3 more.  My carrots were still a bit less-than-tender, but it was fine.)
  3. Combine cornstarch and cold water in a small bowl until smooth; gradually stir into stew. 
  4. Stir in peas and canned mushrooms. 
  5. Cover and cook on high for 30 minutes or until thickened. 


Monday, March 6, 2017

Cake Batter Cheeseball (covered with Sprinkles!)


A few weeks ago I said to some folks at work: "I could solve all the world's problems with enough sprinkles and glitter!"  Did I really mean that?  No.  Obviously I didn't.  Because the world's problems are complicated and involve things like authoritarian regimes, droughts, massive cultural clashes/misunderstandings, greed, hate, etc.

Now, do I think that sprinkles and glitter bring some happiness into my very-definitely-First-World life?  Yes.  Yes, I do.  And do I think that I'm shallow for liking glitter and sprinkles (which are really just the edible equivalent of glitter anyway)?  Why, no.  No, I do not.  But I do know that there are people who do judge me for liking "trivial" things....and I think that is shallow on their part.  Because--and let's be honest here--I'm pretty awesome.  In addition to my love of sparkles and brightly colored bits of sugar, I'm a highly skilled research librarian sharing info with my patrons everyday. I'm an activist working toward improving my community and my country. I'm a caring friend, proud aunt, pretty decent sister and mostly-OK daughter.  I'm a reader, sci-fi fan, Star Wars devotee, kick-ass board game player, namer of houseplants, player of bar trivia, and baker of award-winning cakes.  Like most people, I'm complex.  And my love of parades, balloons, cupcakes, hedgehogs, penguins, sprinkles--and, yes, even glitter--does not make me a foolish little girl or a person who can't grow up.  It means that I like what I like, even though much of society tells me that I'm dumb for doing so.  

Anyway, since I like sprinkles, I decided they needed to be a component for my entry into work's most recent food challenge.  The theme was snack food, so I brought Nilla wafers and pretzels to dip into a sweet cheese ball.  Specifically, I made a sprinkle-covered, cake-batter flavored ball of cream-cheese-based wonder.  The secret ingredient is actually cake mix, so this makes it even more appropriate for me!

The original recipe came from a blog called Like Mother, Like Daughter, and it was really the photos that drew me in.  I'm also pretty certain you could use all kinds of cake mix to make this super-tasty treat.  I think chocolate would be worth a try...but I'm thinking that spice cake and/or carrot cake might be amazing.  Also, this recipe is seriously delicious and a bit addictive...and it won me my second-ever Golden Spatula ("Spatchie") award from co-workers voting it as the best food in the challenge.  I'm honored and also just glad they enjoyed it! :)  

Ingredients:

  • 8 oz cream cheese, softened
  • ½ cup butter, softened
  • 1½ cups yellow cake mix, dry
  • ½+ tsp vanilla extract
  • 1 cup powdered sugar
  • approximately 1 cup sprinkles, optional-but-not-really-optional (don't use the colored sugar or the non-pareils.  The first will disappear and the second are too crunchy.  Use the long-shaped sprinkles.)            

Important directions re: sprinkles
Man!  Sprinkles sure have a bunch of blue in them these days!  (Though Wilton does sell jars of non-blue-containing sprinkles, they are sort of expensive.)  I bought a small shaker of sprinkles so that I wouldn't have to use all my "good" ones, but the bottle was about 1/3 blues.  Blech!  So I decided to remove all the blues and throw those away.  I did this using a plate, small sharp knife, and a bowl, plus a good conversation with a friend on the phone. It was actually kind of relaxing to separate out the good colors from the bad.

At the beginning
Mid-separation

Basically finished

So much better!
 Directions:

  1. Stir/whisk/beat your cream cheese until smooth and creamy
  2. Add butter and stir/whisk/beat until smooth
  3. Mix in cake mix, vanilla, and powdered sugar.
  4. Add half of the sprinkles and stir (optional)
  5. Place all of mixture onto a piece of plastic wrap in a generally ball-like shape
  6. Wrap the plastic wrap around the mixture and roll into a better ball
  7. Refrigerate for at least an hour (until cheese ball is at least mostly firm)
  8. Spread remaining ½ cup sprinkles onto a large flat plate or into the bottom of a large bowl
  9. Remove cheese ball from plastic and dab/roll it in the sprinkles, then press sprinkles into an empty spots so that it is even.  Note: I did not put sprinkles on the bottom of the cheeseball.  
  10. Cover bowl with cheese ball in it and put in freezer for about 1 hour (or in fridge overnight).  If left in freezer for several hours/overnight, remove to thaw 30 minutes before serving
  11. Serve with cookies, graham crackers, pretzels, or whatever
And no, I don't have a photo of the finished product.  People pretty much dug in right away and I didn't have a camera or phone.  But here it is after most of it was eaten:

Sunday, March 5, 2017

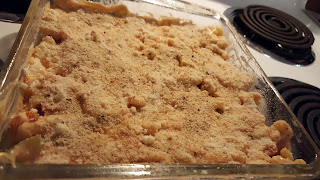
Buffalo Chicken Mac n' Cheese Pasta Bake


One of the recent recipes that I've tried and liked (the corn pudding recipe was not terrible, but I didn't have any desire to finish it, so I'm not going to make it again!) is this healthy, veggie-packed Buffalo Chicken Pasta Bake.  It has lots of flavor but isn't particularly cheesy.  I think adding some extra shredded cheese stirred in and all melty (after it is out of the oven) was a great idea.  Personally, I used some reduced fat shredded Colby and it was super-good.  The original recipe I found in my Hungry Girl 300 under 300 cookbook, but I made a few small changes.  Here's my version:  

Ingredients
  • 4.5 oz. (about 1 cup) uncooked macaroni 
  • 2 or 3 stalks celery, chopped
  • 2 medium carrots, chopped (or a bunch of baby carrots chopped, which is what I did)
  • 1 small onion, chopped (or a about half a medium onion, chopped)
  • 8 ounces cooked and and shredded/chopped skinless lean chicken breast
  • 1+ teaspoon garlic
  • 1/4 cup Frank's Red Hot Buffalo sauce, divided
  • 1/2 cup fat free sour cream
  • 2 wedges Laughing Cow light Swiss cheese
  • 2 teaspoons yellow mustard
  • 1 1/2 Tbsp. grated Parmesan cheese
  • bread crumbs, optional 


Directions
  1. Preheat oven to 350 degrees
  2. Cook pasta to al dente, drain, and set aside
  3. Heat large skillet sprayed with non-stick spray to medium-high heat.  Add celery, carrots, and onions.  Stir occasionally, cook until veggies are softened, about 5 minutes.
  4. Add chicken, garlic, and 3 Tbsp. hot sauce to skillet.  Mix and set aside

  5. In a microwave safe bowl mix sour cream, cheese wedges, mustard, and rest of hot sauce.  Heat in microwave for 30 seconds.
  6. Spray an 8x8 or 9x9 pan with non-stick spray.  Place half of pasta in pan, top with veggie/chicken mixture, top with rest of pasta.
  7. Put sour cream mixture on top in an even layer, Sprinkle with Parmesan cheese and bread crumbs.
  8. Bake about 30 minutes, until hot and bubbling
  9. Serve, sprinkle with shredded cheese, if desired


Makes 4 servings 

Friday, February 24, 2017

Veggie Pasta Bake


In the past few weeks I've started trying to regularly cook.  Not just making dinner, but cooking actual things, mostly so that I can have leftovers.  The other part of the goal is to make things that are healthy: lots of veggies, lower fat, that sort of thing.

In that spirit I made this pasta bake last week.  It is based on a recipe from the Hungry Girl 300 Under 300 cookbook.  The original recipe says that it makes 4 servings, but I actually divvied it up into just 3.  I also changed the pasta to what I had in my cabinet (macaroni rather than ziti) and made a few other changes.  Let's be honest, I used more cheese.  

Ingredients:
  • 5 ounces (about 1 1/2 cups) uncooked pasta
  • 1 cup thinly sliced/chopped onions (about 3/4 of a medium onion)
  • 2 cups thinly sliced mushrooms (I used one package of button mushrooms)
  • 1+ Tbsp minced garlic
  • 2 cups spinach (I used one bag of spinach from the salad section)
  • 3/4 cup light or low-fat ricotta cheese
  • 2 tsp dried basil
  • 1 1/2 cups crushed tomatoes
  • 1 cup part-skim mozzarella cheese
  • 2 Tbsp. grated Parmesan cheese


Directions:  

  1. Pre-heat oven to 375 degrees
  2. Prepare pasta to al dente, drain, and set aside in a bowl
  3. Heat a large skillet sprayed with non-stick spray, to a medium heat
  4. Add onion and cook, stirring often, until onions are soft (about 3 or 4 minutes)
  5. Add mushrooms, garlic, and basil.  Cook until mushrooms are soft (about 3 minutes)
  6. Add spinach and, again stirring often, cook until spinach is wilted and excess moisture was evaporated (about 8 minutes)

  7. Remove skillet from heat and add ricotta cheese.
  8. Transfer everything from the skillet to the bowl with the pasta
  9. Add tomatoes and 1/2 cup of the mozzerella cheese.  Stir
  10. Spray a 8in or 9in square baking pan with non-stick spray.
  11. Add mixture from bowl
  12. Top with Parmesan and the rest of the mozzerella
  13. Bake about 15 minutes (until entire dish is hot and cheese on top is melted)


Monday, February 20, 2017

Chocolate-filled Croissants: Valentine's Treat #2


Since a package of cinnamon rolls only makes 8 treats--and I wasn't sure of success--I decided to make another type of small-batch, easy treat.  This is something I've made before, and they are fast and easy.

The only rough part is that they call for nutella or other chocolate spread.  Which isn't terrible, but then I have left-over nutella.  Which means that at some point I end up eating a spoonful out of the jar.  Again, not a terrible hardship.  But it is a little shameful, and a little bad for my healthy-eating goals.  In this case, however, I already had a partial jar, so this recipe was actually helpful.

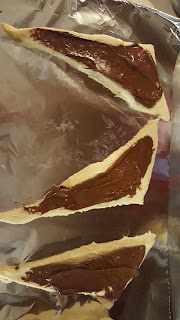
All you do is unroll the Pillsbury crescent rolls, spread with a spoonful of nutella, roll up, and bake.  Be sure to roll from the wide end toward the point, and to put the point on the bottom before baking.