Showing posts with label Money Saving. Show all posts

Thursday, January 14, 2021

Southwestern Black Bean Burgers


The original for this recipe was from America's Test Kitchen.  I saw it on their Instagram feed and when I clicked I could actually see the whole recipe!  It just looked so tasty, so I copied it right away before they could change their mind and put it behind a paywall of some kind.  I didn't make the mayonnaise sauce that they recommended, figuring I'd try the burgers with regular toppings and then make the sauce some other time if I feel like it.     

I did make a mistake and started putting them together right when I wanted to cook them.  Unfortunately, they need at least an hour for the ingredients to sort of meld together.  It meant I was really hungry by the time they were finished that evening.  Here's a reminder to, you know, read whole recipes before you start them.  Also, I don't have a food processor, so I chopped/mashed everything by hand.  It wasn't hard at all.  

Also, I don't usually have tons of hot sauces in the house, and the recipe was a little sparse with the details on what kind of hot sauce to use.  I used Frank's Red Hot, but I might put in more next time or switch up the sauce.  It was good, just not particularly spicy if that's your thing.  

I cooked 3 at once, and froze the other 3 patties for later.  The pre-cooked ones reheated nicely in the microwave for lunches, too. (The leftovers were better than beef burgers and cheaper, too.)

Ingredients:

  • hot sauce (or more, to your taste)
  • ground cumin

Directions:

  1. Spread rinsed beans onto rimmed baking sheet lined with triple layer of paper towels and let drain for 15 minutes. 
  2. In large bowl, whisk eggs and flour into uniform paste, then stir in scallions, minced cilantro, garlic, hot sauce, cumin, coriander, and salt.
  3. Crush up tortilla chips until relatively fine (I crushed them in a bag).  
  4. Mash up black beans (I smooshed mine with a fork on a cutting board) and stir in chip crumbs. 
  5. Stir egg mixture in until combined. 
  6. Cover and refrigerate, for at least an hour and up to 24 hours.  
  7. Divide bean mixture into 6 equal portions. Using lightly moistened hands, tightly pack each portion into ½-inch-thick patty. 
  8. To freeze patties (for up to a month): transfer to parchment paper and stack (w/ parchment between layers).  Wrap in plastic wrap and place in zipper-lock freezer bag. Thaw patties completely before cooking.)
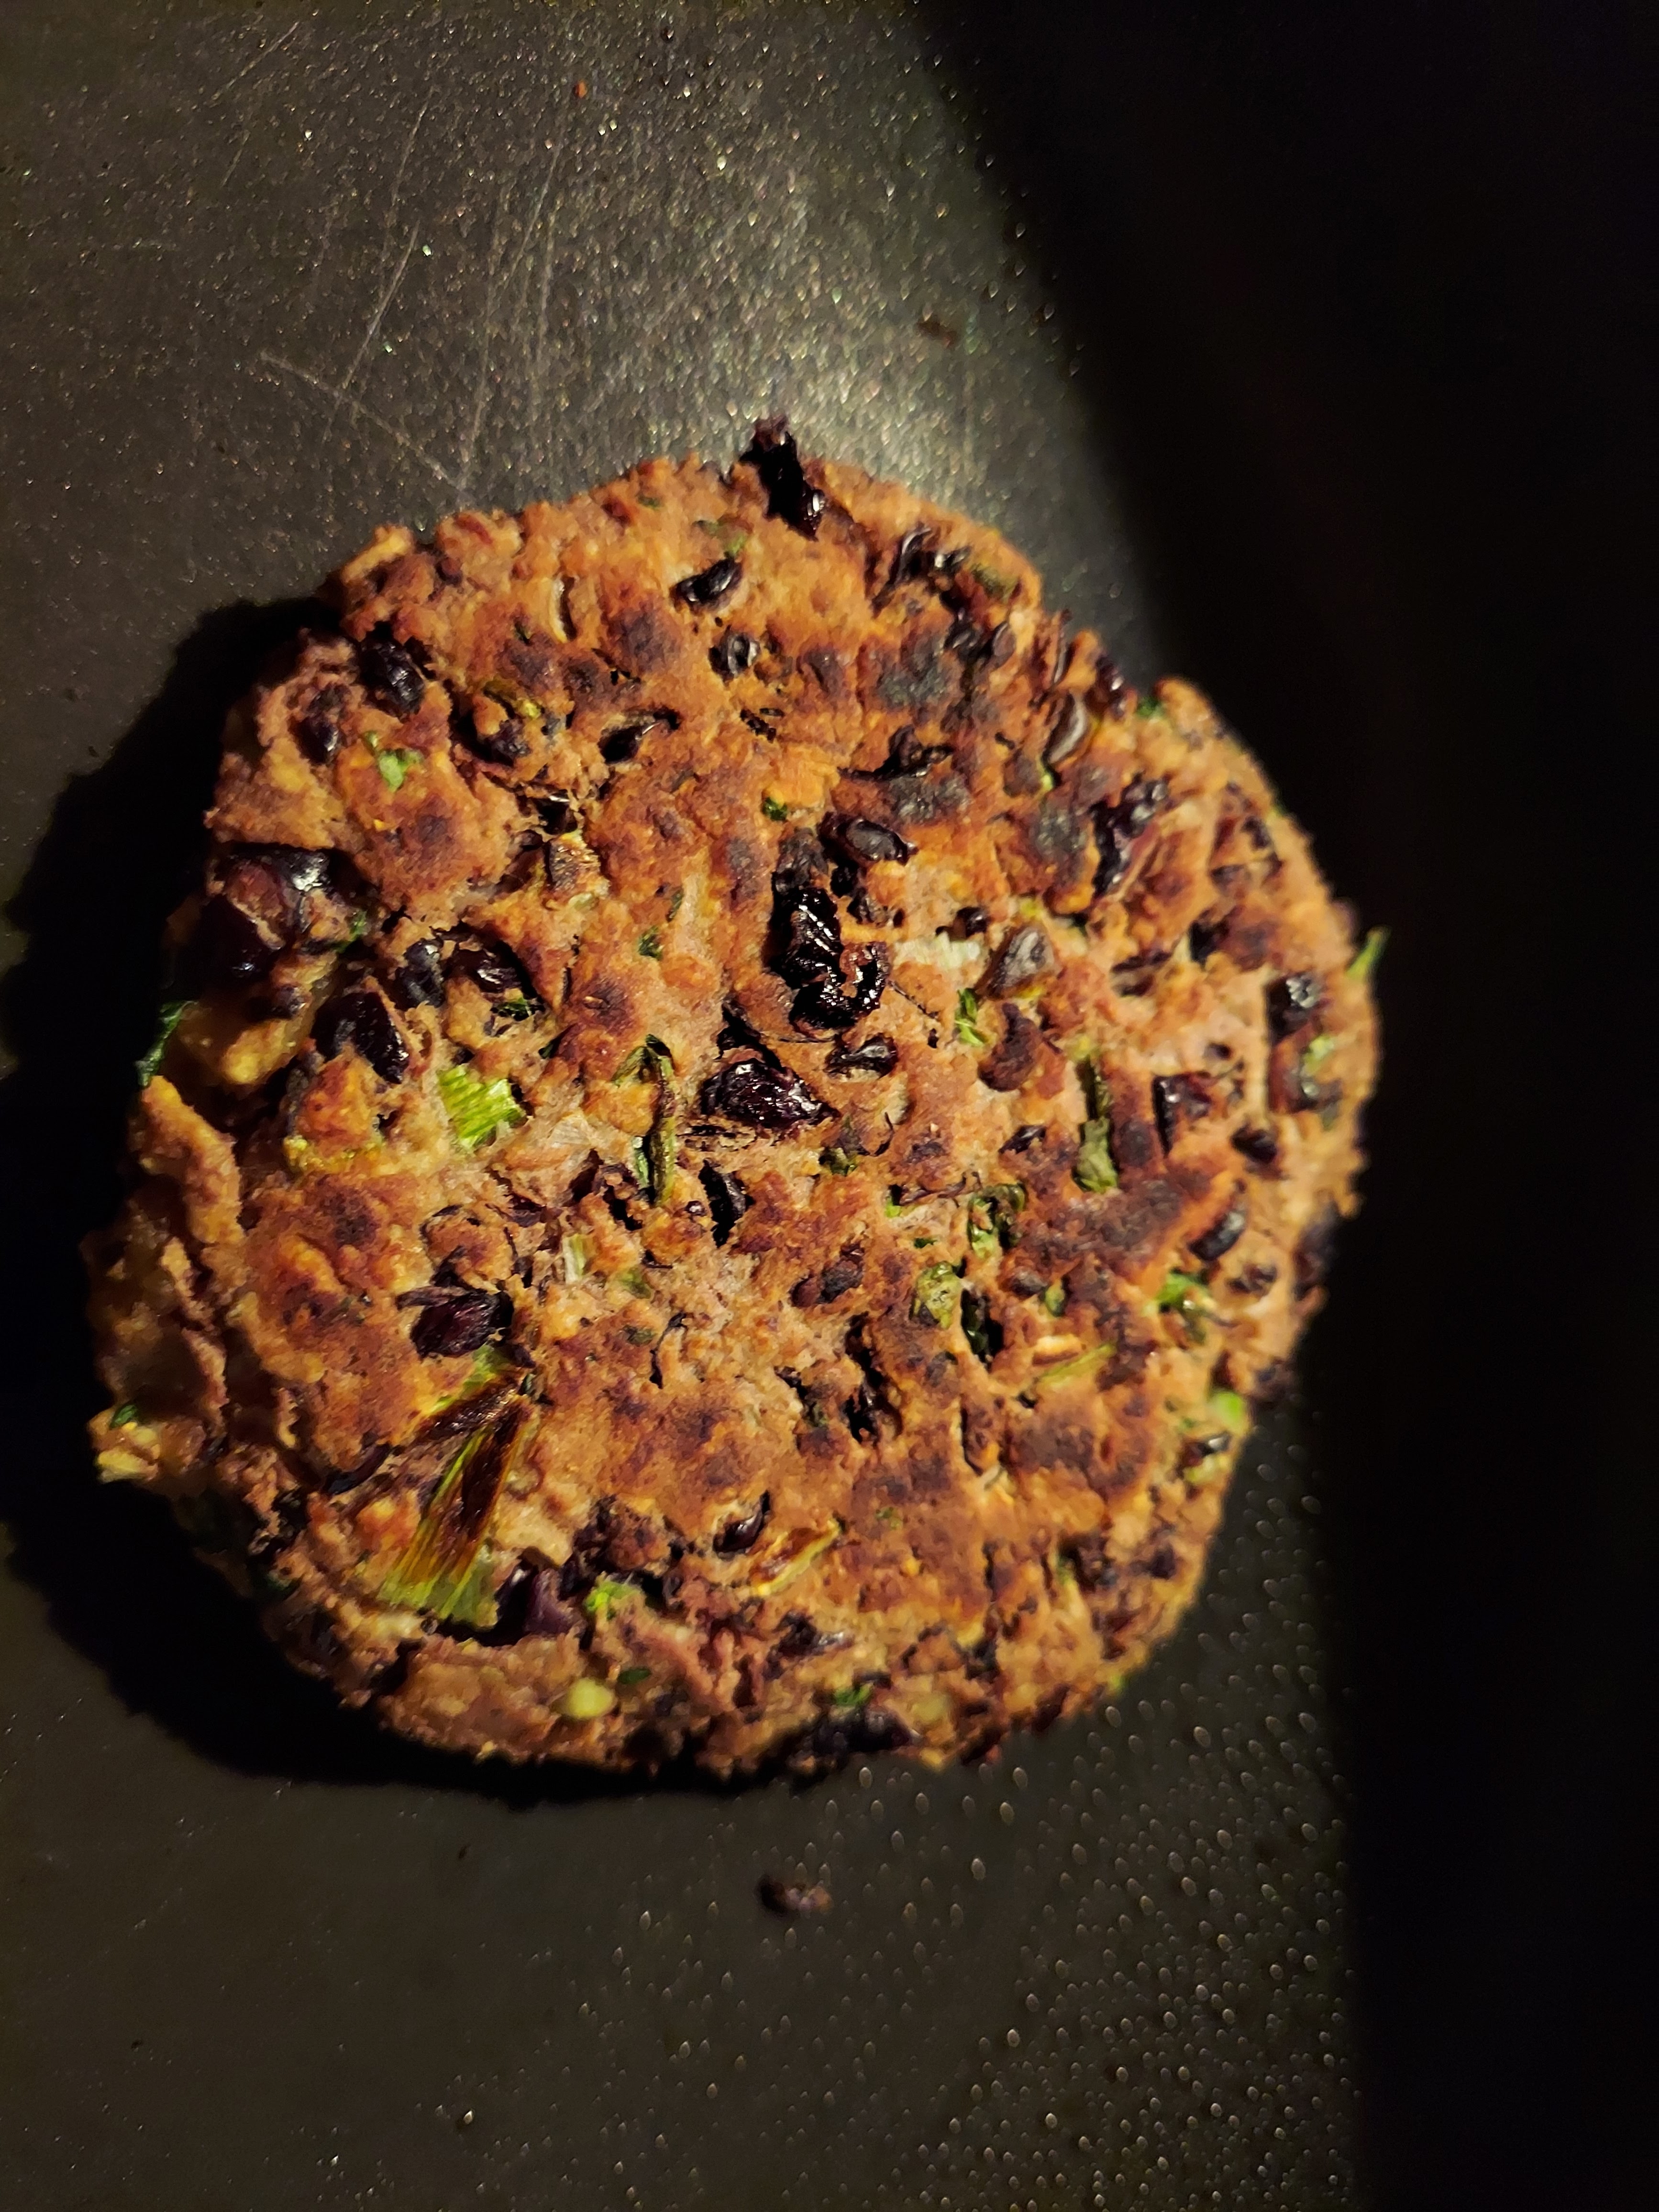
  9. Heat oil in a skillet on a medium heat until shimmery (or, like me, use some Pam spray).  Cook patties until well browned on one side, 5 to 7 minutes.  Then flip and cook until the other side is well-browned and crisp.  
  10. Serve with your favorite toppings--I did a cheese slice, tomatoes, pickles, avocado slices, ketchup, and mustard.  

Wednesday, April 22, 2020

Slow Cooker Beef with Broccoli


I'm pretty enthralled with my slow cooker. Even if I never figure out how to cook with it during regular work-days, it's great for weekends.  And it is perfect for right now, when I'm working from home.  If I remember, I can put ingredients in at lunch time and have dinner ready later, all while my house/workplace smells delicious. 

Speaking of which, this recipe is one that made the whole house smell amazing!  I love takeout--or buffet--beef and broccoli, and this version was super easy, tasty, and healthy, too.  I found the original online and loved that it mostly uses ingredients that I always have on hand.  I just had to buy the meat and the sesame oil...and now I have the bottle of sesame oil for later!  Also, no cleaning and chopping broccoli.  I like broccoli, but dealing with fresh is annoying sometimes.   

Also, leftovers froze and reheated well.  Since I only used about 1 pound of meat, this made 3 good sized servings.  I might add more broccoli next time, but I liked the more-sauce-version that happened by making it with less meat (also, it was a lot cheaper!). 

Ingredients:


  • 1 to 2 lbs. sirloin steak or boneless beef chuck roast, sliced thin (I used 1 lbs. of sirloin steak this time)
  • 1 cups beef broth (I made some beef bouillon from a cube for this and it worked totally fine)
  • ½ cup low sodium soy sauce
  • ¼ cup brown sugar (I used dark brown sugar because that is what was open in my pantry)
  • 1 Tablespoon sesame oil
  • 1+ Tbsp. minced garlic (or like 3 cloves?)
  • 4 Tablespoons cornstarch
  • 4 Tablespoons water
  • 1 (12 oz.) bag frozen broccoli florets


Directions: 

  1. Whisk together beef broth, soy sauce, brown sugar, sesame oil, and garlic, in the insert to the slow cooker.
  2. Place slices of beef in the liquid and stir.  
  3. Cover with lid and cook on low heat for 5 hours.
  4. After 5 hours, whisk together cornstarch and water in small bowl. (I suspect I could have added less, maybe 3 Tablespoons cornstarch to 3 Tablespoons water?)
  5. Pour into crock pot and add the frozen broccoli over the beef and sauce some (I won't be super-thick, which is a good thing) 
  6. Stir to combine. 
  7. Cover with lid and cook 30 to 45 minutes to cook broccoli and thicken sauce.


Sunday, February 5, 2017

Victory: Success in Fixing my Vacuum!

Let's be honest, I'm not super-handy.  I can follow directions like a champ, but I don't have a lot of confidence in my abilities to, you know, actually fix stuff.  Not in a real, permanent way.  For anything even remotely complicated, I mostly end up having to ask my dad for help, paying someone to fix it, or replacing whatever the broken thing is.

There is one major exception to this rule of thumb, however:  my vacuum.  I've managed to fix it multiple times, mostly using my own know-how, manuals I've found on the internet, and--in two separate instances--a replacement part that I bought on Amazon.com for less than $5.

Needless to say, every time I repair my vacuum I feel like a genius or a hero...or something.  It is a tremendous sense of triumph to "win" over the broken thing, to have control over something that is messed up in my life! :)

My most recent triumph was when my vacuum's belt broke.  I was minding my own business, vacuuming my living room, when I just slightly bumped the front into my TV stand.  Unfortunately, it started to make a terrible noise and smelled like something was burning.  (Smells-like-burning is pretty much always a bad sign.)  I turned it off and took it apart at the bottom to find this had happened:


After a bit of research, an order online, and waiting a few days, my replacement part arrived.  I threw it in the vacuum and I was ready to go!  Victory!!


Sunday, January 1, 2017

Graham Cracker Gingerbread Houses: Perfect for a Decorating Party


Since I moved into my house I have worked really hard to build my own traditions in my home. (After all, why should it be only the married and the parents among us that get to celebrate and build?)  One of those traditions is family Christmas Eve at my house.  The others are entertainments at my house for friends: a Halloween party and a holiday, gingerbread decorating party.  

The main issue with the gingerbread party is having houses (or other stuctures) for people to decorate.  I've tried baking them and I've bought tiny village kits to put together.  Both are good options, but the first is time consuming and the second can be expensive.  This year I decided to go with a 3rd option: making houses from graham crackers.  Still takes *some* time, but it was really affordable and made houses of a nice size for decorating.  

Here's how I did it....


Each house requires about 6.5 full-sheet graham crackers.  (Probably more, though, due to the chance of breakage while working.)

For each house, cut 2 of the crackers like this:
Then you will have main pieces like this:


Make a batch of royal icing and then load it into a frosting bag with the tip cut off.

Pipe frosting along two sides of one cracker:


Stand up the crackers on edge and attach a side wall piece:


Attach the other side wall piece:


Pipe frosting on the other long wall piece and attach it:


When frosting is partially set up, pipe frosting along cut edges of the side walls and the top of the long walls:


Put roof piece on, and repeat on other side. If your graham crackers are like mine, you'll have a space at the top where the roof doesn't meet:

To fill it in, frosting-glue two partial cracker-quarters (you might have to cut one to make it a bit shorter:


Also, you may want to frosting-glue the house down to a piece of foam core from the beginning.  It not only helps with stability but also gives a "lawn" for decorating!  


This year's graham crackers were really awesome!


Saturday, October 22, 2016

Spicy Red Spice Racks


I haven't posted any home improvements for a while, mostly because I haven't done very many.  :(  However, I'm pretty proud of my new spice racks. I officially hung them on August 7th and have been using them long enough to declare that a) They are awesome. and b) They have made my countertops much more organized. 

The reason for the spice racks?  Well, I have kind of a lot of spices and extracts.  Not as many as some people, but more than just the basics.  Which means that the nifty vintage Watkins Spices rack that I bought at an estate sale *definitely* didn't hold everything.  The bottles and jars took up some space, but they also tended to meander around on the counter and every time I wanted to clean the counter, it was really annoying to move them all.  Plus, they were perpetually falling over.  

When I started looking for spice racks, they were all fairly expensive and none of them were what I wanted.  I finally found something workable at Ikea, the Bekvam spice racks. At a mere $3.99 each, they are what I will call "super-cheap."  They are also real wood and can easily be customized.  
        
Like all Ikea things, the spice racks come flat-packed and need assembly.  So, I unpacked the pieces and assembled them.  You don't need any tools; a little wrench thing is included in the packaging.  You do, however, have to figure out one of the standard, slightly confusing Ikea drawings, because there aren't any actual words in the directions.  Luckily, though, this is a spice rack and not a huge piece of furniture!  


After I assembled my two spice racks, I spray painted them (with a glossy red Rustoleum).  It took 3 coats to get a nice, even, shiny red.  Yeah, I should probably have sanded them first, but honestly I didn't think about it at the time.  So....oh, well!


After they were completely dry, I hung them up in my kitchen.  The tricky parts were avoiding my electrical outlet, hanging them individually straight, and hanging both in an even line...all while working right underneath my cabinets and standing on a chair because I have short arms.  As you can see, there is a bit of space between them, but I think they turned out just fine!


Sunday, January 3, 2016

Infused Water


In an effort to drink more water (always a good thing, right?), I always get to the point where plain water just doesn't taste good anymore.   And then drinking it seems like like chore and I start resenting it.  Pretty soon, I'm not drinking water like I should...and the vicious cycle starts over. 

I've found a few solutions: lightly flavored waters,  crystal light packets,  etc. But these are all kind of pricey and are a better fit for when I'm away from home.  When I'm at home, a pitcher of infused water is a good solution.  Also, it is inexpensive...and makes me feel kinda fancy.  

I've found that scrubbing the fruit really well, then slicing it really thin and letting it infuse (AKA: sit in my fridge in the pitcher without drinking it) for 24 hours works really well. I've done apples and it turned out OK, but a relatively light flavor.  Citrus fruit is the classic and definitely my favorite.  I've done oranges, lemons, limes, and combos of those 3. All have been thoroughly tasty, healthy, refreshing beverages!


Sunday, May 31, 2015

Matching Flower Pots: Variations on a theme!


Last year I did some container gardening, with a whole bunch of pots on my back deck.  It was pretty fun and I wanted to do it again this year, but I also wanted this year's set of plantings to help make my back porch/deck a bit classier.  Last year was for experimentation, but this year is for the cool version, or so I told myself.  I figured that the best--read that cheapest and easiest--way to do this was to color coordinate my flower pots.  Since last year I had a turquoise seat cushion and matching turquoise holders for my movable lights, this seemed like a legit choice for a color scheme. 

So, I went to the home improvement store and bought a can of ridiculously bright turquoise spray paint.  I went with a glossy Rust-oleum paint that is advertised to adhere to plastic and work well outside.  Then I rounded up the planters and pots that I wanted to use, spread them out on a plastic drop cloth in my garage (it was raining outside) and started painting.  Oh, yeah.  And I decided that it would be super-fun to have my tomato cages match my planters, so I painted them, too.  
To get a nice, even finish, I needed at least two coats of paint and a few pieces needed three.  I also painted the sides and bottoms first, then flipped them up and painted the tops and inside edges.  All this crazy painting meant that I ended up going back to get a second can of spray paint.  I forgot to write down the name of the color, but luckily the one I picked was such a wild and notable color that I didn't have to worry about getting the wrong color of turquoise on that second store trip!  
  

I painted almost all of the pots/planters, with the exception of two of my four smaller pots that were a darker turquoise already. I left these their original color to add what I'm thinking of as a "sophisticated color contrast."  And then when I think that, I laugh inside.  :)  

After the base coat was done, I decided to add some more "sophisticated color contrast" [hehehe!] to a few other pots.  These were the terra cotta and plastic pots and saucers for my hanging plant holder.  For these, I bought a sample of a contrasting color of paint.  I could have gone to a craft store, but those are far away.  For less than the price of the gas for a round trip drive to a craft store plus the cost of a small bottle of craft paint ($3.75 to be more exact), I bought a small jar of lighter turquoise Behr Satin Gloss house paint.  I used that to paint some designs on the terra cotta pots (some free-hand and some with painters tape) and saucers, and to paint one plastic pot completely.  Fun note, painting the plastic using a sponge brush made it more textured and suddenly it looked like a ceramic pot, rather than a cheap $1 plastic version.  Cool, huh?  


After the designs were done, I coated the pots and saucers with 3 coats of indoor/outdoor glossy varnish (left-over from use in my Coaster and Glitter Shoes projects, actually). Then they were ready for planting.  Here are a few pictures, but you can see even more of my new and *very* sophisticated porch decor in my up-coming post about this year's container gardening.     

Sunday, May 10, 2015

Front Garden: 2015 Edition


My townhouse has a small front garden area.  When I moved in, it had a bush and 4 hostas in front, and a clematis climbing up a little trellis in a rocked in the back area with my air conditioning unit.  Since I moved in, I've had potted plants out front on my steps, trimmed the bush (well, my dad trimmed it for me, actually), and added a little bit of rock on the side closest to the steps.

Rock and mulch look good for a while, but they just seem to sink into the ground over time.  Which means it has to be replaced periodically.  This spring, it was obvious that I needed a bunch of rock and to add some mulch.  And since I was at it, I figured I would add some annual plants, too.  Luckily for me, Menards was having a big sale that included annuals, the white rock I wanted, and a bunch of other things.  

I cleaned out leaves from the back corner, then weeded, and then added some mulch in the front and white garden marble in the back.  Originally I bought 3 bags of rock and 1 of mulch, but I had to go back and get another 2 of rock. They are awfully heavy, but don't seem to cover very much ground.  Since the rock was only on sale through yesterday, though, I had to do it the same day. Nothing like a sale to motivate a purchase and some action on a needed project!

I also added 2 rubber paver stones, one on each side, and put a small urn-shaped pot on top of each one.  (I bought the urns on clearance last year at the end of the season.)  I planted "spikes," yellow rose moss, and purple petunias in them.  Hopefully they will fill in nicely and add color to the front of the house throughout the summer.

The final touches were:

  • a hanging pot of purple and yellow pansies on a shepherd's crook hanger (both purchased at a significant savings from the Menard's sale)
  • my weird little, plastic hedgehog outdoor figurine
  • a solar-powered decorative light globe
  • the larger rocks previously located by the air conditioner 

Everything looks so much better: neater, cleaner, and more home-y.  This is my first spring/summer house project, and I think it turned out nicely.  Here are some before and after images:


Thursday, January 8, 2015

DIY customized "white" board: Fancy and utiliarian


I wrote before about my salon-style wall with lots of different frame sizes, types, designs, etc. One of the things I definitely wanted on this wall from the beginning was a chalkboard.  Mostly because it would be a utilitarian thing.  

I used chalkboard paint in one of my homes in grad school.  I painted several large-ish cardboard rectangles, which I interspersed with same-sized cardboard rectangles covered with brightly colored, patterned fabric from the $1 clearance bin.  This made for a cheap and amazing wall.  It was decorative and utilitarian.  My roommate and I wrote grocery lists, to do lists, and who owed who money from recent shopping/outings.  I loved it!  However, the one problem was that the cardboard was not a very long-term base for a chalkboard.  It soaked up a ton of paint and lasted great for a year, but was never meant to be forever.  

For my grown-up house, I wanted something more durable, so I figured I would paint my chalkboard over the glass already in a large frame.  However, the difficulty of getting cheap chalkbaord paint that I knew would stick to glass made me change my mind a bit. (There is a special kind of chalkboard paint for glass, but it is normally sold in tiny bottles for use on glassware.) I also started thinking about having chalk dust flying around and ultimately decided to go in another direction: custom "white" board. 

One of the fun things about white board markers is that they work well on all kinds of slick surfaces, including glass.  Ever see a mathematician or a crime-solver writing on windows or glass walls on TV or in a movie?  That's what I'm talking about.  

The one thing is that it can be hard to read markers on glass, because of the transparency factor.  Opaque boards have the advantage on this front.  But I also had two issues: 1) I didn't want to pay for white board material and 2) I didn't want to use anything that was hard to cut to fit in my frame.

I came up with a solution that is working really well for me:
  1. I already had a large frame with nice glass in it that would work well.  (I got it from my mom.  She was going to donate a bunch of old frames to the Goodwill, but a few were diverted to me.)  My frame is about 16 X 20 and I spray-painted it to match the rest of the frames on my frame-wall.  
  2. Bought a piece of poster board ($0.50 at the Dollar Tree) and cut it to fit inside my frame, right up against the glass. 
  3. Found a fabric for the background that was cheap, attractive, and not too busy.  You could use any plain color, light pattern, etc., but I bought a silver-on-silver floral patterned fabric from the clearance rack at my local Hancock Fabrics.  It clocked in at about $2.50 a yard and 3/4 yard was more than enough.
  4. Tightly covered my poster board rectangle with the fabric, folding the extra to the back and securing with tape.  
  5. Put the fabric covered rectangle in the frame like a photo and then closed the whole thing up. 
  6. Custom "white" board finished and ready to use! 

Cost for the customization:
  • Frame--Free 
  • Spray Paint--$4 (but also part of a larger project)
  • Poster Board--$0.50
  • Fabric -- under $2
  • Total--Under $7!


Mary Poppins Costume Accessories


I know that it is now January, but I wanted to catch up with several of my older projects that are worth documenting and sharing.

Because I love Halloween (LOVE it!), I decided long before the end of October that I would have two different Halloween costumes in 2014: one for work and one for my now-annual Halloween party.  I also decided to be Mary Poppins for work.  Why?  Well, it is a costume that is mostly based around things that I either already had or could acquire cheaply...a main point in favor of any costume.  More importantly, however, it was something that could be work appropriate if you stretch the idea of business casual just a tiny smidge.  (Although, to be fair, my boss is OK with us dressing up....as long as we don't get too crazy.)

The main costume consisted of a made-by-me black circle skirt with a made-by-me black crinoline under it to give it shape.  (I know, I know.  Not authentic to have Mary Poppins in a swirly skirt.  But it was MY costume.  Also, I made these in 2013 when I made my wind-up doll costume.  Yeah, I know.  That WAS cool.)  A white button-up shirt, black tights, black heels, and black blazer completed the actual outfit.

As for basic accessories, I added a $1 red bow tie--I think I found it at the dollar store--and a red grosgrain ribbon belt (ribbon purchased with a coupon at JoAnn fabrics) that I affixed to itself and my skirt with fashion tape (also purchased with a coupon at JoAnn's).

BTW: If you haven't tried fashion tape, you should.  It works on gaps in shirts, missing buttons, broken hems, keeping necklines up/work appropriate, etc.  I love this stuff!  The best kind comes in pink and black packaging and can come in either a tin of strips or a roll of tape.  Cost saving tip: Don't bother buying the dispenser if you buy the rolls; just keep a set of scissors with it in your drawer/dresser/bathroom.

As for the other accessories, I needed two other things: Mary's distinctive hat and her talking bird umbrella.  I bought the basis for both at the Goodwill.  The hat was a costume bowler-style hat that was new and cost me about $3.  The umbrella had an L-shaped handle and was also about $3.

To decorate the hat, I purchased one piece of thick white scrapbook paper embossed with flowers of different types.  I cut out a few of the flowers, colored the centers yellow-orange, and attached them with double-stick tape.  I also purchased ($1) a small bunch of Christmas greenery that had some berries on it.  I used just the 2 bunches of berries, tucked in the band of the hat.

To make the umbrella, I bought two different colors of air dry clay.  It is super light-weight and sold in the kids' section of craft stores.  My packages were a light, bright green for the main head and beak, and a white for the eyes.  Crayola makes a nice version, but many craft stores have a generic version as well.  Again, I had a coupon for both packages.  I molded the green clay around the l-shaped handle, using the handle as an armature that would support the beak.  I spread the clay down around the main handle, to be sure that it would stay on and sort of become a part of the handle.  I let the surface dry and then added the small white round pieces for the eyes.  The next day, I used multi-colored Sharpie markers to color the beak, add "feathers" to the neck, and add details to the eyes.  Then I left the bird to totally dry for another 2 days.

If I had needed to ditch my costume quickly--for an unexpected meeting with someone important, for example--I would have left the hat and umbrella at my desk with the bow tie, buttoned my blazer, and perfectly ready. Also, I now have all these items and accessories, so a costume party at a non-Halloween time would be no problem (Purim, anyone?).

Most important lesson to impart on costume making: think ahead.  This helps both with the gathering of items and the ability to comparison-shop/save money.  Several 50% and 60% off coupons saved me huge, as did the ability to make a few trips to find just the right items at the thrift shop.

After work on Halloween, a small group of people from work played trivia at Summit Brewery.  We got second place, and so Michael, Tim, Rosie the Riveter, and Mary Poppins had a photo taken to commemorate our near-win.


Monday, January 5, 2015

Use a Coaster Already!


One of my friends has a really nice, really large table that is perfect for board games and a big crowd of fun people.  He--very reasonably--wants people to use coasters for their drinks to keep the table nice.  However, he only had two kinds of coasters: disposable cardboard ones (think bar coasters) that somehow keep getting reused and old, cool ones from his mom that are perfect for bottles or cans but are a little small and uneven for mugs, glasses, etc.

To solve this lack-of-appropriate-coaster issue, I decided to make him a set of customized coasters that would work for any beverage.  His set of 6 would be from the Avengers, because he freaking loves the Marvel cinematic universe and insisted that we watch the movies all in order before we could go see The Guardians of the Galaxy.  (Somehow he thought we wouldn't understand GofG without seeing the other movies.  No so much, really, though there were a few inside-moments that built on things from the other films....anyway...)

To make the coasters I first needed supplies:


  • The base of the coasters were 4.25 inch square white tiles from the Home Depot.  They cost somewhere in the range of 20 cents each and I bought an extra, just in case.  
  • The images I painstakingly made in a simple Paint program (because that is what I have) and then I had them printed on photo paper at my local Target.  I made sure that my images would be exact squares that would fit on 4inch by 6inch photo paper. There was an issue initially with the very edges of my emblems getting cut off, and I had to resize and do them again.  The best way seemed to be making the image square, printing it on rectangle paper, and then trimming it down to the square I wanted.  
  • I purchased Mod Podge, both to glue the images onto the tiles and to create an initial layer on the top of the coaster.  I used glossy.  However, it is important to note that Mod Podge is not waterproof.  So for coasters that are not just decorative, you need a more waterproof topcoat.
  • I bought a Ceramcoat gloss exterior/interior varnish for the actual topcoat layers, figuring that anything meant to protect outdoors could probably stand up to some condensation from glassware.  
  • For padding on the bottom of the coasters--so that they wouldn't scratch the table whist providing protection from water-rings--I get some self-adhesive felt.  Fuzzy on one side and sticky on the other.  
  • I used a foam brush, though other kinds of brushes might have put fewer texture lines in the glossy finishes.  

Here is my process:

1.  Cut images to be 4inch squares. Hint: use a paper-cutter to get a nice straight line.
2. Lay out tiles on newspaper so that you can work quickly and efficiently.
3.  Coat the reverse side of the image with an even coating of the ModPodge and affix to tile, centering it and smoothing out any bubbles, extra glue, etc.
4.  Coat with multiple coats of ModPodge, being sure to make it as even as possible and not forgetting to coat the edges.  The ModPodge goes on opaque white, but dries clear. See Capt. America image below.  Also, be sure to let the ModPodge dry completely between layers.  With my house's heat on, the coats dried very quickly.  Also, be sure to pick up tiles after a layer is dry so that they don't stick to the newsprint.  If some sticks on, just rub or smooth it off the bottom and/or edges
5. When the last ModPodge layer is dry (I did 3 layers), start layering on the varnish layers.  (I added 3 varnish layers, too.)  Again, make sure one coat is dry before adding the next. 
6. When all the coating layers are finished, make sure to let them dry/cure out.  I let mine do so for the afternoon and then overnight.  
7. The final step is adding the felt to the reverse side. I cut the felt into squares just smaller than the 4.25 inch tiles...approximately the same size as my images on the top side.  
8.Even though my felt had an adhesive layer, I added a bead of superglue to each corner, just for added security. 
9.And there you have it, a customized set of utilitarian coasters.  Form and function unite!!