Thursday, January 8, 2015

Mary Poppins Costume Accessories


I know that it is now January, but I wanted to catch up with several of my older projects that are worth documenting and sharing.

Because I love Halloween (LOVE it!), I decided long before the end of October that I would have two different Halloween costumes in 2014: one for work and one for my now-annual Halloween party.  I also decided to be Mary Poppins for work.  Why?  Well, it is a costume that is mostly based around things that I either already had or could acquire cheaply...a main point in favor of any costume.  More importantly, however, it was something that could be work appropriate if you stretch the idea of business casual just a tiny smidge.  (Although, to be fair, my boss is OK with us dressing up....as long as we don't get too crazy.)

The main costume consisted of a made-by-me black circle skirt with a made-by-me black crinoline under it to give it shape.  (I know, I know.  Not authentic to have Mary Poppins in a swirly skirt.  But it was MY costume.  Also, I made these in 2013 when I made my wind-up doll costume.  Yeah, I know.  That WAS cool.)  A white button-up shirt, black tights, black heels, and black blazer completed the actual outfit.

As for basic accessories, I added a $1 red bow tie--I think I found it at the dollar store--and a red grosgrain ribbon belt (ribbon purchased with a coupon at JoAnn fabrics) that I affixed to itself and my skirt with fashion tape (also purchased with a coupon at JoAnn's).

BTW: If you haven't tried fashion tape, you should.  It works on gaps in shirts, missing buttons, broken hems, keeping necklines up/work appropriate, etc.  I love this stuff!  The best kind comes in pink and black packaging and can come in either a tin of strips or a roll of tape.  Cost saving tip: Don't bother buying the dispenser if you buy the rolls; just keep a set of scissors with it in your drawer/dresser/bathroom.

As for the other accessories, I needed two other things: Mary's distinctive hat and her talking bird umbrella.  I bought the basis for both at the Goodwill.  The hat was a costume bowler-style hat that was new and cost me about $3.  The umbrella had an L-shaped handle and was also about $3.

To decorate the hat, I purchased one piece of thick white scrapbook paper embossed with flowers of different types.  I cut out a few of the flowers, colored the centers yellow-orange, and attached them with double-stick tape.  I also purchased ($1) a small bunch of Christmas greenery that had some berries on it.  I used just the 2 bunches of berries, tucked in the band of the hat.

To make the umbrella, I bought two different colors of air dry clay.  It is super light-weight and sold in the kids' section of craft stores.  My packages were a light, bright green for the main head and beak, and a white for the eyes.  Crayola makes a nice version, but many craft stores have a generic version as well.  Again, I had a coupon for both packages.  I molded the green clay around the l-shaped handle, using the handle as an armature that would support the beak.  I spread the clay down around the main handle, to be sure that it would stay on and sort of become a part of the handle.  I let the surface dry and then added the small white round pieces for the eyes.  The next day, I used multi-colored Sharpie markers to color the beak, add "feathers" to the neck, and add details to the eyes.  Then I left the bird to totally dry for another 2 days.

If I had needed to ditch my costume quickly--for an unexpected meeting with someone important, for example--I would have left the hat and umbrella at my desk with the bow tie, buttoned my blazer, and perfectly ready. Also, I now have all these items and accessories, so a costume party at a non-Halloween time would be no problem (Purim, anyone?).

Most important lesson to impart on costume making: think ahead.  This helps both with the gathering of items and the ability to comparison-shop/save money.  Several 50% and 60% off coupons saved me huge, as did the ability to make a few trips to find just the right items at the thrift shop.

After work on Halloween, a small group of people from work played trivia at Summit Brewery.  We got second place, and so Michael, Tim, Rosie the Riveter, and Mary Poppins had a photo taken to commemorate our near-win.




Monday, January 5, 2015

Use a Coaster Already!


One of my friends has a really nice, really large table that is perfect for board games and a big crowd of fun people.  He--very reasonably--wants people to use coasters for their drinks to keep the table nice.  However, he only had two kinds of coasters: disposable cardboard ones (think bar coasters) that somehow keep getting reused and old, cool ones from his mom that are perfect for bottles or cans but are a little small and uneven for mugs, glasses, etc.

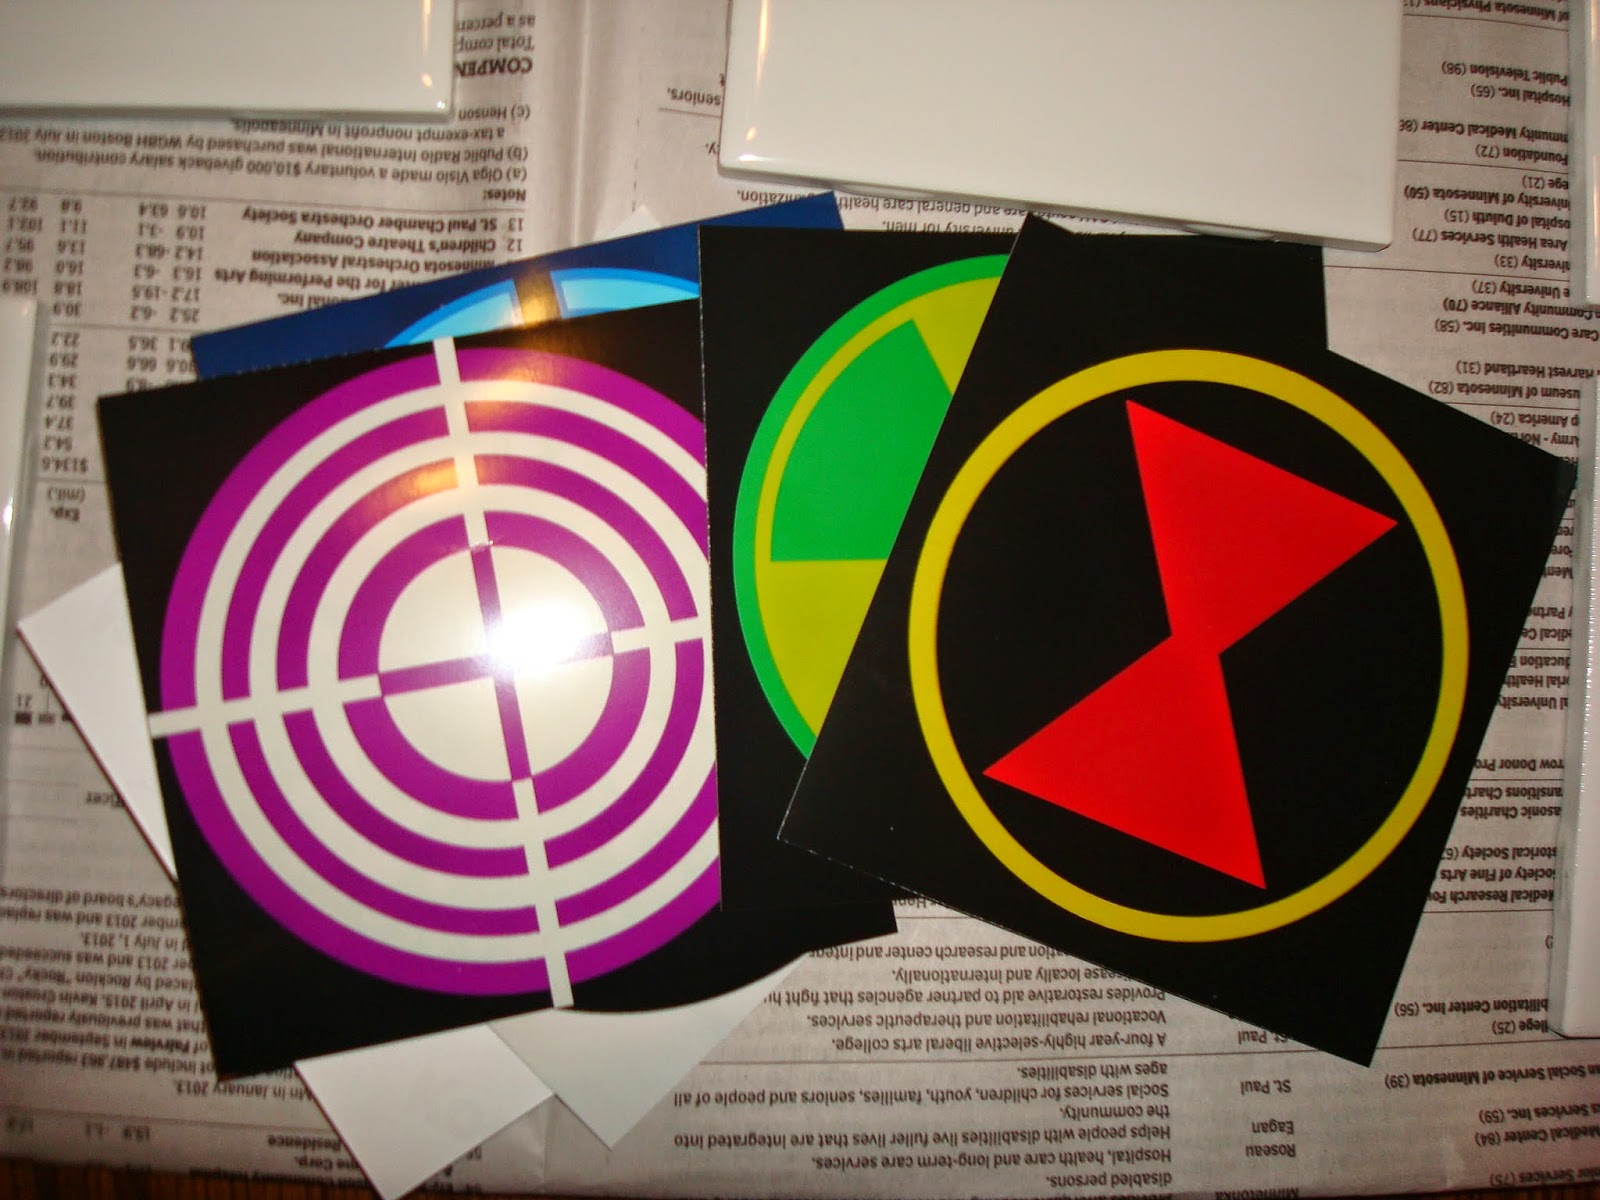
To solve this lack-of-appropriate-coaster issue, I decided to make him a set of customized coasters that would work for any beverage.  His set of 6 would be from the Avengers, because he freaking loves the Marvel cinematic universe and insisted that we watch the movies all in order before we could go see The Guardians of the Galaxy.  (Somehow he thought we wouldn't understand GofG without seeing the other movies.  No so much, really, though there were a few inside-moments that built on things from the other films....anyway...)

To make the coasters I first needed supplies:


  • The base of the coasters were 4.25 inch square white tiles from the Home Depot.  They cost somewhere in the range of 20 cents each and I bought an extra, just in case.  
  • The images I painstakingly made in a simple Paint program (because that is what I have) and then I had them printed on photo paper at my local Target.  I made sure that my images would be exact squares that would fit on 4inch by 6inch photo paper. There was an issue initially with the very edges of my emblems getting cut off, and I had to resize and do them again.  The best way seemed to be making the image square, printing it on rectangle paper, and then trimming it down to the square I wanted.  
  • I purchased Mod Podge, both to glue the images onto the tiles and to create an initial layer on the top of the coaster.  I used glossy.  However, it is important to note that Mod Podge is not waterproof.  So for coasters that are not just decorative, you need a more waterproof topcoat.
  • I bought a Ceramcoat gloss exterior/interior varnish for the actual topcoat layers, figuring that anything meant to protect outdoors could probably stand up to some condensation from glassware.  
  • For padding on the bottom of the coasters--so that they wouldn't scratch the table whist providing protection from water-rings--I get some self-adhesive felt.  Fuzzy on one side and sticky on the other.  
  • I used a foam brush, though other kinds of brushes might have put fewer texture lines in the glossy finishes.  

Here is my process:

1.  Cut images to be 4inch squares. Hint: use a paper-cutter to get a nice straight line.
2. Lay out tiles on newspaper so that you can work quickly and efficiently.
3.  Coat the reverse side of the image with an even coating of the ModPodge and affix to tile, centering it and smoothing out any bubbles, extra glue, etc.
4.  Coat with multiple coats of ModPodge, being sure to make it as even as possible and not forgetting to coat the edges.  The ModPodge goes on opaque white, but dries clear. See Capt. America image below.  Also, be sure to let the ModPodge dry completely between layers.  With my house's heat on, the coats dried very quickly.  Also, be sure to pick up tiles after a layer is dry so that they don't stick to the newsprint.  If some sticks on, just rub or smooth it off the bottom and/or edges
5. When the last ModPodge layer is dry (I did 3 layers), start layering on the varnish layers.  (I added 3 varnish layers, too.)  Again, make sure one coat is dry before adding the next. 
6. When all the coating layers are finished, make sure to let them dry/cure out.  I let mine do so for the afternoon and then overnight.  
7. The final step is adding the felt to the reverse side. I cut the felt into squares just smaller than the 4.25 inch tiles...approximately the same size as my images on the top side.  
8.Even though my felt had an adhesive layer, I added a bead of superglue to each corner, just for added security. 
9.And there you have it, a customized set of utilitarian coasters.  Form and function unite!!


Sunday, November 16, 2014

Halloween Papercrafting


I'm still working on my pre-Halloween catch-up for my projects... and here's one of them:

In order to add a little Halloween flair to my salon picture-frame wall, I needed a few cool and appropriately themed images.  I filled some of the frames with creepy art that I love, but the rest I filled with some fun paper art that I...MADE MYSELF!  Some were free-handed (Frankenstein), others are from direct patterns for paper-crafting (the rats and the cat), and one was from a pumpkin carving pattern (the wolf howling).  All in all a very satisfying afternoon of work.

Oh!  A tip for doing this sort of papercrafting: Find small scissors.  I actually bought a nail set at the dollar store that included a small set of straight scissors and they worked perfectly for this sort of thing.  


Chocolate-Peanut Butter Crinkle Cookies


I know that I already wrote about the wonders of cake mix-based crinkle cookies, but this is experimental twist turned out really great!  

I have had some peanut better extract (yes!  peanut butter extract!!!!) from Watkins since I bought it at the Minnesota State Fair last year.  I just hadn't figured out how to use it.  Last week I was tidying up my spices and extracts on my counter and found a stray bottle top, which I threw away.  I thought it was from a bottle of vanilla that I had finished recently.  WRONG!  It was from my peanut butter extract, which luckily still had an intact seal. Ack!  Also luckily, however, I still had the empty vanilla bottle mixed in with my other stuff.  I washed it out as thoroughly as possible and transferred the peanut butter extract to it.

But now that the exotic PB extract was on my radar, I needed to figure out a way to use it.  I was already going to make a batch of cookies for my buddies working at the Half Price Books during the big November coupon sale, so I decided they would include PB flavor.  Crinkle cookies are always a favorite and they are pretty forgiving of small experiments, in my experience, so they were the perfect choice.  

Here are the details....

Ingredients:
  • 1 Devil's Food cake mix 
  • 1/3 cup vegetable oil
  • 2 eggs
  • 1 1/2 tsp. Watkins Peanut Butter Extract 
  • granulated sugar 

Instructions:
  1. Heat oven to 350 degrees 
  2. Mix cake mix, eggs, extract and oil with a spoon in a large bowl.  The dough will be a bit sticky.
  3. Shape dough into 1-inch balls and roll in sugar. Granulated will make the cookies more sparkly and it is what I did in this case (mostly because peanut butter cookies usually have granulated on them!).  But you can certainly use powdered sugar, if you want
    • Tip: A lot of people have written online about how the sugar "sinks" into the cookies as they bake and it isn't very visible in the finished product.  To help with this, roll all the balls in sugar and place on cookie sheet.  Then go back and roll each ball around in your hands again, embedding that layer of sugar into the cookie, and then immediately roll it in sugar again.  
  4. Place dough balls about 2 inches apart on ungreased or parchment paper-lined cookie sheet.
  5. Bake 8 to 10 minutes or until set.
  6. Cool for a minute or so on cookie sheet and then cool completely on wire rack or on waxed paper.  Or, if they are on parchment paper, just slide the parchment off onto a table or counter for cooling.   

Butternut Squash and Apple Soup


 One of the great things about fall and winter gatherings is that you can fix warming foods...things that you couldn't dare serve in the middle of summer because the idea of turning on the oven in a house full of people in the heat is just unthinkable.

After I moved into my townhouse, I decided that I needed to start some traditions for my new home.  Since I have a deep and abiding love of all things Halloween, I have held a Halloween party for friends for the past two years.  One of the main dishes that I've served both years is an autumn soup.  It can be left to warm on the stove or in a crock pot, and people can eat more or less of it whenever they want.  Plus, there are so many hearty vegetarian options that it makes preparations for a diverse group of people much, much easier!

This year's soup was a butternut squash-apple variety and the recipe came from (though I'm a bit sad to admit it) Martha Stewart's online presence.  It was really good, simple to make, and warm both in temperature and from spices.  Also, the ingredients are the perfect fall produce combo and the recipe is really quite healthy.

I did not follow Martha's serving instructions, which included a fussy garnish of diced apples and jalapeno slices.  Instead I served it with some optional sour cream and AMAZING pumpkin-cornbread croutons that I got at Trader Joe's.

Seriously, these are the greatest and most unique croutons of all time.  It is like someone took the perfect fall day and somehow transformed it into crouton form.  Am I enamored?  Yes.  Absolutely.  Do I count on ever seeing these croutons in a store again?  No.  Of course not.  Trader Joe's discontinue everything that I truly love!

By the way, what follows is double the size of the original recipe.  So, if you don't want quite so much soup, this version should half down really well.  

Ingredients:
  • 2 Tbsp unsalted butter
  • 2 medium onions/1 large onion, diced
  • 2 butternut squash (about 4 pounds), peeled, seeded, and chopped
  • 8 apples, peeled, cored, and chopped (I used Haralsons and Galas, I think) 
  • 4 tsp coarse salt
  • 3 tsp ground cumin
  • 1 tsp ground coriander
  • 1 tsp ground ginger
  • 1/2 tsp cayenne pepper
  • 1/2 tsp freshly ground black pepper
  • 4 cups low-sodium vegetable stock
  • 5 cups water, plus more if needed


Directions 
  1. Melt butter in a large saucepan over medium heat. 
  2. Add onion and cook, stirring occasionally, until it begins to soften (about 4 minutes) 
  3. Add squash and cook, stirring occasionally, until soft (about 10 to 12 minutes) 
  4. Add apples, salt, cumin, coriander, ginger, cayenne, black pepper, stock, and just enough water to cover everything.  
  5. Bring to a boil. 
  6. Reduce to a simmer and cook until vegetables are very soft (about 30 minutes)
  7. Puree in batches in a blender until smooth and return to saucepan. 
  8. Heat over low, adding more water if the soup is too thick.   
  9. Serve with croutons and/or a dollop of sour cream.

Saturday, November 8, 2014

Poetry Pumpkin


This Halloween I decided that I would do a few projects that would be crafty but festive for my house.  I found all sorts of amazing things on Pinterest, including the idea of using sharpies to decorate pumpkins for indoor use.  Some people just drew on their pumpkins, some people wrote on their pumpkins, and some people did both (see below).  The basic idea is just to spray paint the pumpkin and then get creative with your sharpie pens!  


My pumpkin was also obviously silver, rather than white.  Mostly because I had silver spray paint already and thought it would look cooler.  I like the way it turned out, but writing on the silver was more difficult than it would have been if I had used a matte color spray paint.  It was also probably harder to read.  


As for what to put on the pumpkin: I can't really draw very well, but the idea of poetry on a pumpkin seemed perfect for me, what with my love of books and all.  I love, love, love Poe's poetry...and basically everything he ever wrote.  However, I already had a passage from Edgar Allan Poe hanging on my wall, so I decided to go for something a bit different: Henry Wadsworth Longfellow's "Haunted Houses."  

I think that my decorative indoor pumpkin turned out really well.  I made sure to pick a pumpkin that was whole and firm, with no soft or damaged spots.  I also made sure it had an appropriately nifty stem, which I covered with newspaper during the painting process.  I spray-painted it (two coats) about a week and a half before Halloween and it was still in good shape over a week after.      

Here is the poem I used, if you're interested:  

Haunted Houses
 All houses wherein men have lived and died
Are haunted houses. Through the open doors
The harmless phantoms on their errands glide,
With feet that make no sound upon the floors.

We meet them at the door-way, on the stair,
Along the passages they come and go,
Impalpable impressions on the air,
A sense of something moving to and fro.

There are more guests at table than the hosts
Invited; the illuminated hall
Is thronged with quiet, inoffensive ghosts,
As silent as the pictures on the wall.

The stranger at my fireside cannot see
The forms I see, nor hear the sounds I hear;
He but perceives what is; while unto me
All that has been is visible and clear.

We have no title-deeds to house or lands;
Owners and occupants of earlier dates
From graves forgotten stretch their dusty hands,
And hold in mortmain still their old estates.

The spirit-world around this world of sense
Floats like an atmosphere, and everywhere
Wafts through these earthly mists and vapours dense
A vital breath of more ethereal air.

Our little lives are kept in equipoise
By opposite attractions and desires;
The struggle of the instinct that enjoys,
And the more noble instinct that aspires.

These perturbations, this perpetual jar
Of earthly wants and aspirations high,
Come from the influence of an unseen star
An undiscovered planet in our sky.

And as the moon from some dark gate of cloud
Throws o’er the sea a floating bridge of light,
Across whose trembling planks our fancies crowd
Into the realm of mystery and night,—

So from the world of spirits there descends
A bridge of light, connecting it with this,
O’er whose unsteady floor, that sways and bends,
Wander our thoughts above the dark abyss.


Wednesday, November 5, 2014

Ham-and-Swiss Savory Scones


At the same time that I tried the cinnamon-chip scones for the first time, I also tried this recipe for ham-and-swiss savory scones.  Like those others, it is based on a recipe I found online from Southern Living for Best Ever Scones.  Here's my version.

Oh, and the mustard butter was an experiment that was actually pretty good.  Definitely worth trying if you are a person that digs the flavor of mustard things.

Scone Ingredients:

  • 2 cups all-purpose flour 
  • 1 tablespoon baking powder
  • 1/2 teaspoon salt 
  • 1/2 cup cold butter, cut into 1/2-inch cubes  (unsalted)
  • 1 cup 2% milk, divided (the original recipe called for heavy/whipping cream, but 2% worked great and I felt better about it)  
  • 3/4 cup shredded Swiss cheese
  • 3/4 cup finely chopped ham


Scone Directions:

  1. Preheat oven to 450°. 
  2. Stir together flour, sugar, baking powder, and salt in a large bowl. 
  3. Cut butter into flour mixture with a pastry blender/a fork until crumbly and mixture resembles small peas. 
  4. Freeze 5 minutes. 
  5. Add 3/4 cup plus 2 Tbsp. milk, cheese, and ham, stirring just until dry ingredients are moistened.
  6. Turn dough out onto wax paper; gently press or pat dough into a 7-inch round.
  7. Use a sharp knife to cut dough into 8 wedges. 
  8. Place wedges 2 inches apart on parchment paper.  
    • Note: the original recipe said to bake these scones on a lightly greased cookie sheet.  I  recommend using parchment paper.  
  9. Brush or pat tops of wedges with remaining milk, just until moistened.    
  10. Bake at 450° for 13 to 15 minutes or until golden.
    • Note: the original recipe also listed an option for Bite-Size Scones, but I haven't tried it yet.  They said: Pat dough into 2 (4-inch) rounds. Cut rounds into 8 wedges. Bake as directed for 12 to 13 minutes.


Mustard Butter:
Stir together 1/2 stick of butter and 1/2+ Tbsp. brown mustard.  Store refrigerated.