Showing posts with label Breakfast. Show all posts

Monday, February 7, 2022

Egg-In-A-Basket


One of my tasks to complete over the weekend was clearing out some old magazines.  I have a particularly hard time throwing out recipes, but I decided I would only keep things that I might realisitically make someday.  The further plan being that I would transfer each "keeper" to this blog as I make it...and I *should* make new things.  

Today I had the day off, so I made this Medditerranean-style egg-in-a-basket this morning (the recipe originally appeared in Better Homes and Gardens in July 2020).  It was a nice reward for walking on the treadmill first thing this morning.

The recipe suggested using halves of everything bagels or 1/2-inch thick bread.  However, I only had light wheat bread.  Also, it was supposed to have fresh herbs (I had dried) and feta cheese (I had shredded parmesan).  So those are the things that I used!

Ingredients:

  • Pieces of bread or bagels halves
  • Eggs (number to equal the number of pieces of bread)
  • Cherry or grape tomatoes
  • Pitted, sliced kalamata olives
  • Fresh or dried herbs, to taste
  • Crumbled feta or shredded cheese of another kind
  • Salt and pepper, to taste

Directions:

  1. Preheat oven to 400 degrees 
  2. Coat a baking sheet (or a baking sheet covered in foil) with non-stick spray
  3. Cut holes in bread (or expand holes in bagels), so each has a 2+ inch diameter hole
  4. Place bread on baking sheet
  5. Crack each egg into a hole in a piece of bread
  6. Season with herbs and salt/pepper. 
  7. Top with tomatoes, olives, and cheese


  8. Bake 10 to 12 minutes, or until bagels are toasted  and eggs are the doneness that you like (runny yolks = 10 minutes, thicker and jammy yolks = 12 minutes). 
  9. Let stand 5 minutes before serving. 


Monday, January 17, 2022

Double-blueberry lemon beer bread


I mostly failed in writing about or recording my recipes, projects, and experiments for 2021, but that doesn't mean I can't start again fresh in 2022, right?  

So this is what I made on Saturday to bring to my parents' house as a treat...

I've been working on what is essentially a double-blueberry beer bread--a quick-style beer bread made with both blueberry beer and fresh blueberries--for a while now.  I've entered two versions in the State Fair (no ribbons for it so far!), but this newest version is the best yet, I think.  The dough is a beautiful light lavender color, though that color largely bakes out.  Ane the addition of the extra lemon ingredients make the finishing taste a nice citrus one.       

Ingredients:

  • 3 cups all-purpose flour
  • 4 1/2 teaspoons baking powder
  • 1/2 teaspoon salt
  • +/- 1/4 tsp dried grated lemon peel 
  • 1/2 cup firmly packed brown sugar (this time I used dark brown sugar)
  • 12 oz. blueberry beer (I used Grain Belt Blu blueberry lager)
  • 1/2 teaspoon vanilla extract
  • 1/4  teaspoon lemon extract
  • 2 Tablespoons lemon juice
  • 3 Tablespoons melted butter
  • 1 cup whole, fresh blueberries with 1 Tablespoon flour stirred into them
  • Finely granulated white sugar to sprinkle on top of the loaf 
Directions:

  1. Preheat oven to 375°F 
  2. Lightly spray 9 x 5 inch loaf pan with non-stick spray
  3. Whisk together flour, baking powder, salt, brown sugar, and lemon peel


  4. Lightly whisk together vanilla, lemon juice, lemon extract, melted butter, and beer in a measuring cup


  5. Pour liquids into dry ingredients and stir until well mixed


  6. Fold in blueberries


  7. Put mixture in pan, smooth top, and sprinkle top with granulated sugar


  8. Bake 45 to 50 minutes, until lightly browned and middle is set


Monday, January 4, 2021

Delicious Fluffy Pancakes for Two


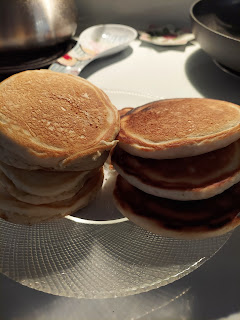
Who doesn't like pancakes?!  Next up in my 2020 recipe catch-up series is this nice recipe that makes two servings. I guess you could share them with someone if you wanted to.  But I like to eat one when I make it on the weekend, and save the other serving for Monday morning. 

I first made it early this fall and I've had it several times since. Pictured above is a stack served with light margarine, bourbon-vanilla maple syrup, and toasted pecans. Pictured below is a stack made with sprinkles.  You could make fewer, bigger cakes, but I like a tall stack of smaller ones.  Because it just seems more fun that way!


Ingredients:

  • 1 cup all-purpose flour
  • 2 Tbsp. sugar (or less, if you prefer)
  • 2 tsp. baking powder
  • 1/2 tsp. salt
  • 1 egg
  • scant 2 Tbsp. vegetable oil
  • 3/4 cup milk
  • 1/4 tsp. vanilla (or to taste)


Directions:

  1. Combine flour, sugar, baking powder, and salt.  Whisk or stir with a fork to blend
  2. In a small bowl, lightly beat egg.  Add milk, oil, and vanilla.
  3. Stir to blend.
  4. Spray skillet/griddle with non-stick spray
  5. Use a 1/4 cup to measure out batter onto skillet
  6. Cook on one side until bubbles are breaking all over the top
  7. Flip and cook until bottom is browned. 


Sunday, January 3, 2021

Holiday Baked Fruit: Perfect for a Crowd


With a 4-day work holiday for New Years, I'm working to get caught up on a bunch of stuff: sleep, housework, recipes, etc.

This is an old favorite from my mom's recipe cards, labeled as being from "Taste of Farmland" magazine.  You could swap out whatever fruit you want and use the fruity liquor of your choice.  For example, I couldn't find pineapple chunks this holiday, so I used an extra can of pears.  And I didn't have any orange liquor, so I used Chambord.  Oh, and I added dried strawberries, just for kicks!  

Also, while it makes a huge batch, it keeps well.  I had several servings over the Christmas week, but I have some in my freezer for later.  It can be served warm or cold, but my favorite is warm.      

Ingredients:

  • 1 can apple pie filling
  • 1 can cherry or strawberry pie filling
  • 1 can mandarin oranges, drained
  • 1 can pineapple chunks, drained
  • 1 can pear halves or slices. drained
  • 1 can sliced peaches, drained
  • 12 oz. pitted prunes
  • 2 to 4 Tbsp. butter or margarine
  • 1/4 to 1/3 cup orange liquor or brandy (optional)
  • dash of salt

Directions:

  1. Combine fruit
  2. Place in greased 13x9 baking pan
  3. Sprinkle with a smidge of salt, and dot with butter and liquor/brandy
  4. Bake at 350°F for 1 hour.


Thursday, August 6, 2020

Apple Cheesecake Quesadillas


A friend of mine regularly posts delicious-looking recipes on his social media.  One day this spring he posted this recipe for apple cheesecake breakfast quesadillas.  I swapped out some of the sugar, added more cinnamon, nixed using a hand mixer, and decided it didn't have to be for breakfast!  Here it is:

Ingredients:
  • 2 flour tortillas
  • 2 large spoonfuls of whipped cream cheese 
  • 1 packet splenda
  • 1/4 tsp. vanilla
  • 1/8 to 1/4 tsp. cinnamon
  • 1/2+ small apple, thinly sliced
  • cinnamon sugar


Instructions:
  1. Mix cream cheese, sugar, vanilla, and cinnamon until smooth and creamy.
  2. Spread half on one tortilla and half on the other. 
  3. Top one tortilla with apple slices and sprinkle with cinnamon sugar. 
  4. Place other tortilla on apples (cream cheese side down, obviously)
  5. Heat skillet and spray with non-stick spray.
  6. Cook quesadilla until golden brown on one side
  7. Flip and cook other side. 
  8. Slice and serve warm

Monday, April 2, 2018

Nutella Cheesecake Crescent Ring Recipe: For Coffee Station Grand Opening Day


We used to have an EXTREMELY sad break area by my office suite at work.  It is the lobby of the museum's freight elevator, has industrial grey floor and white walls with strangely-dim recessed lighting, and was home to a table and a few relatively uncomfortable chairs.  The one good thing was that we had a water filter/dispenser that would provide good, clean water in both the cold and hot varieties.  Perfect for a nice cuppa tea or for refreshing hydration.  It is notable that I work on the 2nd floor and this is the only work floor in the building that didn't have a full-on "Coffee Station."  That's right: B, A, 1, and 4 all have coffee stations, but 2 didn't. (I know what you are thinking: but what about the poor people on level 3?  Well, 3 doesn't have one because it isn't a real office floor. That is the floor the museum exhibits are on and only a couple of people have their offices there.)  

For a while now the powers that control the facilities aspects of the building have been saying that they might upgrade this space.  Ok, I'm gonna be honest with you: For literally *years* they have been going back and forth about this.  Late last year they finally committed to it and they removed our water cooler/heater to prep for it...even though the water cooler/heater was on the other side of the area from the construction...and then they did nothing for several months.  It was amazing when they started working on it for real, though not surprising that it took several extra weeks to get the water-bottle filler (the replacement for the water cooler), coffee-maker, and mug-washer to work.  

What's a mug washer, you ask?  That is a great question and thank you for asking!  Since the coffee station has a sink with hot water and a dish-soap dispenser, it might seem like a completely useless piece of equipment that just takes up valuable countertop real estate and is a waste of money. I wouldn't really disagree with any of that.  *But*, since we are only the second area to get one (the first being the 4th floor were all the high muckety-mucks work), I'm pretty OK with it.  Also, it is basically a car wash for mugs, and since I like to go through car washes--usually with my music blaring--I don't begrudge my mug the same experience.   

Since the coffee station is now fully operational, I thought we needed to celebrate it.  (And yes, the phrase "fully operational" in reference to any kind of station should make you think of the Emperor saying, "Now witness the firepower of this fully ARMED and OPERATIONAL battle station!"  What can I say? Star Wars nerd over here.)  I unilaterally decided Monday, April 2nd would be the Grand Opening of the station.  On Sunday I was alone for Easter and so I had plenty of time to make a batch of cookies and a Nutella-cheesecake crescent ring.  Then I gathered up the snack food that didn't get consumed at work on Saturday, the giant container of cocoa I bought for D&D brunch, and some half-and-half.  And it made the morning much better for a number of people!

The danish/crescent ring was REALLY GOOD!  Also very sweet, but it is called Nutella-Cheesecake so people should have expected that, right?

My recipe is based off of this one, but--as usual--I made some changes.  Also, this danish doesn't need any sort of glaze.  It might look nice, but the thing is 100% sweet enough without it.  I'm telling you: don't do it! 

Ingredients:
  • 2 tubes Pillsbury Crescent Rolls
  • 1 8 oz package cream cheese, softened
  • 1/2 cup granulated sugar
  • 1/2 teaspoon vanilla extract
  • 1/2 (plus or minus) cup Nutella or other chocolate hazelnut spread  

Directions:


  1. Preheat oven to 350.
  2. Line a cookie sheet with aluminum foil and spray with nonstick spray.
  3. Unroll crescent rolls and separate them into individual triangles. Arrange the triangles in an overlapping circle on the the pizza pan with the points out. (I originally used only 1 1/2 tubes of crescent dough, but this ended up with bigger spaces and some of the filling oozed out.  This wasn't bad, but use all of both and it should be better.)
  4. Gently press the dough together where it overlaps.
  5. Mix the cream cheese, sugar, and vanilla together until smooth (you might want to use a mixer, but I did fine with just a sturdy spatula) 
  6. Spoon a generous dollop of the cream cheese mixture in the center of the base of each triangle. (Only use about half of it...Don't use it all!)
  7. Mix the chocolate hazelnut spread into the remaining cream cheese filling.
  8. Drop the chocolate filling between cream cheese filling.
  9. Drag a spoon around the top of the dollops in one circle, evening them out on top
  10. Fold the points over the filling and tuck them into the center of the ring, pressing gently.

  11. Bake at 350 for 20-25 minutes.  Cool before serving.  Store covered in refrigerator. 


Monday, March 26, 2018

Somali Banana Fritters


The Minnesota Historical Society Press is publishing a cookbook of Somali foods this summer.  They invited employees to try the recipes and bring them in to be photographed for the book.  I decided to try something that would let me learn a new skill: the banana fritters.

I had all the ingredients for the recipe, but I have not deep-fried anything since college. (Back then we made Moldovan mushroom- and cheese-stuffed mamalyga balls for my Russian food/culture/history class in the shared kitchen in the basement of Fitch.  Mmmm.  Those were good.  I should make them again some time!)

The recipe as given was not really very descriptive at all. Among other things, it said that the batter could be made in a blender.  That is just not true!  It is much too thick with 2 1/2 cups of flour in it.  I also had to look up directions about the actual frying--how hot to make the oil, in particular.

Because these were for a photo shoot, I was really worried about making them perfectly round.  It wasn't really possible, since they are fritters and not shaped donuts.  Ultimately, they turned out pretty good and I can't wait to see the photo in the book!


Ingredients:

  • 1 cup milk
  • 1 egg
  • 2 bananas, mashed
  • 1 teaspoon vanilla
  • 2 1/2 cups all purpose flour
  • 3 teaspoons baking powder
  • 1/4 cup sugar
  • pinch of salt
  • 1/2 teaspoon cinnamon
  • 1/2 teaspoon cardamom
  • vegetable oil for frying
  • powdered sugar for sprinkling

Directions:
  1. Place all the ingredients except for the oil and powdered sugar in a bowl and mix into a thick batter with mixer.  Alternatively, place ingredients into food processor and process into batter.  Note: Batter will be probably be too thick for a blender.   
  2. Batter should be thick and sticky.  Add more flour if it is runny.
  3. Let batter sit while heating oil.
  4. Pour vegetable oil into a heavy pan or pot, to a depth of at least 1 inch
  5. Heat on medium until oil is 350 degrees Fahrenheit.  If you do not have an oil safe thermometer, you can use one of the following methods to check the temperature:
    • Dip the handle of a wooden spoon or a wooden chopstick into the oil. If the oil starts steadily bubbling, then the oil is hot enough for frying. If the oil bubbles very very vigorously, then the oil is too hot. If very few bubbles pop up, then it’s not hot enough.
    • Drop a single kernel of popcorn into the oil as it is heating. The kernel will pop as the oil reaches between 350 and 360 degrees.
  6. Drop spoonfuls of dough into the heated oil. Large dough spoonfuls may not cook through very well.  
    • Hint: Do not put too many dough dollops in the oil at a time (2 to 4 is plenty).  Putting too much dough in the oil at once will lower the temperature. 
  7. Let dough cook until light brown, flipping once if they do not flip themselves. 
  8. Remove fritters from oil with a slotted spoon and drain on a plate or cooling rack lined with double-thickness of paper towels.  
  9. Let cool and sprinkle with powdered sugar for serving.  
Good as a substitute for donuts (or donut holes!) for breakfast, but they are more traditionally served with coffee or tea as a snack.  They are only crispy the day they are made, but still good the next day.     


Monday, February 20, 2017

Chocolate-filled Croissants: Valentine's Treat #2


Since a package of cinnamon rolls only makes 8 treats--and I wasn't sure of success--I decided to make another type of small-batch, easy treat.  This is something I've made before, and they are fast and easy.

The only rough part is that they call for nutella or other chocolate spread.  Which isn't terrible, but then I have left-over nutella.  Which means that at some point I end up eating a spoonful out of the jar.  Again, not a terrible hardship.  But it is a little shameful, and a little bad for my healthy-eating goals.  In this case, however, I already had a partial jar, so this recipe was actually helpful.

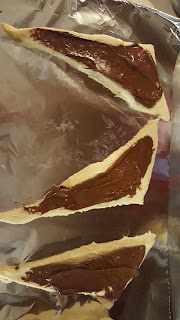
All you do is unroll the Pillsbury crescent rolls, spread with a spoonful of nutella, roll up, and bake.  Be sure to roll from the wide end toward the point, and to put the point on the bottom before baking.


Heart-Shaped Cinnamon Rolls: Valentine's Day Treat #1


I was looking for something festive, but easy to make to share with my co-workers on Valentine's Day, obviously I went on Pinterest.  Well, not obviously.  But that *is* a good place to just see a bunch of ideas in one place.  I saw this recipe's photo, followed it to the Pillsbury site, and thought: "Dang!  Easy, cute, cheaper than bakery cinnamon rolls.  A winner!"  

Well, it turns it it wasn't as easy as I thought.  "But, why?" you might ask.  Well, apparently the Pillsbury people make several different kinds of cinnamon rolls and they are relatively different...and the vital preliminary task of unrolling the cinnamon rolls is made significantly harder if they are not technically rolled in the first place.  Yep, somehow I managed to buy the type of rolls that are more of a solid roll with cinnamon stuff on top.  


"Ok.  No problem," I thought.  I can do this.  And I did!  They turned out pretty cute, actually.  Here's what I did:

1. Take a cinnamon roll and rip it in half.  Then stretch each half out and pinch ends together to made one long piece.  (Now, if I'd really been thinking, I would've just cut a spiral myself.  But did I do that?  Uh, no.)


2. Fold long piece in half and pinch bottom together.


3. Roll under loose ends to make a heart-shape


4. Spray an 8 or 9 inch round pan with non-stick spray and place hearts around edge, points to the center


5. Bake according to the package directions


6. Separate the rolls and then use frosting that came in package, if you like.  (I left mine plain and brought the frosting and a knife, so that people could add as much or as little as they liked.)


Tuesday, November 29, 2016

Thanksgiving leftovers breakfast bake for one


I've seen a whole bunch of recipes related to Thanksgiving leftovers, but most of them were these tremendously huge pans full of...well....everything.  Some, though, were breakfast bakes that looked really tasty and used eggs to hold it all together.  I had neither super-tons of leftovers, nor a crowd of people to eat them.  But I figured that I could just use small amounts in a smaller pan and it would probably turn out OK.  I was right!
Ingredients
  • Already-made stuffing
  • 2 eggs
  • deli turkey
  • cooked carrots
  • shredded cheese
  • salt and pepper

Directions


  1. Preheat oven to 350 degrees
  2. Put stuffing in small casserole container, enough to cover bottom of dish. (My container here is about the size of a cereal bowl.)
  3. Lightly press down stuffing 
  4. Chop up turkey and carrots.
  5. Add 2 lightly-beaten eggs
  6. Add eggs to turkey and carrots
  7. Add shredded cheese and then stir
  8. Pour over stuffing

  9. Bake for 30+ minutes, until eggs are cooked
  10. Sprinkle top with a bit more cheese and put back in oven for 3 or 4 minutes, until cheese is melted.