Monday, March 9, 2020

Lemon Chiffon Cake


My mixer broke in August, right as I was finishing practice baking for the State Fair.  It was terrible timing, but I was lucky to have several friends who offered to loan me their stand mixers for the duration, so I was able to finish my recipes!

Since there aren't any authorized repair shops in the entire state of Minnesota, I contacted the nice folks at Kitchen Aid and they told me how to get my mixer repaired.  They sent me a giant box with packing materials and I sent my beloved red mixer off to them in the Fall. My mixer finally got back to me in January, right as rain. 

To celebrate, I wanted to try something that would use the full power of the stand mixer.  So chiffon cake, it was!  This recipe was from King Arthur Flour and it was SO GOOD.  Everyone at work liked the texture and the flavor, too.  It would probably be even better served with berries or with a bit of lemon drizzle, but plain worked just fine.  Also, this was the first time I've ever used Grandma McElroy's square angel food cake pan.  It was a very cool shape and the cake came out just like a regular round one would. 
   
Ingredients:

  • 2 cups (241g) all-purpose flour (NOT cake flour)
  • 1 Tablespoon baking powder
  • 1 1/2 cups (298g) white sugar
  • 1 teaspoon salt
  • 1/2 cup vegetable oil
  • 1 cup water
  • 8 large eggs, separated, at room temperature
  • 2 teaspoons vanilla extract
  • 1 teaspoon grated fresh lemon peel
  • 1 1/2 teaspoons lemon extract
  • 1 tablespoon lemon juice
  • 1/2 teaspoon cream of tartar

Directions:

  1. Preheat the oven to 325°F. 
  2. Sift flour, baking powder, sugar, and salt into a large bowl.
  3. Make a well in the center of the dry ingredients and add (in order) the oil, water, egg yolks, vanilla, grated lemon peel, extract, and 1 tablespoon lemon juice.
     
  4. Mix until smooth; scrape the bowl and mix for 30 seconds more.
  5. In a separate bowl with clean beaters, combine the egg whites and cream of tartar. Whip until very stiff peaks form.
  6. Fold one quarter of the beaten whites into the egg yolk mixture to lighten it up
  7. Gradually (in four additions) pour the yolk mixture back over the remaining whites, folding gently just until blended each time. 
  8. Pour the batter into a 10" angel food cake pan (original recipe called for round, but I used square!)
  9. Bake the cake for 55 minutes
  10. Increase the oven temperature to 350°F and bake for an additional 10 to 15 minutes, until a cake tester or toothpick inserted into the center comes out clean.
  11. Remove the cake from the oven, and cool it upside down.
  12. When completely cool, run a thin-bladed metal spatula or knife between the cake and the pan, and turn the cake out onto a serving plate.

    Note: The texture allowed for fairly thin slices, which would be nice if serving a big group, especially if there were extras like fruit or ice cream.  


Mushroom, Chicken, and Rice Casserole


This is another of my new, (at least relatively) healthy recipes for January.  It turned out to a be a very nice, comfort-food type of recipe.  Very easy to make and my kitchen smelled amazing as it baked!

Ingredients
  • 1 cup uncooked long grain rice (I used basmati, because that's what was in my cabinet)
  • 1 10.75 oz. can of condensed cream of mushroom soup (I used a healthy version with less sodium and fat, and could probably use cream of chicken, celery, or whatever)
  • 1.5 cups water
  • 1 envelope onion soup mix, dry
  • 8 oz. fresh mushrooms
  • 1 pound chicken breasts, preferably 3
  • Black pepper
  • Cashews for the top (original recipe called for toasted slivered almonds, but I don't have those)
Directions
  1. Grease 2 quart casserole dish
  2. Preheat oven to 375°F
  3. Sliced and saute mushrooms, cooking until soft and liquid is mostly gone
  4. Put uncooked rice in dish
  5. In a bowl, mix water, dry soup mix, condensed soup, and mushrooms.  Stir to blend
  6. Pour over rice and mix together.
  7. Put chicken in the rice mixture (actually push down into the mixture) and sprinkle with pepper
  8. Cover dish with foil and bake for about an hour, or until rice is tender and chicken is cooked.
  9. Uncover dish, sprinkle top with nuts, and put back in oven for 5 minutes.


Wednesday, January 15, 2020

Baked Falafel


Ingredients:

  • 1  medium bunch fresh cilantro, chopped
  • 1 medium onion, thinly sliced
  • 1 1/2 tsp. minced garlic
  • 1 tsp. ground cumin
  • 1/2 tsp. salt
  • 1/2 tsp. ground pepper
  • 15 oz. can of chickpeas, drained and rinsed
  • 2 Tbsp. olive oil (could use a bit less, or swap for tahini)
  • 1/4 cup panko breadcrumbs


Instructions:

  1. Line baking sheet with foil, put it in a cold oven, and preheat oven to 450°F
  2. Chop cilantro, onion, garlic, cumin, salt, and pepper. (The original called for using a food processor, but I don't have one.  I tried using my blender, but it didn't work.  So I did little batches in the hand chopper I use for nuts and stuff.)
  3. Chop/puree chickpeas with oil to make a paste (for this I did use my blender).
  4. Mix chickpea and cilantro mixtures together with panko breadcrumbs.
  5. Form 2 Tbsp. scoops of mixture into patties.  
  6. Remove baking sheet from oven, spray foil with nonstick spray, and add patties.
  7. Bake 20-25 minutes, flipping halfway through--until crispy.  
  8. Serve with cucumbers, pita bread, tomatoes, tzatziki, or etc.  
(I considered this 2 servings)


Slow-cooker Greek Chicken with Tzatziki Sauce

I was looking for a new slow cooker recipe and this one for Greek chicken with tzatziki sauce is a keeper!  It's based on a recipe I found online, but as usual I changed it up just a bit.  

Ingredients for Chicken

  • 2 lb boneless skinless chicken breast
  • 1 onion chopped (I used a sweet yellow, but you could use basically any kind, I think)
  • 1 tsp. (2 cloves) garlic, minced
  • 1 tsp dried oregano 
  • 1/2 tsp salt
  • 1/2 tsp pepper
  • 3 Tbsp olive oil
  • 1 Tbsp red wine vinegar
  • Juice of 1/2 medium lemon
  • 1/3 cup water

Ingredients for Tzatziki Sauce:

  • 2 cups plain, fat free greek yogurt
  • 1 cucumber, finely grated
  • 1 1/2 tsp (2 to 3 cloves) garlic, minced 
  • 1 Tablespoon white wine vinegar
  • 1 teaspoon dried dill 
  • 1 teaspoon dried oregano 
  • Salt and pepper to taste
  • Juice of 1/2 medium lemon
  • 1 tablespoon extra-virgin olive oil

Options for serving accompaniments:

  • warm pita bread
  • red bell pepper
  • romaine lettuce or spinach
  • cucumber 
  • tomatoes
  • feta cheese crumbles
  • kalamata olives
  • On top of a salad

Instructions

  1. Spay slow cooker container with cooking spray. 
  2. Add the chicken at bottom of the slow cooker. 
  3. In a small bowl combine onion, garlic, oregano, salt, pepper, olive oil, red wine vinegar, lemon juice, and water. Pour over chicken. 
  4. Cook on low for 6-8 hours or high for 4-6.
  5. Shred or chunk chicken.  
  6. Make the sauce: In a medium bowl combine all sauce ingredients. Refrigerate for 30 minutes to let the flavors blend.
  7. Prepare chicken on warm greek pita bread with desired veggies and sauce on top.  Or make a salad, top with chicken, and use sauce as dressing. 

Saturday, February 9, 2019

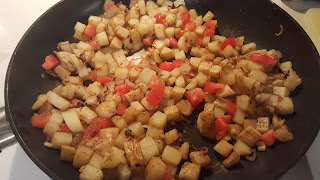
Chicken with Potato, Spinach, and Tomato Hash


I was recently in Target and bought a Local Crate, a meal kit box that includes ingredients sourced from local farms. It was a great deal because it had a $5 off coupon slapped on the outside.  Apparently they regularly throw coupons on them the day of or before their sell by date.  It worked for me, because I was headed home to make dinner, anyway.  

The Crate I bought was Italian Chicken with Roasted tomatoes, baby kale, and potatoes.  I made the recipe and it was pretty good.  Also, the recipe itself was nice, especially if you are a novice at cooking or are just trying a new technique.  Not only is it illustrated, but it has definitions of cooking terms. 


The only issue was that the original called for using a cast iron skillet.  I do have one, but it is too small.  Instead, I used a skillet on the stove and a baking dish for the oven.  It was more dishes, but it worked just fine.

As I started eating the finished meal I immediately thought: why did they put kale in this instead of spinach?  Baby kale is quite obviously the best of all kinds of kale, but good kale is still...you know... kale.  And anyone with any sense at all will admit that kale is basically bad spinach.

(OK, the last statement isn't true.  I had no idea that kale was so controversial and genuinely thought people just said they liked kale because it is supposedly healthy.  It allows them to be all superior with phrases like "I'm eating a FANTASTIC kale power salad/smoothie/quinoa bowl..." or whatever.  But when I commented about baby kale on my facebook page, people felt pretty comfortable being strongly pro-kale.  I guess some people really do like it?  I will never really understand it, but to each their own.  But still...it's just bad spinach.)

After my "it should have had spinach" thought, I wondered if I could make the meal easier/cheaper/healthier to reproduce in other ways, too. Among other things, I decided to nix the oil and use Roma tomatoes instead of roasted ones.  Here's what I made from scratch on my own.  It turned out really well, though if I'm being totally honest it would probably be even better with some crumbled bacon mixed in there.

Ingredients:
  • 1 shallot, peeled and thinly sliced
  • 2 gloves garlic, peeled and minced
  • 1 Roma tomato (or another kind of "solid" tomato), chopped
  • 2 medium potatoes, scrubbed and chopped into 1/2 inch cubes
  • 2 chicken breasts
  • 2 Tbsp. Greek yogurt (or you could use sour cream)
  • 2 Tbsp. water
  • Fresh baby spinach (I used two big fistfuls from a 1 lb. box, but you could certainly use more!)
  • salt and pepper
  • other spices as desired--I used a few shakes of roasted garlic powder and some lemon pepper
    • Note: Roasted garlic powder is NOT regular garlic powder.  It has a much mellower and less sharp/harsh taste.  In fact, it tastes like--gasp!--roasted garlic instead of raw garlic.  They sell it at Penzey's, a company that has wonderful products, but also a wonderful sense of corporate responsibility and social involvement.  I'm always really happy with what I get from them.  
  • non-stick spray or oil
Directions:
  1. Preheat oven to 400 degrees F
  2. Heat a large skillet pan to a medium-high.
  3. Season chicken with salt and pepper
  4. Spray skillet with non-stick spray and sear chicken on both sides until golden brown (2 to 3+ minutes per side.
  5. Put chicken on a plate and then turn the heat down to medium.  
  6. Use the same pan to saute the shallot until translucent (1 to 2 minutes)
  7. Add garlic and potatoes and saute, stirring occasionally and scraping up any bits sticking to the bottom
  8. Cook until potatoes start to brown (7+ minutes)
  9. Stir tomatoes into potatoes
  10. Transfer to baking dish sprayed with non-stick spray. (I used a deep ceramic pie-type pan, but a pyrex would work, too)
  11. Nestle chicken into the hash
  12. Cover with foil (or, you know, forget to do that...it'll probably turn out OK.  Mine did!)
  13. Bake for 15 to 20 minutes or until potatoes are tender when stabbed with a fork and chicken is cooked through.

  14. Take pan out of oven and transfer chicken to a surface to "let rest"
  15. In a small bowl, mix water, yogurt, and a pinch of salt and pepper and the other spices that sound good to you.

  16. Drizzle over hash and fold in spinach
  17. Stir/toss until spinach is wilted and veggies are coated in cream sauce
  18. If you need to--if your dish isn't big enough to fold all the fresh spinach into, for example (not like that happened to me, or anything.  *Definitely* not. 😉)-- you can put the pan back in the oven for a minute or two to help the spinach wilt more quickly and with less stirring
  19. Divide hash between two plates and serve with chicken.  I recommend slicing up the chicken and stirring it into hash.

Makes 2 servings

Saturday, February 2, 2019

Pasta with Veggies and Peanut Sauce


One of the publishers at ALA Midwinter always gives away their display books to people who can answer 3 trivia questions.  Of course I had to try to win one...and I did.  Called "The Clueless Vegetarian: a cookbook for the aspiring vegetarian," I figured it would have some good ideas.  And after taking a look at it, I think it does!

The first recipe I tried was one for "Spicy Peanut Pasta."  I made a few changes to make it easier and healthier: swapping fresh veggies for frozen, adding more vegetables and sauce, using whole wheat pasta, and dividing it into more servings.  (For some reason the book said a full pound of pasta would be only make 4 servings, but I divided it into 7).

Sauce Ingredients:

  • 3/4 cup smooth peanut butter
  • 3/4 cup hot water
  • 3 Tbsp. soy sauce
  • 3 Tbsp. rice vinegar
  • 2 tsp. vegetable oil
  • 3 cloves garlic
  • ground red pepper flakes (I did about 6 shakes from my small shaker, could definitely have done more)

Pasta Ingredients:

  • 1 lb. whole wheat spaghetti
  • 1 Tbsp. vegetable oil 
  • 1/2 medium onion, chopped
  • 2 tsp. fresh ginger root, finely grated
  • 2 medium carrots, coarsely grated
  • 2 packages frozen steam-in-bag stir fry mixed vegetables
  • 1 package frozen steam-in-bag cauliflower
  • green onions, optional 
  • roasted peanuts, optional 


Directions:

  1. Add all sauce ingredients together in a blender and blend until smooth
  2. Cook pasta until al dente, drain, and rinse with cool water
  3. Heat vegetables in the microwave for less time than directed, just long enough to be unfrozen/warmish, but not to thoroughly heat.
  4. Heat oil in large pot (I used the same one that I cooked the pasta in), add onion and ginger, cook for 1 to 2 minutes over high heat.
  5. Add veggies and grated carrots and cook until carrots are tender and other veggies are thoroughly warm
     
  6. Add cooked pasta and stir, then heat for a minute or two
  7. Add sauce and stir, cooking until everything is heated through

  8. Divide and top bowls with peanuts and/or green onion, as desired. 

Organizing the most unorganized of kitchen drawers


Before I left for the ALA Midwinter meeting in the last week of January, I decided to do a bit of an organization project in my kitchen.  Basically I was tired of raking around in my "other kitchen stuff" drawer looking for what I needed to use.  On top of everything else, some of the things in the drawer are stabby (or grate-y)!

I used some sturdy cardboard from a box, wrapped the pieces in wrapping paper--to go with the red theme in my kitchen--and put them in diagonally.  They are held in/up with scotch tape at the moment, and between that and the stuff in the sections, it seems to be holding up.  
One section has my tea stuff, one has measuring spoons, one has measuring cups, and one is everything else. 

I'm sure this will not be a permanent change--I should use contact paper or something that is more heavy duty--but it's working well for now and I feel good about at least one area where I'm being more organized!