Saturday, April 14, 2018

Peppermint-filled Chocolate Bundt Cake


Since it is blizzard-ing outside, I'm catching up on a few winter recipes.  This one is for a really nice winter cake.  I mean, I suppose you could make it anytime you wanted, but the chocolate-peppermint combo is pretty classically winter-y.    

Every year at the holidays there is a pot-luck party at work, held by the Collections Department on level A.  But they invite us in Reference and people who have retired, too, and it is usually a lovely time.  They even have a white elephant gift exchange.  Side note on the white elephant exchange: One year I got a cherry-pitter called a "cherry chomper."  It looks like a little cartoony guy with an open mouth.  You put a cherry in his mouth and push down on his head and it pits the cherry.  This  small and hilarious item pretty much changed my life during cherry season.  Fresh cherries in greek yogurt are amazing!

Anyway, for the lunch party in December 2017 (a few months ago) I made a chocolate-peppermint bundt cake.  It was based off this one, but I subbed out the white peppermint bark ganache.  It was super yummy.  My advice would be to do the glaze and topping right before serving.  I did it the night before and it wasn't as cute as for the party as I hoped.    


Ingredients--Cake:
1 regular chocolate cake mix
1 regular package chocolate pudding (just the dry mix)
1 cup sour cream
1 cup vegetable oil
4 eggs
1/2 cup warm water
Optional: If desired add 1-2 tsp of pure peppermint extract (be sure it is peppermint, not just mint.)

Ingredients--Peppermint Cream Cheese Filling:
8 oz. cream cheese, softened
1 egg (at room temperature)
1/4 cup granulated sugar
2 tsp pure peppermint extract
2 tbsp crushed candy canes

For Topping:
chocolate frosting in a can 
crushed candy canes 

Directions
  1. Preheat oven to 350 degrees
  2. Combine all cake ingredients until combined.  
  3. Spray bundt cake pan well with non-stick spray.  (If you have problems with cake sticking in your pan, "flour" the pan using cocoa powder.)
  4. Combine filling ingredients (except candy) and mix until creamy.
  5. Stir in candy canes.  
  6. Spoon 1/3 of batter into pan
  7. Carefully spoon filling in a ring, try not to let the filling touch the pan on inside or outside. 
  8. Spread the rest of cake batter over filling
  9. Bake for 50-55 minutes, until toothpick comes out clean
  10. Allow to cool and top as desired  Suggested topping: Heat up frosting in the microwave until it is a glaze-like consistency (it only takes a few seconds, and be careful not to burn it).  Drizzle over the cooled cake and sprinkle with crushed candy canes.  
  11. Keep refrigerated


Friday, April 13, 2018

Chicken Cordon Bleu Casserole


In my on-going quest to make meals that produce good lunch-/dinner-time leftovers, I tried this chicken cordon bleu casserole.  I made it healthier with some swaps--2% milk for the half and half, lower fat cream cheese, etc.--and it was a winner.  It was a little pricey to make when considering it as a single dinner, but if you consider that I got so many meals out of it, it really wasn't too bad. 

Also, I'm happy to say that this was my first opportunity to use my new, matching food containers.  Nothing like buying a full set of containers from Sam's Club and then actually using them...neatly stacking leftovers in my fridge.  


Ingredients:
  • 12 ounce package of no-yolk egg noodles
  • 3 cups 2% milk (recipe called for half & half, but 2% milk worked really well)
  • 1 can (10.75 oz.) Cream of Chicken and Herb soup
  • 4 oz. reduced fat, spreadable cream cheese (softened)
  • 4 Tbsp. grated Parmesan cheese, divided
  • 1/2 tsp. dried roasted garlic
  • 1/2 tsp. garlic powder
  • 1/2 tsp. salt
  • 2+ tsp. dijon mustard 
  • 1/4 tsp. nutmeg
  • 1/4 tsp. black pepper
  • 2 to 3 chicken breasts--or equivalent, cooked and roughly chopped (I cooked up some frozen chicken breasts, but rotisserie chicken would also be tasty)
  • 1 lb. cooked/smoked ham, roughly chopped
  • 3 cups shredded cheese, be sure it is all or mostly swiss (I used one 8 oz. block of swiss that I shredded and a handful of pre-shredded mixed colby/cheddar)
  • Bread crumbs


Directions:
  1. Preheat oven to 350 degrees
  2. Spray a 9x13 baking dish with non-stick spray (I also lined mine with foil first, to make cleanup easier)
  3. Cook noodles until al dente.  Drain well
  4. Mix milk, soup, cream cheese, 3 Tbsp. Parmesan cheese, garlic, garlic powder, salt, pepper, mustard, and nutmeg. 
  5. Save back aboug 1 cup of noodles.
  6. In dish, layer 1/2 of noodles, 1/2 chicken, 1/2 ham.
  7. Drizzle 1/3 of sauce, top with 1/3 of shredded cheese.
  8. Repeat.
  9. Top with remaining 1 cup of noodles, remaining 1/3 of sauce, 1/3 of shredded cheese.
  10. Top with remaining Parmesan cheese and bread crumbs
  11. Bake for 35 to 40 minutes, until bubbly
  12. Let sit for 5 minutes or so before serving.  


Thursday, April 12, 2018

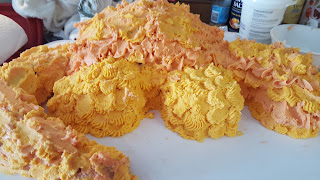
Dragon Cake: Dessert for the dragoniest Dungeons and Dragons meeting


My gaming group's April meeting was a dragon-and-spring-themed potluck.  So I made a cake shaped like a dragon!  I looked online at a variety of different ideas, but then settled on using this one as a basic pattern/idea.   (Note: this is an Instructables page, which should be OK. But it seems to want to create warnings with my anti-virus software.)
  1. Bake two 9-inch round cakes. (Mine were triple-chocolate-fudge, from a mix. Feel free to judge me, but it tasted awesome.)
  2. Cut one in half for the body
  3. Cut the other into pieces vaguely like this:

  4. Assemble the cake using buttercream frosting, cutting to shape as needed. (I used almond-vanilla buttercream, using the Wilton frosting recipe)
  5. Crumb-coat entire dragon with buttercream.  Refrigerate/freeze to solidify before decorating.


  6. Use frosting to create textured skin (I used two colors of orange-y/yellow-y frosting to try to add some depth).

  7. Decorate!  
I used:
  • Chocolate-covered grahams (cut) for spines
  • Pull-and-Peel Twizlers for flames
  • Fruit Roll-ups for wings (on straws)
  • Black licorice for nostrils and eyebrows 
  • Mini oreos (opened and with pieces of tops) for eyes
I think he turned out pretty cute. The eyebrows make him look a little sheepish, but I really thought they were needed to make the dragon less mean-looking.  


After our game night there was a lot of leftover cake, so I brought it to work to share.  People hacked it up, but they left the face.   He looked so sad and sat there for so long...

I took off the face-decorations and the cake was finished in less than 10 minutes!  


Friday, April 6, 2018

Basically Perfect Hard-Boiled Eggs: Another Skill Unlocked!


I made a whole bunch of things on Easter last weekend.  One of those things was half a dozen hard boiled eggs.  And they turned out so close to perfect that I wanted to record how I did it for next time.  (The one thing that was less than 100% was the shape.  I didn't pay attention to how they were sitting and so they aren't the same.)


  1. I filled my smallest soup pot 2/3 of the way full of cold water, added a teaspoon or so of salt and a quick glug of white vinegar--I didn't measure. 
  2. Then I placed my eggs in the water, put it on the stove and heated until it came to a good rolling boil.
  3. I covered the pot and turned it down to low for 1 minute, then turned it off and let it sit for 12 minutes.  
  4. I removed the eggs with a slotted spoon and carefully put them in a bowl filled with ice water
  5. I left them in there for a while, then removed, dried, and refrigerated the eggs. 
  6. They peeled really nicely, and were well-cooked but without any green ring around it.  
I ate the first one (pictured above) with carrot sticks and cucumber slices!


Monday, April 2, 2018

Nutella Cheesecake Crescent Ring Recipe: For Coffee Station Grand Opening Day


We used to have an EXTREMELY sad break area by my office suite at work.  It is the lobby of the museum's freight elevator, has industrial grey floor and white walls with strangely-dim recessed lighting, and was home to a table and a few relatively uncomfortable chairs.  The one good thing was that we had a water filter/dispenser that would provide good, clean water in both the cold and hot varieties.  Perfect for a nice cuppa tea or for refreshing hydration.  It is notable that I work on the 2nd floor and this is the only work floor in the building that didn't have a full-on "Coffee Station."  That's right: B, A, 1, and 4 all have coffee stations, but 2 didn't. (I know what you are thinking: but what about the poor people on level 3?  Well, 3 doesn't have one because it isn't a real office floor. That is the floor the museum exhibits are on and only a couple of people have their offices there.)  

For a while now the powers that control the facilities aspects of the building have been saying that they might upgrade this space.  Ok, I'm gonna be honest with you: For literally *years* they have been going back and forth about this.  Late last year they finally committed to it and they removed our water cooler/heater to prep for it...even though the water cooler/heater was on the other side of the area from the construction...and then they did nothing for several months.  It was amazing when they started working on it for real, though not surprising that it took several extra weeks to get the water-bottle filler (the replacement for the water cooler), coffee-maker, and mug-washer to work.  

What's a mug washer, you ask?  That is a great question and thank you for asking!  Since the coffee station has a sink with hot water and a dish-soap dispenser, it might seem like a completely useless piece of equipment that just takes up valuable countertop real estate and is a waste of money. I wouldn't really disagree with any of that.  *But*, since we are only the second area to get one (the first being the 4th floor were all the high muckety-mucks work), I'm pretty OK with it.  Also, it is basically a car wash for mugs, and since I like to go through car washes--usually with my music blaring--I don't begrudge my mug the same experience.   

Since the coffee station is now fully operational, I thought we needed to celebrate it.  (And yes, the phrase "fully operational" in reference to any kind of station should make you think of the Emperor saying, "Now witness the firepower of this fully ARMED and OPERATIONAL battle station!"  What can I say? Star Wars nerd over here.)  I unilaterally decided Monday, April 2nd would be the Grand Opening of the station.  On Sunday I was alone for Easter and so I had plenty of time to make a batch of cookies and a Nutella-cheesecake crescent ring.  Then I gathered up the snack food that didn't get consumed at work on Saturday, the giant container of cocoa I bought for D&D brunch, and some half-and-half.  And it made the morning much better for a number of people!

The danish/crescent ring was REALLY GOOD!  Also very sweet, but it is called Nutella-Cheesecake so people should have expected that, right?

My recipe is based off of this one, but--as usual--I made some changes.  Also, this danish doesn't need any sort of glaze.  It might look nice, but the thing is 100% sweet enough without it.  I'm telling you: don't do it! 

Ingredients:
  • 2 tubes Pillsbury Crescent Rolls
  • 1 8 oz package cream cheese, softened
  • 1/2 cup granulated sugar
  • 1/2 teaspoon vanilla extract
  • 1/2 (plus or minus) cup Nutella or other chocolate hazelnut spread  

Directions:


  1. Preheat oven to 350.
  2. Line a cookie sheet with aluminum foil and spray with nonstick spray.
  3. Unroll crescent rolls and separate them into individual triangles. Arrange the triangles in an overlapping circle on the the pizza pan with the points out. (I originally used only 1 1/2 tubes of crescent dough, but this ended up with bigger spaces and some of the filling oozed out.  This wasn't bad, but use all of both and it should be better.)
  4. Gently press the dough together where it overlaps.
  5. Mix the cream cheese, sugar, and vanilla together until smooth (you might want to use a mixer, but I did fine with just a sturdy spatula) 
  6. Spoon a generous dollop of the cream cheese mixture in the center of the base of each triangle. (Only use about half of it...Don't use it all!)
  7. Mix the chocolate hazelnut spread into the remaining cream cheese filling.
  8. Drop the chocolate filling between cream cheese filling.
  9. Drag a spoon around the top of the dollops in one circle, evening them out on top
  10. Fold the points over the filling and tuck them into the center of the ring, pressing gently.

  11. Bake at 350 for 20-25 minutes.  Cool before serving.  Store covered in refrigerator.