Sunday, July 24, 2022

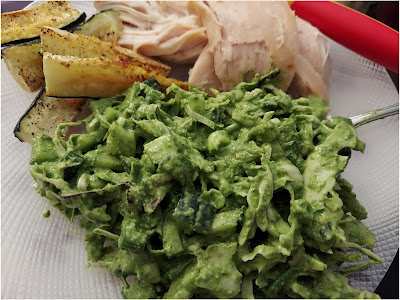
Green Goddess Salad for Summer-Time


This summer is the first summer I've ever had a CSA box.  A friend and I are sharing a mini box and it's been an adventure!  This week I needed to find something to use up a variety of the green-goodness-veggies that came in my box.  In particular I had chives and basil to use.  Since I also had cucumbers, I decided to try that Green Goddess salad that seemed to take over the internet a few months back (or was it longer?  Who knows!)

The recipe that I worked off of was this one.  I ate it as a side with a dinner and with some chicken stirred in for a hearty summer lunch, and the original author says she eats it with tortilla chips (like salsa) or on sandwiches or tacos.  I'm also pretty sure lots of things could be swapped out.  I did happen to have nutritional yeast, for example, but could see swapping that with grated parmesan (it wouldn't be vegan then, but would probably be good!).  Also, I swapped the "one head green cabbage" with a bag of pre-made cole slaw mix.  Totally worked and saved time and mess.  

Ingredients

Salad

  • 1 bag cole slaw
  • 1+ large cucumbers (I used about 1.5 medium cukes)
  • 1/4 cup chives
  • 1 bunch green onions or scallions

Dressing 

  • 1 cup basil leaves
  • 1 cup fresh spinach
  • 2 cloves garlic (or equivalent)
  • 1 smallish shallot
  • 2 lemons, juiced (about 6 to 8 Tbsp)
  • 1/4 cup olive oil
  • 1/4 cup nuts of your choice  (I used unsalted cashews and pistachios.  Original author also recommends walnuts as an option) 
  • 1/3 cup nutritional yeast
  • 1 tsp salt
  • 2 Tbsp rice vinegar 
  • Any extra chives you have on hand (optional)


Directions

  1. Wash and chop all of the salad ingredients.
  2. Place in a large bowl with plenty of room to stir
  3. Add olive oil, lemon juice, and rice vinegar to the blender first
  4. Then add the other dressing ingredients to the blender
  5. Blend until it is all blendy, and a pourable dressing.  
  6. Pour dressing into bowl and mix.

Mint Simple Syrup


With my summer CSA half-share, the early boxes have had herbs in addition to veggies.  One week I got a really nice bunch of mint and needed to determine *something* to use it for.  Since none of my current State Fair practice bakes features mint, I thought some mint syrup--for beverages, etc.--would be nice.  And it is!  

Ingredients:
  • 1 cup water
  • 1/2 cup sugar
  • 1/2 cup fresh mint leaves
Directions:
  1. Bring the water and sugar to a boil in a small pan, over medium-high heat. Whisk to dissolve the sugar.
  2. When liquid is just at a boil, add mint leaves.
  3. Reduce heat to a simmer and let cook (without stirring) until mixture is very slightly thickened (10 to 15 minutes)


  4. Remove from heat and let stand 10 to 15 minutes. 
  5. Remove and discard mint leaves.
  6. Let syrup cool to room temperature, then transfer to a covered glass jar/container. 
  7. Store in the fridge.
  8. Use in cocktails, lemonade, iced tea, etc.!


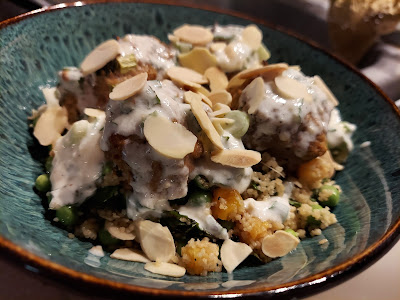
Moroccan Couscous Bowls with Meatballs


In past years, my work has sponsored field trips to various historic sites for the staff each spring or summer.  It was a sort of morale event--there was lunch, transportation, etc.  Last year, however, Covid-19 made this impossible.  But we did have a virtual event in its place: a cooking class


The institution hired a very cool chef/company called Roots for the Soul and sent participants ingredient lists. We all cooked together, and finished in time for eating at a regular dinner time.  I had a really nice time, and made a very tasty meal@  

I saved the recipe and I'm thinking I should make it again soon.  It was a very springy-summery meal!


Ingredients:

Yogurt Sauce:

  • 1 cup plain whole-milk yogurt (not Greek) 
  • 3 scallions, trimmed & finely sliced 
  • 1/4 cup mint leaves 
  • 1 garlic clove, minced 
  • 1/4 tsp red pepper flakes 
  • Salt & pepper, to taste 

Couscous:

  •  8 dried apricots, cut into bits 
  • 1/4 cup white wine vinegar or red wine vinegar 
  • 1/4 cup warm water 
  • 3 scallions, trimmed & finely sliced 
  • 1/2 cup mint leaves, lightly packed 
  • 2 cups peas, fresh or frozen 
  • 1/2 cup almonds, toasted 
  • 1 cup couscous 
  • Juice of 1/2 lemon, other half reserved for garnish 
  • 1/4 cup extra-virgin olive oil 
  • Salt & pepper, to taste

Meatballs:

  • 1 lb ground meat (I used turkey, but could be lamb, beef, impossible meat, etc.)  
  • 3 scallions, trimmed & finely sliced/chopped 
  • 1/4 cup mint leaves 
  • 1 tsp cumin, ground 
  • 1.5 tsp kosher salt 
  • 1/8 tsp cayenne 
  • 1 Tbsp dry white wine or white wine vinegar 
  • 1/4 cup breadcrumbs 
  • 1 egg 
  • Extra-virgin olive oil 

Directions:
  • BEFORE YOU START COOKING 
    1. Place apricots in small bowl with vinegar & warm water. 
    2. Soak until they are plump, about 30 minutes, then drain and rinse (if desired). 
    3. Slice and soak all scallions in ice water for 20 minutes then drain. 
  • MAKE THE YOGURT SAUCE
    1. Mix yogurt, scallions, mint, garlic and red pepper flakes in a bowl with salt & pepper, to taste. Adjust red pepper flakes, salt and pepper as needed. 
    2. Set sauce aside to let flavors develop, for at least 30 minutes. 
  • START THE COUSCOUS
    1.  Bring 1 cup of water to boil
    2. Remove from heat and mix couscous into water with a spoon. 
    3. Cover with lid and let absorb for 5-10 minutes. 
    4. Fluff with fork, add lemon juice, 1/4 cup of olive oil and generous amount of salt and pepper. 
    5. Toss throughly, let cool to room temperature. 
  • MAKE THE MEATBALLS

    1. Preheat oven to 450℉. 
    2. Gently blend ground meat, scallions, mint, cumin, salt, cayenne, wine and breadcrumbs with fingers, or wooden spoon. Be as gentle as possible to not over process meat, which will make it tough. 
    3. Once mixed well, take a small piece and fry it in small skillet. Taste cooked sample for seasoning, add more spices if needed. The meatballs should be highly seasoned. 
    4. If seasonings are to your liking, mix egg with a glue of olive oil, then add to the meat mixture gently until fully-combined. 
    5. Using a tablespoon, or scooper, shape the meat mixture into total of 16 meatballs. 
    6. Arrange all meatballs on lined baking sheet. 
    7. Bake meatballs for 8-10 minutes, or until fully cooked.  
  • FINISH THE COUSCOUS: 
    1. While the meatballs cook, gently add apricots, scallions, mint, shelled peas, and almonds to the couscous. 
    2. Adjust seasoning and add more salt, pepper, lemon and olive oil as needed. 
       
  • TO SERVE: 
    1. Divide couscous into four bowls
    2. Top each portion with four meatballs, a drizzle of yogurt sauce and lemon wedge. 
    3. Serve additional sauce on table. 


Makes 4 servings, each with 4 meatballs.  

Sunday, February 13, 2022

Buffalo Cauliflower Bites


I first made this recipe in the summer, and it was a bit too spicy for me.  I made it again today in the spirit of the Super Bowl.  This time, I added a bit more honey this time and liked it better.  Note for future: watch it towards the end, so that the extra sauce on the pan doesn't burn.   

Ingredients:

  • ¾ cup all-purpose flour
  • 1 teaspoon paprika
  • 2 teaspoons garlic powder
  • 1 teaspoon salt
  • ½ teaspoon pepper
  • ¾ cup milk
  • 1/2 to 1 head cauliflower (depending on size)
  • ¼ cup buffalo sauce
  • 2 tablespoons vegetable oil
  • 1 to 2 tablespoons honey

Directions:

  1. Preheat the oven to 450˚F. 
  2. Line a baking sheet with parchment paper.
  3. In a large bowl, add flour, paprika, garlic powder, salt, pepper, and milk, and whisk until well-combined.
  4. Break the head of cauliflower into florets, about 1½-inches wide. 
  5. Add the cauliflower florets to the batter, making sure each piece is evenly coated. 
  6. Arrange the coated cauliflower on the baking sheet. 
  7. Bake for 10 minutes, flip, and bake 10 more minutes. 
  8. In a small bowl, combine the buffalo sauce, oil, and honey and stir until evenly combined (warm for 20 seconds in microwave if necessary). 
  9. Brush the buffalo sauce mixture on the cauliflower and bake for another 20 minutes.


  10. Serve with ranch dip or dressing

Monday, February 7, 2022

Egg-In-A-Basket


One of my tasks to complete over the weekend was clearing out some old magazines.  I have a particularly hard time throwing out recipes, but I decided I would only keep things that I might realisitically make someday.  The further plan being that I would transfer each "keeper" to this blog as I make it...and I *should* make new things.  

Today I had the day off, so I made this Medditerranean-style egg-in-a-basket this morning (the recipe originally appeared in Better Homes and Gardens in July 2020).  It was a nice reward for walking on the treadmill first thing this morning.

The recipe suggested using halves of everything bagels or 1/2-inch thick bread.  However, I only had light wheat bread.  Also, it was supposed to have fresh herbs (I had dried) and feta cheese (I had shredded parmesan).  So those are the things that I used!

Ingredients:

  • Pieces of bread or bagels halves
  • Eggs (number to equal the number of pieces of bread)
  • Cherry or grape tomatoes
  • Pitted, sliced kalamata olives
  • Fresh or dried herbs, to taste
  • Crumbled feta or shredded cheese of another kind
  • Salt and pepper, to taste

Directions:

  1. Preheat oven to 400 degrees 
  2. Coat a baking sheet (or a baking sheet covered in foil) with non-stick spray
  3. Cut holes in bread (or expand holes in bagels), so each has a 2+ inch diameter hole
  4. Place bread on baking sheet
  5. Crack each egg into a hole in a piece of bread
  6. Season with herbs and salt/pepper. 
  7. Top with tomatoes, olives, and cheese


  8. Bake 10 to 12 minutes, or until bagels are toasted  and eggs are the doneness that you like (runny yolks = 10 minutes, thicker and jammy yolks = 12 minutes). 
  9. Let stand 5 minutes before serving. 


Wednesday, January 26, 2022

Slow Cooker Ham Tetrazini with Mushrooms and Peas


Did I base this recipe off of something from Taste of Home? Yeah, I did.  But did I completely change most things about it?  Also yeah.  I had to.  There were circumstances beyond my control, and I went with it.  It turned out pretty good, though, and made 6 generous portions of creamy comfort food for a cold winter day, so I have leftovers for lunches/dinners later!

Ingredients

  • 2 cans (10-3/4 ounces) condensed cream of mushroom soup, undiluted (I used the low fat, low sodium kind)
  • 3 cans sliced mushrooms, drained (or you could use 2 cups of sliced fresh mushrooms, *if you can find any at your store*)  
  • 2 cups fully cooked ham, cubed (I used two 8 oz. ham steaks and diced them up, because little hams that used to be pretty cheap were $25 at my store)
  • 1 can evaporated milk (fat free or 2%)
  • about 2 teaspoons spicy brown mustard
  • 1 package (16 oz) spaghetti (will cook before putting in slow cookr, at the end)
  • 1/2 cup shredded Parmesan cheese
  • 1 package of frozen peas (warmed/steamed before putting in slow cooker, at the end)
  • Pepper, to taste

Directions

  1. Combine the soup, mushrooms, ham, milk, mustard in the slow cooker.

     
  2. Cover and cook on low for 4 hours.
  3. Cook spaghetti according to package directions; drain. 
  4. Cook/steam peas according to package directions. 
  5. Add the spaghetti, peas, and cheese to slow cooker, then toss/stir.


Tuesday, January 25, 2022

Coffee-Walnut Cake with Coffee Buttercream


I first started working on this recipe as a potential entry in the "Ethnic Baking:Cake" category at the State Fair. While it is an English cake--rather than a Scottish one, obviously!--it is also a teatime and dessert classic.  Interestingly, the coffee flavor in the cake isn't super obvious due to the combination with the walnuts.  So if you don't like the taste of coffee, you might actually like the cake with a different flavor of frosting besides the traditional coffee buttercream.    

This recipe is based on/riffed off a few different versions I found online including this one and this one.  This one didn't win a ribbon at the 2021 State Fair, but it was popular at work and I thought it was really tasty! 


Ingredients: Cake

  • 225g butter, softened 

  • 225g caster/granulated white sugar

  • 225g self-raising flour

  • 4 eggs

  • 2 Tbsp strong, cooled coffee/espresso

  • ½ tsp vanilla

  • ½ tsp coffee extract

  • ½ tsp espresso powder

  • 50g finely chopped walnut


Ingredients: Buttercream

  • 145g unsalted butter, softened

  • pinch of salt

  • 500g powdered sugar

  • 4 Tbsp strong, cooled coffee/espresso

  • ½ tsp vanilla

  • ½ tsp coffee extract


Optional:  8 to 12 walnut halves for decorating the top of the cake 


Instructions for Baking:

  1. Grease or spray 2 round cake pans. Line the bottoms with parchment paper, grease, and dust with flour.

  2.  Preheat the oven to 350F (180C)

  3. Cream the butter and sugar together until light and fluffy. 

  4. Add one egg and thoroughly mix in.  Add ¼ of the flour and thoroughly mix.  Repeat, alternating, until remaining eggs and flour are combined in. 

  5. In a cup, stir the espresso powder, vanilla, and coffee extract into the liquid coffee, then add to the batter. Add the chopped nuts. Stir well. 

  6. Divide the cake mixture into the prepared pans and smooth tops.  .

  7. Bake for about 30 minutes or until a cake tester comes out clean. Cake will be a golden brown color.

  8. Cool in the pans for 10 minutes, then turn out and cool completely.  


Make the Buttercream and Assemble:

  1. Cream butter, then mix the other ingredients in until it is smooth and creamy.  

  2. Level cake layers if necessary

  3. Assemble with frosting between layers and on top, and then decorate

    • Traditionally, this cake has frosting between the layers and on top, but not on the sides.  It is usually decorated with a series of piped or spooned dollops of frosting with half-walnuts resting on them.

  4. Serve with tea or coffee


Serves: 8 to 12