Monday, January 4, 2021

Rhubarb Upside-Down Cake

Back in August when I was making other rhubarb-based treats, I made this cake and it was really good.  Cutting and placing the rhubarb made for a pretty design--though I obviously could've crammed more together in the center of the cake pan.  I based the recipe off this Real Simple one, but I made some changes.    

Ingredients: 

  • 1 1/4 cups unsalted butter, room temperature
  • 1 1/2 cup white sugar, divided
  • 2 cups flour (cake or all-purpose)
  • 1/2 tsp. salt
  • 1 tsp. vanilla
  • 1/3 cup plain yogurt (I used greek yogurt)
  • 1 lb. rhubarb, cleaned and cut (I did about 1 inch sticks with diagonal ends)
  • 1/2 cup packed brown sugar
  • 1 1/4 tsp. baking powder
  • 1/2 tsp. dried lemon peel (or 1 tsp. fresh zest)
  • 4 large eggs, room temperature
  • Cinnamon sugar, optional

Directions:

  1. Preheat oven to 325°F.
  2. Grease a round cake pan, line bottom with parchment, and grease parchment.
  3. Stir rhubarb with 1/2 cup of white sugar and 1/4 cup of brown sugar.
  4. Layer rhubarb in bottom of pan and add the remaining sugar mixture to it.  I made concentric circles!
  5. Whisk flour, baking powder, and salt together.  
  6. In a separate bowl beat the butter, the rest of the white and brown sugar, and lemon zest with mixer until light and fluffy, about 4 minutes.
  7. Scrape down the sides of the bowl, then beat in vanilla and eggs, one at a time. 
  8. Stir in yogurt at a low speed (the original recipe said, "The mixture may look curdled.")
  9. Gradually add flour mixture and stir to combine. 
  10. Spoon batter over rhubarb and smooth top evenly.
  11. Sprinkle cinnamon sugar on top.  
  12. Bake until toothpick comes out clean, about 1 hour and 15 minutes.
  13. Cool for 15 minutes or so, then remove from pan, upside down on a plate.  Take off the parchment carefully and serve warm (or cold).  Store in the fridge. 


Delicious Fluffy Pancakes for Two


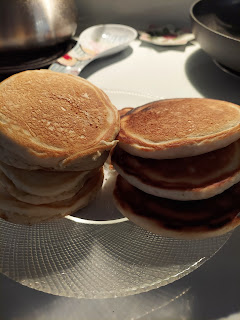
Who doesn't like pancakes?!  Next up in my 2020 recipe catch-up series is this nice recipe that makes two servings. I guess you could share them with someone if you wanted to.  But I like to eat one when I make it on the weekend, and save the other serving for Monday morning. 

I first made it early this fall and I've had it several times since. Pictured above is a stack served with light margarine, bourbon-vanilla maple syrup, and toasted pecans. Pictured below is a stack made with sprinkles.  You could make fewer, bigger cakes, but I like a tall stack of smaller ones.  Because it just seems more fun that way!


Ingredients:

  • 1 cup all-purpose flour
  • 2 Tbsp. sugar (or less, if you prefer)
  • 2 tsp. baking powder
  • 1/2 tsp. salt
  • 1 egg
  • scant 2 Tbsp. vegetable oil
  • 3/4 cup milk
  • 1/4 tsp. vanilla (or to taste)


Directions:

  1. Combine flour, sugar, baking powder, and salt.  Whisk or stir with a fork to blend
  2. In a small bowl, lightly beat egg.  Add milk, oil, and vanilla.
  3. Stir to blend.
  4. Spray skillet/griddle with non-stick spray
  5. Use a 1/4 cup to measure out batter onto skillet
  6. Cook on one side until bubbles are breaking all over the top
  7. Flip and cook until bottom is browned. 


Sunday, January 3, 2021

Grandma's Hello Dolly Cookies: aka Magic Cookie Bars


My Grandma Duple--and my aunt, apparently--used to make these, especially at holiday time.  My college (go Williams Ephs!) served a semi-giant version all-year-round.  They are delicious, gooey, and extra-easy to make.  In fact, you don't even need a bowl and can just make the whole thing in the pan.  Perfect for 2020, the year of not even wanting to wash a bowl! 

In celebration of Grandma, I decided that they would be the perfect recipe for my 2nd annual holiday-card recipe.    

Ingredients:

  • 1 stick (1/2 cup) butter or margarine, melted
  • 1 cup graham cracker/vanilla wafer crumbs
  • 1 cup chocolate chips
  • 1 cup shredded coconut
  • 1 cup nuts (pecans are the classic)
  • 1 can sweetened condensed milk

Directions:

  1. Put melted butter into square pan (9x9 or 10x10)
  2. Stir in crumbs and press into bottom of pan
  3. Layer chocolate chips, then coconut, then pecans
  4. Pour sweetened condensed milk over the top and spread to edges
  5. Bake at 325°F for 30 minutes
  6. Cool before serving

Hints:

  • Refrigerating makes them way easier to cut
  • Cut smaller for a candy tray and larger for a cookie tray
  • Waxed paper between layers will keep them from sticking
  • Swap out ingredients to experiment (different flavored chips, different nuts, etc.)
  • Don't use twice as much butter by accident (they were very tasty, but unsurprisingly overly buttery)

The handwritten card below is my mom's copy, photographed and sent to me this year.  Gotta see if I can find Grandma's copy in her recipe box...

Holiday Baked Fruit: Perfect for a Crowd


With a 4-day work holiday for New Years, I'm working to get caught up on a bunch of stuff: sleep, housework, recipes, etc.

This is an old favorite from my mom's recipe cards, labeled as being from "Taste of Farmland" magazine.  You could swap out whatever fruit you want and use the fruity liquor of your choice.  For example, I couldn't find pineapple chunks this holiday, so I used an extra can of pears.  And I didn't have any orange liquor, so I used Chambord.  Oh, and I added dried strawberries, just for kicks!  

Also, while it makes a huge batch, it keeps well.  I had several servings over the Christmas week, but I have some in my freezer for later.  It can be served warm or cold, but my favorite is warm.      

Ingredients:

  • 1 can apple pie filling
  • 1 can cherry or strawberry pie filling
  • 1 can mandarin oranges, drained
  • 1 can pineapple chunks, drained
  • 1 can pear halves or slices. drained
  • 1 can sliced peaches, drained
  • 12 oz. pitted prunes
  • 2 to 4 Tbsp. butter or margarine
  • 1/4 to 1/3 cup orange liquor or brandy (optional)
  • dash of salt

Directions:

  1. Combine fruit
  2. Place in greased 13x9 baking pan
  3. Sprinkle with a smidge of salt, and dot with butter and liquor/brandy
  4. Bake at 350°F for 1 hour.


Saturday, January 2, 2021

Crescent Roll "Pretzels"

The first food experiment of 2021 was a moderate success!  These have been on my to-try list for a while, so with the leftovers from New Years Eve, now was the perfect time.  They weren't actually pretzels, but they were distinctly pretzel-y crescent rolls, with a salty crust and a soft interior.  

Ingredients:

  • 5 cups water
  • 2 Tbsp. baking soda
  • 1 egg 
  • 1 Tbsp. water
  • 1 can Pillsbury™ refrigerated crescent rolls
  • sesame seeds
  • kosher/pretzel salt 

Directions:

  1. Prep
    • Heat oven to 400°F. Spray foil on cookie sheet with cooking spray.
    • Heat 5 cups water and baking soda over high heat, until boiling.  
    • In a small bowl, beat egg and 1 tablespoon water with fork.
  2. Roll Dough
    • Unroll dough onto work surface and separate into the triangles. 
    • Starting at shortest side of each triangle and stretching dough slightly, roll up to the opposite point.
    • Bring ends of dough together into a ring shape.  
  3. Boil Dough
    • Place 2 rolls at a time into the boiling water mixture.  
    • Cook 30 seconds. 
    • Remove with a slotted spoon and place on a paper towel (they will be gooey!)
    • Repeat with remaining rolls. 
  4. Put on the Cookie Sheet
    • Move dough to cookie sheet, spread out. 
    • Reshape them if they need it.
    •  Brush tops with egg mixture and then sprinkle each with sesame seeds and salt.
  5. Bake
    • Bake 11 to 13 minutes or until deep golden brown. 
    • Immediately remove from foil/cookie sheet.

Saturday, October 24, 2020

Asiago Mashed Cauliflower: A Birthday Side Dish Fit for a Steak


My birthday was this month, and due to the awfulness of Covid-19 I stayed home and celebrated alone.  It was a pretty big bummer, especially for such a milestone year.  But in an effort to not be so down about it, I decided to make myself a nice dinner.  Step one was looking up "best side dishes with steak recipes."

This is the first of the two new recipes I picked: asiago mashed cauliflower.  Super simple--made even easier by cutting out the "use a food processor" step, since I don't have one--and absolutely tasty in the end.  The leftovers were good both warm and cold, by the way. 

Ingredients:

  • One head of raw cauliflower
  • 1/2 tsp salt
  • 4 oz. cream cheese (I actually used 1/3 reduced fat Philadelphia Neufchâtel cheese.)
  • 1/2 cup asiago cheese, shredded
  • 2 Tbsp. butter
  • 1/4 tsp black pepper (or more if to your taste)
  • 1/2 tsp salt (or more if to your taste) 
  • Optional parsley, or whatever 

[The original recipe called for parsley, but I didn't have any.  And while I didn't miss that in the final product, I did throw in a few dashes of Penzey's Roasted Garlic.  It was a great addition, but I wouldn't recommend regular or raw garlic, as that might overpower the cheesy-ness.] 

Directions:

  1. Clean and rinse cauliflower
  2. Chop into smaller pieces, cutting out any really thick stalk bits (I probably had 6 to 8 big-ish chunks.  Nothing smaller than 1.5 inches for sure)
  3. Place cauliflower and salt in large pan/pot and add water until  it covers the veggies
  4. Bring to a boil and cook until very tender--12 to 15 minutes
  5. Drain and then cool slightly
  6. Add cream cheese, asiago, butter, pepper, salt, and whatever other optional herbs/spices you want to add
  7. Mash and stir everything all together.  I used a big whisk and that worked great!  

Monday, September 28, 2020

Snickerdoodles!


Skip to the recipe

Until 5 years ago, I had never made a single snickerdoodle.  They seemed, somehow, to be mysterious.  (Note: they are not mysterious.  But I thought that they were. I'm not sure why.)  

Now, however, they are one of my go-to cookies.  Why?  They are relatively easy to make, tasty, and since they depend on vanilla and cinnamon for their main flavor, they don't include any majorly controversial ingredients like nuts, raisins, citrus, or--gasp!--chocolate. For those folks concerned about allergies, they are an easy one for people to know if they can have or not.  They have flour, eggs, and dairy, but they're cookies, so that's obvious.  And while they work for a fall or holiday-time treat thanks to the cinnamon, they aren't really associated with either time of year.  Snickerdoodles are just as good in July with a cup of iced tea as they are in November with a mug of cider or coffee.  

My snickerdoodle recipe is courtesy of the Minnesota State Fair Creative Activities division.  In 2015, they provided this recipe and people competed to see whose were closest to the judges' vision of the perfect snickerdoodle.  It was called the Snickerdoodle Recipe Challenge and there were 234 total entries, 86 in my age category.  I didn't win a ribbon, but I will admit that mine looked and tasted pretty-dang good.  (The one in the upper-left is mine in the photo below.)   


For competition, I did all kinds of crazy, exacting things.  Like what?  Like I measured each ball of dough with a ruler to ensure that it was exactly 1.25 inches in diameter.  Like I tried the recipe with all butter, all margarine, and 1/2 of each to see which one my co-workers liked better, measured via a blind taste taste.  Like I tested baking on parchment, on foil, and on the plain baking sheet to see if it made a difference in the browning and texture.  Like I literally compared every cookie in a batch of *4 dozen* to find the most perfectly matching 4 cookies to turn in for judging.  

And ya know what?  Those things make a difference if what you want are a batch of practically-perfect-looking cookies.  But they aren't all that important if what you want are just some good-tasting, homemade cookies.    

The recipe is a simple one, I almost always have all the ingredients on hand, and it makes by a lot of cookies all at once.  It is 100% perfect to make and share, even if--or maybe especially if--the sharing is distanced.  (My most recent batch of these were made for friends and never touched post-oven, in the spirit of Covid-world.) 

So although I did a lot of experimenting within this recipe, to this day I've never used any other snickerdoodle recipe.  Why would I?  These are practically perfect!    

  • 1 1/2 cups sugar
  • 1/2 cup butter or margarine, softened* 
  • 1/2 cup shortening (I've used plain and butter flavored Crisco, and both work just fine)
  • 1 teaspoon vanilla
  • 2 eggs
  • 2 3/4 cups all-purpose or unbleached flour
  • 2 teaspoons cream of tartar
  • 1 teaspoon baking soda
  • 1/4 teaspoon salt
  • 1/4 cup sugar
  • 2 teaspoons ground cinnamon

* Most of my co-workers liked 1/2 butter and 1/2 margarine best in taste tests, but some liked all butter and some liked all margarine the best. And everyone liked all of them. So just use what you have!

Directions: 

Heat oven to 375 degrees Fahrenheit. Mix 1 1/2 cups sugar, the butter, and shortening in large bowl until creamy. Add vanilla and eggs; beat well. Sift together the flour, cream of tartar, baking soda and salt; stir into the mixture. In small bowl, mix 1/4 cup sugar and the cinnamon. Shape dough into 1 1/4-inch balls. Roll in cinnamon-sugar mixture. Place 2 inches apart on ungreased cookie sheet. Bake 8-10 minutes are until edges are set and centers are puffy. Remove from cookie sheet to wire rack. 

Yield: About 4 dozen.