Sunday, July 10, 2016

Key Lime Pie Bars


Since my one of desserts my dad particularly likes is key lime pie (Hi, Dad!)--and because I love it, too--I have tried a bunch of recipes over the years.  In fact, a little over 2 years ago, I put my go-to recipe for key lime pie on this blog.  Check it out if making a full-on pie is what you're after.  

From simple to fancied up, pies are delicious.  However, they can also be a little tricky to serve and people won't always take a whole piece of pie.  The solution to this problem lines up with a time-honored Midwestern (and especially Minnesotan) tradition: make bars instead.  Bars are a wonderful thing.  Everyone can have as much or as little as they like, they are easy to transport and serve, and even if they are fancy-as-all-get-out they aren't intimidating.  

Note: If you want to really impress people--not usually my goal, but maybe it's yours--DO NOT make bars for a party.  They can look amazing and taste like heaven, but people will still say later, "Jenny brought some bars that were pretty good."  All without any kind of tone of awe.  Believe me.  In my experience cakes, pies, and even cookies can be awe-inspiring, but bars are amongst the humblest of the baked-good brethren.  They're right in there with cobblers/crumbles.    

Anyway, a few weeks ago we had a tropical/island themed treat buffet at work as a farewell to a long-time employee.  Rather than try to work on my own pie recipe and tweak it for bars on short notice, I did some searching and found a lovely recipe on Sally's Baking Addiction.  I say lovely not just because they sounded tasty but also because her photos are absolutely mouthwatering.  But she has a successful business based on her food blog, so I refuse to feel bad about my own photos.  So there!  

I changed the ingredients slightly by omitting the lime zest and using regular bottled lime juice.  I also don't have a food processor and used a whisk and spoon instead of a mixer.  But it turned out great!  So good, in fact, that yesterday I made them again for a craft night with friends.  I was told to "bring something that goes with lasagna."  Dessert goes with everything, right?  ;)

Here's the step-by-step:

Ingredients:
Crust
  • 2 cups finely crushed, crunchy gingersnap cookies
  • 3 Tbsp. melted salted butter or margarine (I used the latter)
Filling
  • 4 ounces cream cheese, softened
  • 4 large egg yolks
  • 14-ounce can of sweetened condensed milk (not fat free)
  • 1/2 cup lime juice
Directions:
  1. Preheat the oven to 350 degrees F. 
  2. Line a 9x9 baking pan with aluminum foil, leaving an overhang on the sides, and lightly spray with nonstick spray.
  3. If you haven't already, crush the gingersnaps.  You can use a food processor if you have one.  If not, just do what I do: put the cookies in a freezer bag and use a rolling pin, or a 2 liter bottle of soda...or a glass bottle of Bacardi.  You know, whatever you have on hand :)

  4. Put crumbs in a medium bowl, pour in melted butter, and stir together
  5. Press crumb mixture evenly into pan.  I used a nice solid metal measuring cup.

     
  6. Bake the crust for 10 minutes 
  7. In a large bowl, stir and/or whisk the cream cheese until it is smooth
  8. Mix in the egg yolks 
  9. Mix in sweetened condensed milk and lime juice and whisk until smooth.

  10. All that whisking likely left a ton of air bubbles in the mixture.  Bang the bowl on the counter-top a few times to get rid of some of those. (I know that my filling mixture pretty much matches the color of my bowl, but see.... air bubbles!)

  11. Pour into warm crust.
  12. Drop the pan a few inches onto the counter-top a few times to get rid of more air bubbles
     
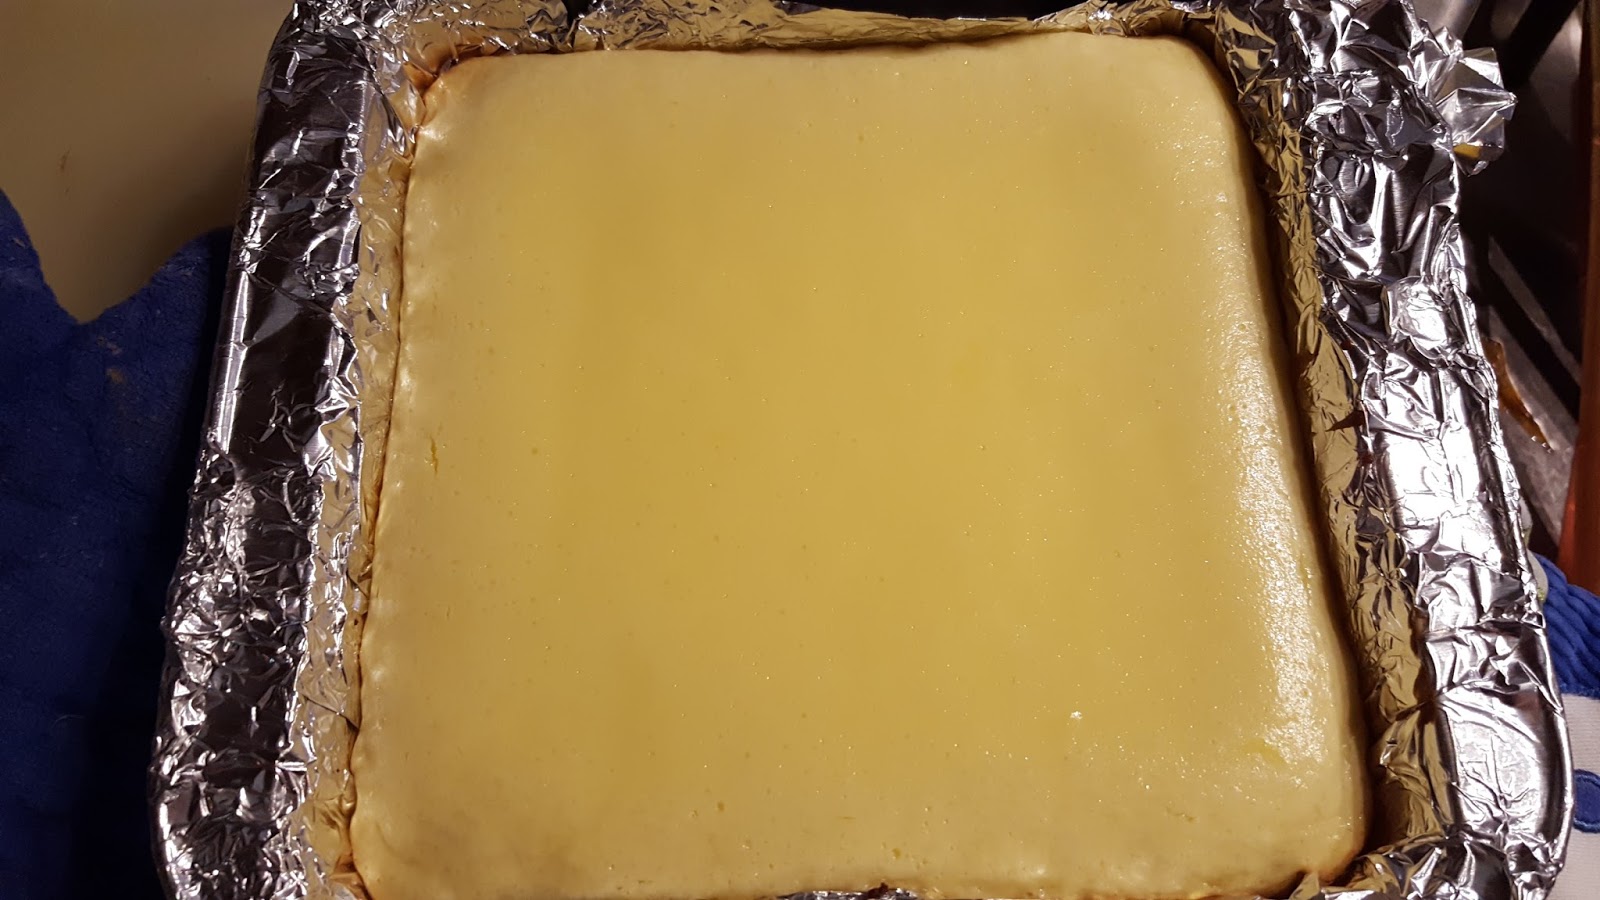
  13. Bake for 15 to 18 minutes or until the edges of the bars start to brown and the center is relatively solid.  The edges will also be a bit puffy, like in the photo below.

  14. Allow bars to cool to room temperature
  15. Once at room temperature, refrigerate for at least 2 hours or until cold
  16. When you want to serve, lift foil out of pan, peal off sides of bars and cut.


Makes 16 bars


Tuesday, April 12, 2016

Fancy Nutella-Filled Cupcakes


I made some cupcakes for a baby-shower this week and they got unanimously good reviews.  They were chocolate cake, filled with Nutella, and frosted with almond buttercream frosting.  The finished product is above.  (Or, rather, one of the finished versions.  There were some that were frosted with lavender, too)  

How did I get the filling in?  Easy, I used an apple corer to make uniform and neat holes in every cupcake.  


Then I took a quart ziploc bag, filled it with nutella, and then cut off a corner.  This let me stick the opening into the hole of the cupcake, squeeze, and neatly fill the hole in the cake.  A jar of Nutella filled one batch of 24 cupcakes.  Then I just frosted over the cupcakes (and the filling) with big swirls.  


Baked Cauliflower Tots


Last week I got a great big head of cauliflower in my Fare4All box of fruits and veggies.  "How to use this vegetable?" I wondered.  "Should I just eat it raw or roast it to make spicy cauliflower nibbles like I did in February?"  Then I remembered that I saw an amazing-looking recipe for broccoli tots (like tater tots, but with broccoli and cheese instead of potatoes) and wondered if I could make a cauliflower version of the broccoli tots.


Turns out that recipes abound online.  Yay!  So I made my own version.  (Also, my version is is a bit healthier than most of what I saw online because it leaves out the shredded cheddar/mozzarella cheese and uses just some parmesan.)

Ingredients:
  • cauliflower (1/3 of a head, or enough to make about 1 cup finely chopped)
  • scant 1/4 cup seasoned breadcrumbs
  • heaping 2 Tbsp. grated Parmesan cheese
  • 1 egg, lightly beated
  • salt, pepper, other seasonings (I added a smidge of garlic powder)

Directions:

  1. Preheat oven to 400 degrees
  2. Boil cauliflower for 4 to 5 minutes, until soft
  3. Place cauliflower in cool water until you can handle it
  4. Finely chop cauliflower
  5. Mix cauliflower and all other ingredients together
  6. Spray cookie sheet with non-stick spray
  7. Form mixture into cylinders. Be sure to press firmly so ingredients stay stuck together while baking.
  8. Bake for 15 minutes (bottoms should be brown and crispy). 
  9. Turn over and bake for 10 more minutes. 
  10. Serve with ketchup or whatever sauce you like and enjoy your brunch/lunch/dinner treat!


Sunday, March 6, 2016

Buffalo Chicken Salad: Light 'n Spicy


In January of this year, I joined a Facebook group based on having a good new year and meeting goals to have a healthier life.  One of the interesting thing about the group is that I only knew one person in it, the friend who invited me to join.  Unlike a previous healthy "challenge" that I took part in, this one was based on participation in the group (posted check-ins, recipes, etc.), rather than points based on specific food and exercise goals.  In many ways, this new approach was a better one for me at that time.  Less pressure in the post-holiday time was a good thing.

One of the recipes that was shared was for a lightened up buffalo chicken salad.  The original was online here.  It was really saucy, so I took a tip from the Hungry Girl chicken salad I like and added some more veggies.  Specifically, I added some chopped cucumbers and carrots to add some crunch and volume.  It was also nice to have the carrots with the celery.  It is like a whole platter of buffalo wings and veggies, all in one mix.  


Ingredients:

  • 1/2 cup plain Greek yogurt
  • 1/4 cup buffalo sauce
  • 1/4 teaspoon garlic powder
  • 1/4 teaspoon kosher salt
  • 1/4 teaspoon ground black pepper
  • 2 1/2- 3 cups diced, cooked chicken breast
  • 3/4 cup diced celery
  • 1/4 cup diced red onion
  • 1/2 or more of a cucumber, peeled and chopped 
  • 1 to 2 handfuls of julienned carrots 


Directions:

  1. In a small bowl combine the plain greek yogurt, buffalo sauce, garlic powder, salt and pepper.
  2. In another bowl, combine chicken, celery, cukes, carrots, and red onion. 
  3. Stir in the buffalo sauce/yogurt mixture until well combined.


Saturday, February 6, 2016

Peanut-Butter Chocolate Oatmeal, now with (optional) Bananas!


Today's first food experiment was with chocolate and peanut butter, a classic American combination of tastiness.  I'm a fan of the Hungry Girl recipe for "Growing Oatmeal Bowls" of various flavors, but decided to expand on my repertoire of fruit combinations.

A friend was talking about using PB2 powder (a low fat peanut butter powder that can be reconstituted with water) for something else, but I had some in my cupboard and thought it might make for some yummy sweet oatmeal.  And also a sweet treat that is lower sugar and fat than it would be if I used chocolate chips and real peanut butter.    

I made up the recipe below pretty much on the fly and it was tasty!

Makes 1 Serving

Ingredients:

  • 1/2 cup old fashioned oats
  • 1 cup vanilla light almond milk
  • 1 cup water
  • 2 tbsp. unsweetened cocoa powder
  • 2 tbsp. PB2 chocolate/peanut butter powder
  • dash of salt
  • approx. 1/2 tsp. Watkins peanut butter extract (or more or less, to taste)
  • Banana, if desired


Instructions:

  1. Combine salt, oats, water, and almond milk in a nonstick pan.  
  2. Bring to a boil, then reduce to a simmer
  3. Cook about 12 to 15 minutes, stirring often, until it is thick and creamy
  4. About halfway through, add cocoa powder and stir 
  5. At the end of cooking, add PB2 powder and peanut butter extract and stir
  6. Add slices of banana, if desired.


Thursday, February 4, 2016

Zuppa Toscana aka Adventures in Soup and in Kale!


For the month of January, I was in a facebook group for being a bit healthier.  Nothing crazy, but a lot of tasty recipes have been shared.  And a lot of people had recipes that included kale.  I've never really liked kale and haven't been able to figure out why other people do.  It is like super-bitter, crazy-textured spinach or something.  I like spinach, but kale just seems silly.  At one point I mentioned my dislike of kale and how I swapped it out of a recipe and my friend Meg gave me this recipe: http://www.myrecipes.com/m/recipe/zuppa-toscana

I'll admit that the kale was fine in the soup.  However, I will also admit to eating the bites with kale first, so that I could eat non-kale bites....sort of like saving best for last.  OK, it was exactly saving best for last.

Changes I made to the original?  I used turkey kielbasa instead of spicy Italian sausage, and it was fine.  But I will try a spicier sausage next time. I also used half-and-half (regular, not low-fat or fat free) instead of whipping cream, and didn't have any cayenne.  Plus, I put in turkey bacon, but I don't think the soup needs the bacon at all, so I've left it off my ingredients list.

Explanation for the sort of weird photos: I didn't double the recipe.  However, I did realize that the only slow cooker I had was my party one, with 3 kinda small ones in one long base. I had to use two of the three for it, but it worked great.

A note on reheating: When I froze some left-overs and reheated in the microwave later on, the dairy was a bit separated-looking, but still tasted good.  Also, I added some shredded cheese and it was tasty all melted in!

Makes 6 servings

Ingredients:

  • 1 pound Italian sausage or kielbasa
  • 4-6 russet potatoes, cut into bite-sized cubes
  • 1 onion, chopped
  • 2 tablespoons garlic, minced
  • 32 ounces chicken broth
  • 1/2 bunch kale (or swiss chard), destemmed and cut/torn into bite-sized pieces (really make them small for better eating, I think)
  • 1 cup half-and-half
  • 2 tablespoons flour
  • salt and pepper to taste


Instructions:

  1. Brown sausage links in a sauté pan or cook kielbasa
  2. Cut in half lengthwise, then cut into slices
  3. Place sausage, chicken broth, garlic, potatoes and onion in slow cooker. Add just enough water to cover the vegetables and meat.
  4. Cook on high 3-4 hours (low 5-6 hours) until potatoes are soft.
  5. 30 minutes before serving: Mix flour, salt, and pepper into cream, removing lumps.
  6. Add cream and kale to the crock pot and stir.
  7. Cook on high 30 minutes or until broth thickens slightly.


Wednesday, February 3, 2016

Spicy Cauliflower Nibbles


I have been making a big effort since New Years to cook more.  There are a few reasons reasons.  Purely practically, cooking something from scratch means that I know what is in it and that I can tweak it to make it healthier.  I also actually like cooking and making things, so it is a fun activity.  And then there is the whole I-live-in-Minnesota-and-it-is-really-cold-here thing.  Basically, using my oven or stove is a wonderful excuse to have a warm kitchen and some warm food to enjoy!

Mid-January came around and had a whole conversation about how expensive fresh cauliflower was getting.  So what did I do?  Look for a recipe involving cauliflower, of course!  ARRGGHHH!  Why must fresh, healthy food be so expensive?  In money, in time, and in effort.  OK.  Sorry.  Backing away from that soapbox, as it deserves its own space and time.       

I found a recipe for cauliflower "poppers" over at WeightWatchers.com.  When I hear the word "poppers," I first think of jalapeno poppers...and then other kinds of crazy appetizers like deep-fried mac and cheese poppers, etc....and then I start thinking of pop-tarts and other things you make in a toaster.  Basically, jalapeno, deep-fried finger-foods, and toasters.  Since this recipe isn't any of those things (I even ate the cauliflower with a fork and not my fingers), I have renamed them "nibbles."  Nibbles sounds cute, but also a bit sophisticated.  Or maybe just cute.  But also bunnies nibble--sometimes on cauliflower--so I think it works.  

I would share the original recipe via a link, except it will only let WW members see it and then only when they are signed in.  So, I won't torture you with the original link.  Instead, I'll just give you my version of the recipe.  It is pretty close to the original, except I only cooked up a serving rather than the whole head of cauliflower. 

Ingredients:
  • 1  uncooked fresh cauliflower
  • about equal parts ground cumin, chilli powder, salt, and black pepper (probably 1/2 tsp or less of each, but more if that's to your taste)


Instructions:
  1. Preheat oven to 400°F. Coat a baking sheet (or foil on a baking sheet) with cooking spray.
  2. Cut cauliflower into bite-sized pieces and put in a medium-sized bowl
  3. Add spices and stir/toss to coat them.  Add more if you like it or change the mix to what you like.  Here's what mine looked like:         
  4. Spread cauliflower on prepared baking sheet and bake until cauliflower is tender, but not mushy.  About 10 minutes will do it, but you should stir halfway through. 

 A bit of a warning: I really liked how these turned out, but they cool off fairly quickly.  So, serve pretty much as soon as they are out of the oven!