Sunday, January 20, 2019

Honey-Thyme Roasted Root Vegetables


Before the holidays I was visiting a Christmas market that included some farmers' market kinds of stuff.  One of the vendors had the most amazing rainbow carrots, but they only came in a really huge bag.  Since I was about to leave on a trip I mentioned that I wanted to get some, but was afraid they wouldn't keep long enough for me to use them all.  The vendor assured me that they would be fine for weeks and even months, as long as I kept them in their bag in the regular part of the fridge.  "NOT in the crisper drawer," she emphasized.  "The crisper is a LIE!"  I'm happy to report that she was 100% correct.  A month later and my rainbow carrots are still in great shape. 

The beautiful carrots are the feature in the recipe I made today.  It is based on several recipes I saw online, mostly because I was looking for things like temperatures, ideas for flavors, and time for baking.  You could use pretty much any root vegetables, but this time I used potato, sweet potato, parsnips, and onion in addition to my beautifully colored carrots.  My house smelled amazing this afternoon and it was a great thing to make on a dreadfully cold day!   

Ingredients:

  • 1 medium to large sweet potato
  • 2 medium parsnips
  • 6 rainbow carrots (red, yellow, and purple)
  • 1 medium potato
  • 1 medium sweet yellow onion
  • 1 Tbsp. vegetable oil
  • 1 1/2 tsp. salt
  • dried thyme
  • 1 Tbsp. honey


Instructions:

  1. Peel and chop veggies.  Pro tip: Try to get them all the same size. 
     
  2. Preheat oven to 425°F. 
  3. Line two large baking sheets with parchment paper.
  4. In a large bowl, combine vegetables with oil and salt
  5. Sprinkle in dried thyme and stir
  6. Spread on the pans.
     
  7. Roast until browned and crispy, stirring veggies and rotating pans in oven halfway through the cooking.  Total cooking time is about 40 minutes.
  8. Put veggies in a bowl and stir in honey   


Makes 4+ servings

Thursday, January 17, 2019

Stovetop "Grilled" Bananas with Cinnamon and Maple


Yesterday I was looking for something that I could have as a dessert that would be healthy.  Or at least healthy-ish. The recipe below is based on one that involved an actual grill or grill pan, as well as toasting pecans.  But a grill pan was too fussy and I didn't have any pecans, so....this is what I came up with.  It tastes vaguely like bananas foster and would be pretty yummy on ice cream, I think.  Will definitely make it again!

Ingredients:

  • 1 Banana, unpeeled
  • Cooking spray
  • ground cinnamon
  • about 2 tsp. real maple syrup, divided


Instructions:

  1. Leave peel on banana and trim ends
  2. Halve lengthwise.
      

  3. Heat a pan to medium and spray with cooking spray
  4. Spread cut sides with half of the maple syrup
  5. Sprinkle with cinnamon
  6. Cook, with cut sides down, for about 3 minutes
      

  7. Flip and cook until bananas start to soften and pull away from peel, about 3 to 5 minutes
  8. Remove bananas from pan and from the peels.
  9. Top with remaining syrup
  10. Enjoy!


Sunday, September 23, 2018

State Fair 2018: Scottish Empire Biscuits and Candied Cherries


Several years ago I submitted a Scottish Dundee cake to the Minnesota State Fair in the Ethnic Baking: Cake category.  I was a bit miffed that the winners were all these towers of cookies that people in Norway call cakes.  (They aren't. Norwegians: you need to get real cake.)  This year I decided to submit in the Ethnic Baking: Cookie category, again with a Scottish treat: empire biscuits.

Empire biscuits are a type of shortbread-like cookie, usually cut as a fluted round and sandwiched with raspberry jam.  They have a water glaze on top and are decorated with (traditionally) half of a candied cherry or (more recently) a gummy fruit candy or another type of colorful decoration.  I spent a lot of time on candied cherries, only to realize that they tend to bleed into the glaze on the top.  Sometimes it takes a day, but it makes them look less than perfect.  This wouldn't be a problem for regular cookie-making, but for the Fair I wanted them to look amazing.  Also, the fair has a rule about nothing being topped with fruit.  Candied fruit isn't like regular fruit, but I didn't want to be disqualified.  Thus, I swapped the cherry for a half of a Dot gummy candy.  Not traditional, but tasty and it looked pretty nice!   

I made...let's say A LOT...of these leading up to the Fair.  I really think they are a good cookie.  Not too sweet, so it is good for a dessert or snacktime.  It is also a bit bulky so that one can be satisfying.  Finally, it is a "simple" cookie that is also "fancy."  Let's be honest: the sandwiching, glazing, and topping is a fussy process.  But worth it!  

Ultimately I won a 4th premium--essentially 4th place.  This level of prize in Creative Activities comes with a check!  For $2.  A virtual fortune! 

Also, I was interested in my direct competition.  They never put the names or descriptions of the cookies with them, so I have to guess what the others are (see photo below).  1st place looked like a nut or spice filled cookie.  2nd place was definitely a cherry mini-biscotti of some kind and 3rd was a krumkakke or another type of cookie made with an iron and then rolled.  5th place was a nut-filled roll-up cookie (maybe nut kolaches?).        


Perhaps the best part of the story--well, besides the pretty pink ribbon and its accompanying prize--is that this was the year that the judges didn't pick a stupid cookie tower to win in the cake category.  There was nary a cookie-tower in sight!  But there was a crazy cookie-basket in the cookie category (shown in the background of the photo below). Which...huh...that's a bit weird, right?  How do you even eat this thing?  And also, doesn't it look strangely like an upside-down cookie tower with a handle? Yeah.  I'm with you: the Minnesotan fans of Norwegian baked goods definitely need to dial it back a bit with the cookie-towers/baskets.  Just...let it go, guys.    


Ingredients: 

Cookies:
  • 225 grams butter (Yep, you kinda need to use a food scale.  Annoying, right?  But this is 2 sticks of butter, more or less)
  • 130 grams superfine granulated sugar (I know, using a food scale *and* specialty ingredients.  I suck.  But it really does make a difference.  And I found this at Byerly's/Lunds, so you don't have to go to a special baking store, just a rich-people grocery store)  
  • 1 egg
  • 1 teaspoon vanilla (I used double-strength, because I love me some vanilla)
  • 450 grams all-purpose flour


Glaze: 
  • 110 grams powdered sugar
  • 4 ½ teaspoons water


Filling:
  • Raspberry jam, seedless (Did you expect me to make my own jam? Ha! No time!) I used a black raspberry all fruit-style jam. 


Decoration:
  • Candied cherries (see ingredients and instructions below) or other decoration

    Note: Traditionally empire biscuits are topped with half of a candied cherry, but more modern versions are often topped with a jelly candy (often Jelly Tots) or some other decoration.  Since the MN State Fair rules do not allow fruit on entries, these are topped with Dots jelly candies.  

Directions:
  1. Preheat oven to 350° F 
  2. Line cookie sheets with parchment paper
  3. Cream butter and sugar together until light & fluffy
  4. Add the egg and vanilla, and mix until combined
  5. Add flour and mix to form a dough.
  6. Roll the dough on a floured surface to around 1cm thick. 
  7. Cut cookies with a round cutter and transfer to cookie sheet 
  8. Bake for 10 to 12 minutes, or until the edges of the biscuit are just golden.
  9. When cool, spread underside of one biscuit with jam and sandwich with another.
  10. Make water-icing by mixing powdered sugar and water.  
  11. Spoon icing onto the top of each sandwich and spread to cover (but do not let it drip down the sides)
  12. Before icing dries, place decoration on top.  

I looked at a bunch of different recipes and tried several versions until I settled on/came up with this one.  The recipe makes 17 sandwiched biscuits with the cutter I used, but it could make more or less, depending on the cutter shape/size. 

For Candied Cherries:
  • 12-ounce jar maraschino cherries
  • 3/4 cup superfine granulated sugar
Directions:   Drain the cherries, reserving 1/4 cup of the juice.  Combine juice and sugar in a medium-sized saucepan, and cook over medium heat until sugar is mostly dissolved. Add the cherries to the pot, and bring the mixture to a boil. Cover the pot and reduce the heat so the liquid is simmering.  Simmer for 45 to 55 minutes, checking on the cherries and stirring them gently every 10 minutes or so. When they are firm when you touch them with a spoon (the syrup should be about 235°F), remove the cherries from the pot with a slotted spoon or strainer to a parchment-lined plate. Allow to cool completely before using. 


This is from a practice batch.  Note that I used different flavors of Dots here, but for the final version I used only the dark red ones (cherry, I think?)

Notice that the top halves of Dots look much nicer than the bottom halves as decorations.

I'm such a proud cookie-Momma!  Look at my little awesome cookies, winning an award and everything!

People definitely thought I was weird with the interest I was showing this particular case.  But I'm so proud of them!

Overhead shot, through the glass of the display case


Healthy Cashew Chicken in the Oven


I haven't written any entries for my projects or recipes since springtime, and with so many recipes and projects completed, that's a real shame!  So today I'm sitting down to write up a few of my recent successes.  

This recipe is based on one from Hungry Girl.  Mine actually made a bigger recipe and because it uses frozen, steam-in-bag sugar snap peas (instead of fresh snow peas) it can be made any time of year, as well as for a bit less money.  

I liked this recipe: healthy, made enough for leftovers, made my house smell awesome, and relatively fast to make (aside from all the chopping).  However, I do think the leftovers were improved with a bit of extra soy sauce and a few extra cashews on top.  You could probably also swap out peanuts, if cashews were unavailable or too pricey at the moment.        

Ingredients:
  • 1 package of fresh mushrooms, quartered (Note: my mushrooms were huge, so I cut them in 1/8ths, instead.  Thanks, Sam's Club!) 
  • 1 chopped onion (Yellow or white)
  • 1 package of raw boneless, skinless breast, cut into bite-sized pieces (I used a 14 oz. package of chicken tenders, because that is literally all that was in the store.  I had a choice of 3 packages, but all the other chicken in the entire store had sold.  Moral of this story: don't grocery shop at 5:45 on a Sunday afternoon!)
  • 1 package frozen sugar snap snow peas
  • 2 tbsp. reduced-sodium/lite soy sauce, divided
  • 1/4 tsp. garlic powder
  • 1/8 tsp. each salt and black pepper
  • 1 oz. (about 1/4 cup) unsalted roasted cashews, roughly chopped
  • 1/4 cup chopped scallions
  • 1/2 cup chicken broth (or water.  I forgot to get the broth from the store and water honestly worked OK)
  • 1 tbsp. seasoned rice vinegar
  • 1 1/2 tsp. cornstarch
  • 1 tsp. chopped garlic
  • 1/4 tsp. ground ginger

Directions:
  1. Preheat oven to 400 degrees. 
  2. Place a large piece of foil on a baking sheet and fold up the edges of the foil.  Spray with nonstick spray.
  3. Place mushrooms, onion, and chicken in a large bowl. Add 1 tbsp. soy sauce, garlic powder, salt, and pepper. Toss to coat. 
  4. Put mixture on prepped baking sheet and spread out evenly.
  5. Bake for 10 minutes.
  6. Flip/rearrange chicken, onion, and mushrooms and sprinkle with cashews and scallions. 
  7. Bake until chicken is cooked through and veggies have softened and lightly browned, about 5 to 7 more minutes.
  8. Meanwhile...Make the sauce: 
    1. In a medium microwave-safe bowl, combine remaining 1 Tbsp. soy sauce with broth/water, vinegar, cornstarch, garlic, and ginger. 
    2. Mix well. 
    3. Microwave sauce for 1 minute. 
    4. Stir, and microwave for 45 seconds, or until mixture is hot and has thickened.
  9. And...Heat the frozen veggies in the microwave according to the package directions. 
  10. Mix all the chicken and veggies together
  11. Serve with sauce, over rice.  
 Makes 3 servings of chicken and veggies with sauce


Saturday, April 14, 2018

Peppermint-filled Chocolate Bundt Cake


Since it is blizzard-ing outside, I'm catching up on a few winter recipes.  This one is for a really nice winter cake.  I mean, I suppose you could make it anytime you wanted, but the chocolate-peppermint combo is pretty classically winter-y.    

Every year at the holidays there is a pot-luck party at work, held by the Collections Department on level A.  But they invite us in Reference and people who have retired, too, and it is usually a lovely time.  They even have a white elephant gift exchange.  Side note on the white elephant exchange: One year I got a cherry-pitter called a "cherry chomper."  It looks like a little cartoony guy with an open mouth.  You put a cherry in his mouth and push down on his head and it pits the cherry.  This  small and hilarious item pretty much changed my life during cherry season.  Fresh cherries in greek yogurt are amazing!

Anyway, for the lunch party in December 2017 (a few months ago) I made a chocolate-peppermint bundt cake.  It was based off this one, but I subbed out the white peppermint bark ganache.  It was super yummy.  My advice would be to do the glaze and topping right before serving.  I did it the night before and it wasn't as cute as for the party as I hoped.    


Ingredients--Cake:
1 regular chocolate cake mix
1 regular package chocolate pudding (just the dry mix)
1 cup sour cream
1 cup vegetable oil
4 eggs
1/2 cup warm water
Optional: If desired add 1-2 tsp of pure peppermint extract (be sure it is peppermint, not just mint.)

Ingredients--Peppermint Cream Cheese Filling:
8 oz. cream cheese, softened
1 egg (at room temperature)
1/4 cup granulated sugar
2 tsp pure peppermint extract
2 tbsp crushed candy canes

For Topping:
chocolate frosting in a can 
crushed candy canes 

Directions
  1. Preheat oven to 350 degrees
  2. Combine all cake ingredients until combined.  
  3. Spray bundt cake pan well with non-stick spray.  (If you have problems with cake sticking in your pan, "flour" the pan using cocoa powder.)
  4. Combine filling ingredients (except candy) and mix until creamy.
  5. Stir in candy canes.  
  6. Spoon 1/3 of batter into pan
  7. Carefully spoon filling in a ring, try not to let the filling touch the pan on inside or outside. 
  8. Spread the rest of cake batter over filling
  9. Bake for 50-55 minutes, until toothpick comes out clean
  10. Allow to cool and top as desired  Suggested topping: Heat up frosting in the microwave until it is a glaze-like consistency (it only takes a few seconds, and be careful not to burn it).  Drizzle over the cooled cake and sprinkle with crushed candy canes.  
  11. Keep refrigerated


Friday, April 13, 2018

Chicken Cordon Bleu Casserole


In my on-going quest to make meals that produce good lunch-/dinner-time leftovers, I tried this chicken cordon bleu casserole.  I made it healthier with some swaps--2% milk for the half and half, lower fat cream cheese, etc.--and it was a winner.  It was a little pricey to make when considering it as a single dinner, but if you consider that I got so many meals out of it, it really wasn't too bad. 

Also, I'm happy to say that this was my first opportunity to use my new, matching food containers.  Nothing like buying a full set of containers from Sam's Club and then actually using them...neatly stacking leftovers in my fridge.  


Ingredients:
  • 12 ounce package of no-yolk egg noodles
  • 3 cups 2% milk (recipe called for half & half, but 2% milk worked really well)
  • 1 can (10.75 oz.) Cream of Chicken and Herb soup
  • 4 oz. reduced fat, spreadable cream cheese (softened)
  • 4 Tbsp. grated Parmesan cheese, divided
  • 1/2 tsp. dried roasted garlic
  • 1/2 tsp. garlic powder
  • 1/2 tsp. salt
  • 2+ tsp. dijon mustard 
  • 1/4 tsp. nutmeg
  • 1/4 tsp. black pepper
  • 2 to 3 chicken breasts--or equivalent, cooked and roughly chopped (I cooked up some frozen chicken breasts, but rotisserie chicken would also be tasty)
  • 1 lb. cooked/smoked ham, roughly chopped
  • 3 cups shredded cheese, be sure it is all or mostly swiss (I used one 8 oz. block of swiss that I shredded and a handful of pre-shredded mixed colby/cheddar)
  • Bread crumbs


Directions:
  1. Preheat oven to 350 degrees
  2. Spray a 9x13 baking dish with non-stick spray (I also lined mine with foil first, to make cleanup easier)
  3. Cook noodles until al dente.  Drain well
  4. Mix milk, soup, cream cheese, 3 Tbsp. Parmesan cheese, garlic, garlic powder, salt, pepper, mustard, and nutmeg. 
  5. Save back aboug 1 cup of noodles.
  6. In dish, layer 1/2 of noodles, 1/2 chicken, 1/2 ham.
  7. Drizzle 1/3 of sauce, top with 1/3 of shredded cheese.
  8. Repeat.
  9. Top with remaining 1 cup of noodles, remaining 1/3 of sauce, 1/3 of shredded cheese.
  10. Top with remaining Parmesan cheese and bread crumbs
  11. Bake for 35 to 40 minutes, until bubbly
  12. Let sit for 5 minutes or so before serving.  


Thursday, April 12, 2018

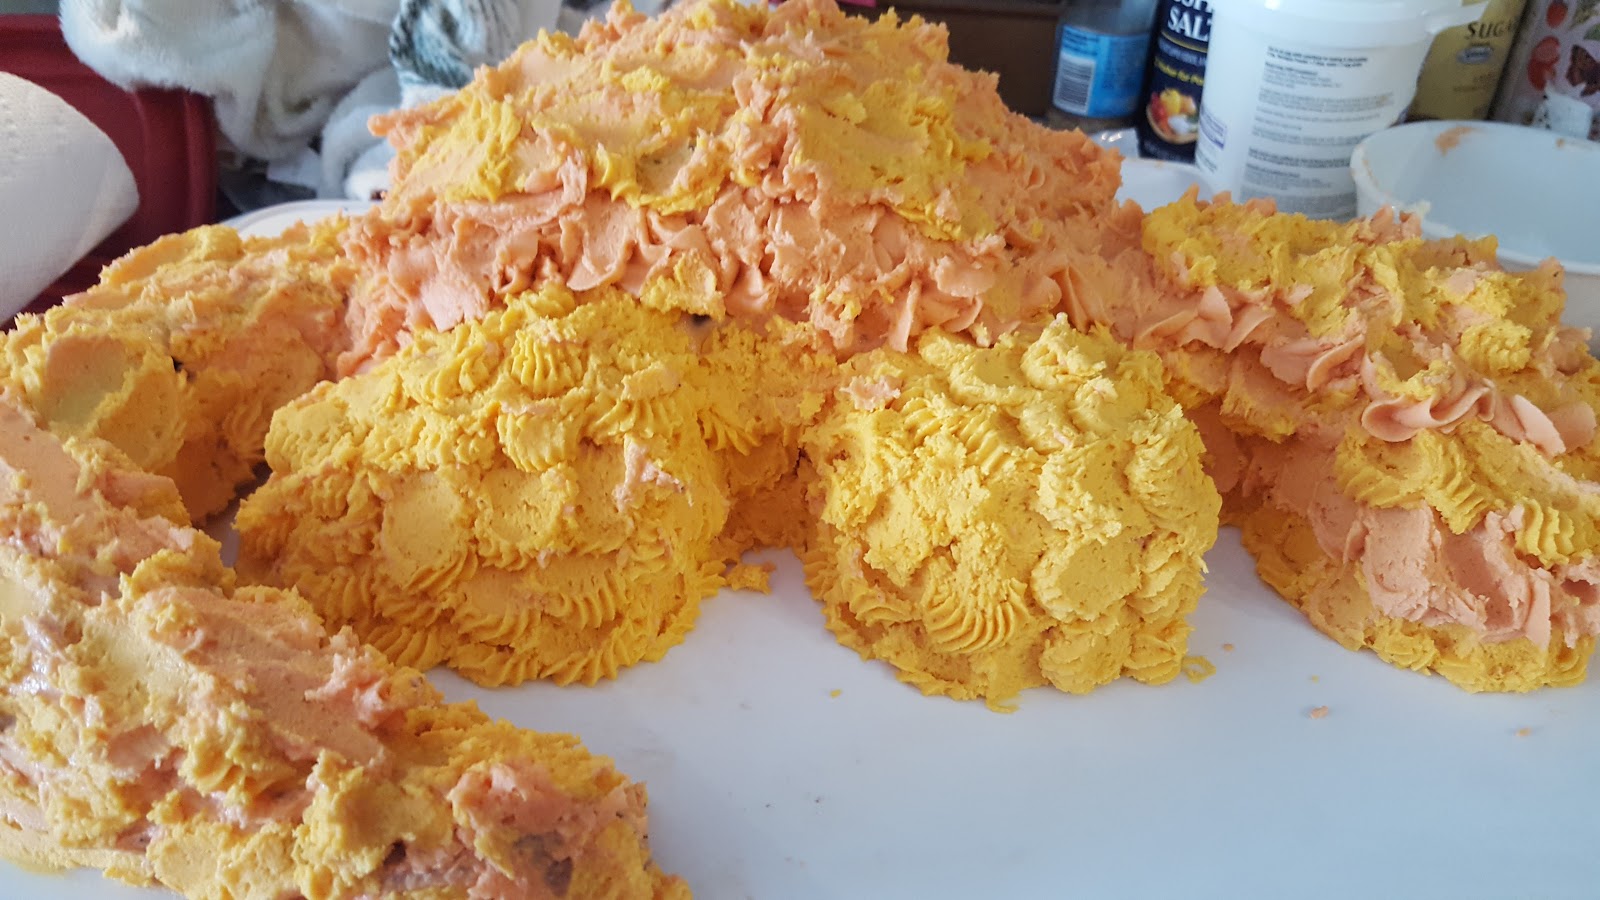
Dragon Cake: Dessert for the dragoniest Dungeons and Dragons meeting


My gaming group's April meeting was a dragon-and-spring-themed potluck.  So I made a cake shaped like a dragon!  I looked online at a variety of different ideas, but then settled on using this one as a basic pattern/idea.   (Note: this is an Instructables page, which should be OK. But it seems to want to create warnings with my anti-virus software.)
  1. Bake two 9-inch round cakes. (Mine were triple-chocolate-fudge, from a mix. Feel free to judge me, but it tasted awesome.)
  2. Cut one in half for the body
  3. Cut the other into pieces vaguely like this:

  4. Assemble the cake using buttercream frosting, cutting to shape as needed. (I used almond-vanilla buttercream, using the Wilton frosting recipe)
  5. Crumb-coat entire dragon with buttercream.  Refrigerate/freeze to solidify before decorating.


  6. Use frosting to create textured skin (I used two colors of orange-y/yellow-y frosting to try to add some depth).

  7. Decorate!  
I used:
  • Chocolate-covered grahams (cut) for spines
  • Pull-and-Peel Twizlers for flames
  • Fruit Roll-ups for wings (on straws)
  • Black licorice for nostrils and eyebrows 
  • Mini oreos (opened and with pieces of tops) for eyes
I think he turned out pretty cute. The eyebrows make him look a little sheepish, but I really thought they were needed to make the dragon less mean-looking.  


After our game night there was a lot of leftover cake, so I brought it to work to share.  People hacked it up, but they left the face.   He looked so sad and sat there for so long...

I took off the face-decorations and the cake was finished in less than 10 minutes!