Sunday, November 2, 2014

Cinnamon-Spiced Apple Bread


A few weeks ago someone from my division at work brought in a tremendously large bag of apples.  I have literally never seen that many apples in any place that wasn't a store or an orchard.  Apparently the person who brought them in also has a seasonal, part-time job at an orchard, and so getting ginormous bags of apples is a perk.  (Yum...that's an awesome job perk!)

People wandered by and marveled at the huge bag, usually taking a few with them when they left.  When I walked by I took 2 for eating, myself.  But by the end of the day there was still a ton of apples left.  I decided that I would take a bunch and bring back something baked and apple-filled to share.

While searching for a new recipe to try, I realized something: Unless you are talking about a pie (which I didn't want to make), most recipes with apples in them don't really use all that many apples.  Since I had what I will call "a whole lot" of apples at this point, I needed something brimming with appley-goodness.

I found this recipe, made a few changes, and it turned out amazing!  Moist, delicious, and the spices really ring through.  This bread pretty much tastes like a good fall bread should.

Also, the first time I made it, it was pretty wildly popular with everyone who had some.  The second time I made it was for the Recipe Challenge: Apple adventure at work, and I won the golden spatula trophy!  It now lives on my shelf for all to admire...until the next challenge (which may or may not be pumpkin).

Here's the how-to:

Ingredients:

  • 2 2/3 cups flour
  • 1 1/2 tsp baking soda
  • 1 tsp salt
  • 2 semi-mounded tsp cinnamon
  • 1/2 tsp ground nutmeg
  • 1/2 tsp ground cloves
  • 1/2 tsp Penzey's baking spice (optional)
  • 2 cups granulated sugar
  • 1 cup vegetable oil
  • 4 eggs, beaten
  • 2 tsp vanilla
  • 4+ cups chopped apples, peeled and coarsely chopped
  • 1 1/4 cup raisins
  • Cinnamon Sugar that is a bit heavy on the cinnamon (about 6 to 8 parts sugar to 1 part cinnamon), for sprinkling on top of the bread.  
    • Ingredient Notes: The original recipe called for 4 cups apples, 1 cup raisins, and 1 cup pecans.  I didn't have pecans, plus the fact that both raisins and nuts are divisive things in baked goods.  So, I decided to make it easy on myself and just use more apples and raisins and no nuts.  Undoubtedly this made the bread heavier and more moist, but it turned out so well that I think I'll just stick with my version.  I used my 2 cup pyrex measuring cup for the apples and filled the entire thing past the line to the top of the cup twice.  So I probably used more like 4 1/2 to 5 cups apples.  Also, I just threw some extra raisins in.  Also, the original called for only 2 tsp sugar mixed with 1/4 tsp cinnamon to sprinkle on top of both loaves.  Definitely use more!    


Directions:

  1. Preheat oven to 325°.
  2. Grease 2 9x5 loaf pans.
  3. Line bottoms only of greased loaf pans with waxed paper and then grease the waxed paper
  4. In one bowl, combine flour, baking soda, salt, and spices. 
  5. In a *large* mixing bowl, whisk together sugar and oil.  
  6. Whisk in eggs and vanilla until smooth, then stir in apples and raisins.  
  7. Add the dry ingredients and mix until well blended. 
  8. Pour batter into pans, smoothing the top with a spatula or spoon. 
  9. Bake for 20 minutes. 
  10. Pull out rack and sprinkle loaves with the cinnamon sugar mixture. 
  11. Continue baking for 30 to 40 minutes, or until a cake tester comes out clean.
  12. Cool in pan for at least 10 minutes.
    • Note: this bread is delicious warm, but *will not slice nicely when warm,* especially if you add more fruit like I did and the chunks are truly coarsely chopped.  

Cinnamon-Chip Scones


Fall is my favorite season and with Halloween, cool days, crisp leaves, and my birthday in it, October is pretty much my favorite month.  It is always so busy for me and this year has been no exception.  I have been doing tons of baking, projects, and socializing, but have fallen way behind on my recording of stuff.  So now that it is November--and before the craziness of the winter holidays hits--I'm going to try to catch up some.

Part one of catching up is a recipe for some amazing scones.  I wanted to make scones for breakfast at work a while ago and stumbled across a link from Southern Living for Best Ever Scones.  What I really liked was that a basic recipe could be changed dramatically to get different results and that sweet and savory were both possibilities.  Of course, none of the options were exactly what I wanted, so I changed mine kind of a lot. Here's my version of the sweet: Cinnamon-chip scones with Brown-sugar-cinnamon butter

Scone Ingredients:

  • 2 cups all-purpose flour 
  • 1/3 cup sugar (plus a smidge more to sprinkle on top of scones)
  • 1 tablespoon baking powder
  • 1/2 teaspoon salt 
  • 1 1/2 tsp cinnamon (or however much you like, I just kinda eyeballed it, to be honest)
  • 1/2 cup cold butter, cut into 1/2-inch cubes  (unsalted)
  • 1/2 tsp vanilla (optional)
  • 1 cup 2% milk, divided (the original recipe called for heavy/whipping cream, but 2% worked great and I felt better about it)  
  • 1/2 cup cinnamon chips


Scone Directions:

  1. Preheat oven to 450°. 
  2. Stir together flour, sugar, baking powder, salt, and cinnamon in a large bowl. 
  3. Cut butter into flour mixture with a pastry blender/a fork until crumbly and mixture resembles small peas. 
  4. Freeze 5 minutes. 
  5. Add 3/4 cup plus 2 Tbsp. milk, vanilla, and cinnamon chips, stirring just until dry ingredients are moistened.
  6. Turn dough out onto wax paper; gently press or pat dough into a 7-inch round.
  7. Use a sharp knife to cut dough into 8 wedges. 
  8. Place wedges 2 inches apart on parchment paper.  
    • Note: the original recipe said to bake these scones on a lightly greased cookie sheet.  I made the recipe once with parchment and the scones baked perfectly.  Then I made them again on a greased cookie sheet and the bottoms were overdone to the point of being nearly burned.  It could have been the unfamiliar oven the second time, but I blame the lack of parchment.   
  9. Brush or pat tops of wedges with remaining milk, just until moistened.  
  10. Sprinkle a bit of sugar on top, if you like the look/flavor.  
  11. Bake at 450° for 13 to 15 minutes or until golden.
    • Note: the original recipe also listed an option for Bite-Size Scones, but I haven't tried it yet.  They said: Pat dough into 2 (4-inch) rounds. Cut rounds into 8 wedges. Bake as directed for 12 to 13 minutes.


Brown-Sugar Cinnamon Butter:
I totally forgot to bookmark where I saw the suggestion/recipe for the fancy butter.  But here is basically what I did.  Oh, and every recipe I see only for something similar calls for a whole stick of butter.  That is way too much for just a batch of scones, so I made half a stick's worth!

Soften 1/2 stick of butter.  Thoroughly mix in 2 packed Tbsp brown sugar and 2 to 3 tsp cinnamon.  Refrigerate.  

Sunday, October 5, 2014

Wall o' Awesome aka Salon-Style Display of Framed Items


I have this wall in my house that is sort of betwixt-and-between.  It creates a sort of faux-hallway connecting my kitchen to my dining area and living room.  I have been thinking for a long time that a salon-style display would be perfect.  (You know, like in old European homes and museums, where frames of all kinds are hung close together, filling whole walls and showing off a huge amount of art all at once.)  Even though this was clearly a great idea, I hadn't really gotten around to trying to do anything, so the wall had been unadorned...until last Christmas.  I used the wall as a place to hang my holiday cards and a variety of winter/Christmas themed words cut out of fancy scrapbook papers. 

That wall looked totally awesome and I loved it!

And then came mid- January, when I could no longer pretend that keeping my bright and cheery decorations up was cool with the world as a whole.  (Ok, yeah. You're right.  It might have been late January.)  After the cards and the brightly colored words came down, the wall was just so....bland.  I started thinking of things I could do with it and I finally decided that the jammed together look was actually a good one.  You see the wall as you walk by it, but it faces in such a way that doing an old-world gallery/salon display wouldn't clutter up an actual room.  

After deciding to do this cool project, I needed to decide what would go on this wall.  I decided on two main utilitarian features: a whiteboard and a keyring holder (which I will describe in future posts).  The I had to find the components for my wall: a wide variety of sizes and styles of picture frames.  

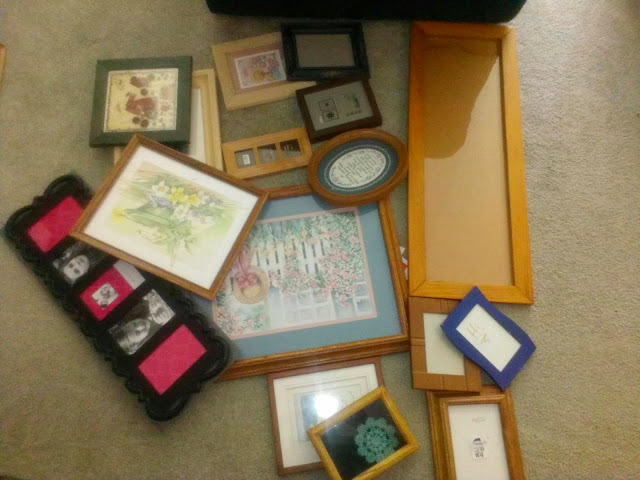
The largest frame was for the whiteboard, and I got it and some others from my mom, who was cleaning out her house.  A fancy-looking-but-made-of-plastic frame  was purchased on clearance and with a coupon from Kohl's.  And all the others were purchased for super-cheap from thrift stores.  I just kept my eyes open for interesting designs, shapes, etc.  Condition didn't matter so much, because I knew that I would be painting them.  And what was in them was completely irrelevant because I wanted to put my own stuff in the frames, anyway.  (The oval frame was a particularly good find, but it had a religious poem in it that had the store selling it as "art" and not just the frame.)  The Kohl's frame was $6, but most were in the $1 to $1.50 range and I'm pretty sure that the most paid for any other frame was $3.00.  Here they all are:


Once I had the frames, I needed to make them look like they belonged together.  I thought about painting them all the same color, but then decided that wasn't the best option.  Instead I purchased 3 different spray paints: a pale grey, a darker grey, and a metallic silver.  The paint I used was a Rustoleum paint+primer that would stick to metal, wood, plastic, etc. 

I took the frames apart, and for those that I couldn't get the glass out of, I covered the glass with paper and scotch tape.  


I decided what color to paint each of the frames, then laid them out on a drop-cloth on my garage floor.  And I opened the garage door, obviously.  


I then spray painted the frames with 2 to 3 coats each.  I tried to do light coats, but I'm not a super-proficient spray-painter at this point, so they were probably heavier than I should have done.  I let them dry for a full day, then moved them inside and let them cure out some more.  


Before I painted the frames, I cut paper shapes (out of old wrapping paper) for each. Then I used them to plan the set-up of the wall.  Here's the plan, in situ:


After getting everything painted and planned, I purchased a variety of 3M Command picture hangers.  They work sort of like locking velcro, but come off the walls and frames like the Command poster adhesives I used in college.  The idea behind the purchase being that they would allow me to keep from putting tons and tons or holes in my wall.  In addition, since they are supposed to be long-lasting, I should be able to take the frames down and change the imagery fairly frequently.  

After getting the hangers up, it was October and time for Halloween decorations.  So instead of putting regular photos and images in the frames, I put creepy artwork (including Munch's "Vampire," Delaroche's "The Execution of Lady Jane Grey," and Fuseli's "Nightmare"), an Edgar Allan Poe "Raven" excerpt, and some paper-crafted stuff (fangs, werewolf, Frankenstein, a black cat, etc.).  

The final project is at the top of this blog post.   My finished, custom gallery wall.  I love it and it will be a great way of displaying photos, art prints/postcards gathered on museum visits, and other stuff that I want to be able to see and share.  


Sunday, September 21, 2014

Almost Instant Hutch Update: Green is the New Orange!


An extremely generous co-worker and friend gave me a hutch several months ago.  I absolutely loved it, and not just because of the low, low price point!  It is beautiful, with two glass shelves, a light, and windowed doors in a top area that is perfect for displaying breakables like my hurricane lanterns and some of my great-grandmother's china.  On bottom there is a solid single-doored area for storage.  It is an old-fashioned and genuinely lovely piece of furniture.


OK, except for one thing: at some point someone painted the original back of the hutch orange.  Really, really orange.  And streaky, because they didn't spring for multiple coats of paint to get it even.

I lived with the orange for a while, thinking I would paint the back when I made some other decisions about painting my cheap living room furniture.

Eventually, I realized that I didn't want to do what the previous owners did.  Just painting over the orange wouldn't bring back the niceness of wood grain, and if I wanted to change it later I would just be adding more coats of paint.

Enter my genius plan: cover the orange with fabric!  I found a great microsuede-like fabric in a dark green that was very similar to the fabric covering my living room chair and ottoman.  I used simple push pins (though I had to hammer them into the hard wood) to attach it, then put the glass shelves back into their original positions.  I think it turned out really nice.  It is colored, but is sort of neautral in that coloring...and I can change it quickly and easily anytime I want to!


Friday, September 19, 2014

Retro Recipes: Fruit Cocktail Cookies


The second recipe of the two that I completed for the Nom-Nom Baking Challenge at Work was for Fruit Cocktail Cookies (see the first recipe here).  I always loved fruit cocktail as a kid--the cherries were my favorite part--so it seemed like something worth trying.

I'll put the original recipe and then my modern, updated version with more information that might help people who aren't experienced bakers or who aren't used to using old recipes.

Three things to note about this recipe:
  • The cookies, as I made them, turned out kind of like little fruit cakes in texture.
  • The original recipe said that the raisins and nuts were optional.  I added them and some extra cherries leftover from making the Cherry Nut Loaf.  I would not recommend leaving them out; I think the cookies would be really bland without them.  And if you do leave them out, you should definitely swap them for other fruit and/or nuts. 
  • This recipe is really large; I made nearly 6 dozen cookies and still had some extra dough.
  • I didn't have any cloves, so I made do with a combo of other spices that I have.  


Original Recipe, as it appeared in Adventures in the Kitchen, the 1954 Waverly Lutheran Church Cookbook:
1 c. shortening
1 c. brown sugar
1/2 c. white sugar
3 beaten eggs
1 c. raisins (may omit)
2 c. well drained finely diced fruit cocktail
1 1/2 c. nuts (optional)
1 tsp. vanilla
Sift together 1 tsp. soda, 1 tsp. B. P., 4c. flour, 1 tsp. each of cloves and cinnamon.  Mix well.  Drop by teaspoonful on lightly greased cookie sheet, Bake at 400 degrees until lightly browned.
--Mrs. Sanford Anderson


Modern Version:
Ingredients:
  • 1 c. margarine
  • 1 c. brown sugar
  • 1/2 c. white sugar
  • 3 beaten eggs
  • 1 c. raisins or other dried fruit (craisins would probably be yummy!)
  • 2 c. well drained, finely diced fruit cocktail (this is more than 1 can, but less than 2)
  • 1 1/2 c. chopped nuts (I used walnuts)
  • 1/4 c. (or more) chopped maraschino cherries
  • 1 tsp. vanilla
  • dash of salt
  • 1 tsp. baking soda
  • 1 tsp. baking powder
  • 4c. flour
  • 1 1/2 tsp. cinnamon
  • 1/2 tsp. ginger
  • 1 tsp. Penzey's baking spice   
Directions:
  1. Preheat oven to 400 degrees.  
  2. Cream together margarine, white sugar, and brown sugar.  
  3. Mix in eggs and vanilla.  
  4. Mix in all fruit and nuts.  
  5. In a separate bowl, sift together salt, baking powder, baking soda, flour, and all spices.  
  6. Mix dry and wet ingredients together.  
  7. Drop by teaspoonfuls onto a lightly greased cookie sheet (I used foil sprayed with Pam spray on cookie sheets).  
  8. Bake for 7 to 9 minutes or until lightly browned.  


Retro Recipes: Cherry Nut Loaf


At work we have an email group called NomNomNom, also known as "Where the Treats At?"  In general, people send announcements when there is left-over party food or if someone has a big batch of a work treat to share.  However, every once in a while, we have a special event.  For the end-of-summer, we had our first bake-off challenge.

Since we work for a Historical Society, selecting historical recipes made sense.  We have a huge collection of cookbooks from all over Minnesota and who doesn't like to muddle through less-than-exact directions?

The organizer picked the book Adventures in the Kitchen, a 1954 cookbook compiled by the women of the Waverly Lutheran Church.  Participants could make any of the cookies, bars, pies, or quick breads/muffins.  I chose to make two recipes: Cherry Nut Loaf and Fruit Cocktail Cookies.  The first is described below and the second is in another post on this blog.

I'll put the original recipe and then my modern, updated version with more information that might help people who aren't experienced bakers or who aren't used to using old recipes. Oh, yeah, and my recipe has more cherries than the original.  Why?  'Cause I like cherries.

Original Recipe:
1 c. sugar
2 eggs
5 oz. jar of chopped maraschino cherries or 1/3 cup cherries and 1/4 c. juice
1 1/2 c. flour
1 1/2 tsp. B.P.
1 1/2 tsp. salt
1/4 tsp. salt
1/2 c. nut meats chopped
Beat sugar and eggs until light, add cherry juice and dry ingredients alternately.  Add cherries and nuts. Bake 1 hour in 350 degree oven
--Mrs. Ollie Kleinschrodt
--Mrs. Orville Peterson
--Mrs. J. H. Holland 
(Guest Cooks)


Modern Version:
Ingredients:
  • 1 c. sugar
  • 2 eggs
  • 3/4 of a 10 oz. jar of chopped maraschino cherries, drained and chopped plus 1/4 cup reserved drained juice 
  • 1 1/2 c. flour
  • 1 1/2 tsp. Baking Powder
  • 1 1/2 tsp. salt
  • 1/4 tsp. salt
  • 1/2 c. nuts, chopped (I used walnuts this time)
Directions:
  1. Preheat oven to 350 degrees.  
  2. Whisk eggs and sugar together until well mixed and light/fluffy.  
  3. In another bowl, stir together dry ingredients
  4. Alternately add cherry juice and dry mixture.
  5. When well blended, stir in cherries and nuts.  
  6. Lightly grease sides and bottom of standard loaf pan
  7. Bake loaf 45 to 60 minutes, or until cake tester comes out clean when inserted in the center of the loaf.  My loaf was not done at all when I checked it after 40 minutes, but probably slightly overdone when I checked it at 50 minutes.  
  8. Let cool, loosen edges, and remove loaf from pan. 

Friday, September 5, 2014

Sweet and fruity chicken salad


I have been making and tinkering with the following fruity chicken salad recipe for several years.  It is based on a Hungry Girl recipe called Sweet 'n Chunky Chicken Salad.  The idea is that it is sort of like a Waldorf salad, but I like to think of it as a totally different thing.  My version has more fruits and veggies than the original, making it less saucy.  None of the amounts in the ingredients are exact, it is definitely a "to taste" thing.  

I have added walnuts to it, topped a sandwich with avocado, added extra salt and pepper to the top of it, eaten it straight out of the bowl with a fork, and other serving variations.  I've also made it without any mayo (when I just didn't have any in the house) and without any sweetener (because I forgot, but it was still pretty good!).  It is filling and a great way to use yummy fruits and veggies to make a healthy lunch.  

Here it is:

Ingredients:
  • About 1 cup cooked and chopped skinless chicken breast (rotisserie chicken makes it extra-tasty!)
  • 1/2 to 1 cup peeled, chopped cucumber
  • 1/2+ cup seedless red grapes, halved
  • 1/2+ cup chopped apple (usually I just cut up half to 3/4 of a medium to large sized apple)
  • 1/4 cup (heaping) plain, fat free, Greek yogurt 
  • 2 Tbsp light or fat free mayo
  • 1 packet Splenda
  • 1/2 tsp lemon pepper seasoning
  • dash salt
  • pepper and more lemon pepper, to taste


 Directions:
1) Mix yogurt, mayo, Splenda, salt, pepper, and lemon pepper.
2) Stir in chicken, coating evenly
3) Stir in remaining ingredients
4) You can eat this right away, or you can let the flavors mellow a bit in the fridge.  

This makes 2 really large servings.

Photos of chicken salad are never really gonna look that appealing, but here is an example: