Sunday, January 1, 2017

Graham Cracker Gingerbread Houses: Perfect for a Decorating Party


Since I moved into my house I have worked really hard to build my own traditions in my home. (After all, why should it be only the married and the parents among us that get to celebrate and build?)  One of those traditions is family Christmas Eve at my house.  The others are entertainments at my house for friends: a Halloween party and a holiday, gingerbread decorating party.  

The main issue with the gingerbread party is having houses (or other stuctures) for people to decorate.  I've tried baking them and I've bought tiny village kits to put together.  Both are good options, but the first is time consuming and the second can be expensive.  This year I decided to go with a 3rd option: making houses from graham crackers.  Still takes *some* time, but it was really affordable and made houses of a nice size for decorating.  

Here's how I did it....


Each house requires about 6.5 full-sheet graham crackers.  (Probably more, though, due to the chance of breakage while working.)

For each house, cut 2 of the crackers like this:
Then you will have main pieces like this:


Make a batch of royal icing and then load it into a frosting bag with the tip cut off.

Pipe frosting along two sides of one cracker:


Stand up the crackers on edge and attach a side wall piece:


Attach the other side wall piece:


Pipe frosting on the other long wall piece and attach it:


When frosting is partially set up, pipe frosting along cut edges of the side walls and the top of the long walls:


Put roof piece on, and repeat on other side. If your graham crackers are like mine, you'll have a space at the top where the roof doesn't meet:

To fill it in, frosting-glue two partial cracker-quarters (you might have to cut one to make it a bit shorter:


Also, you may want to frosting-glue the house down to a piece of foam core from the beginning.  It not only helps with stability but also gives a "lawn" for decorating!  


This year's graham crackers were really awesome!


Chocolate-Covered Ritz Cracker Toffee


I was looking for a recipe for something sweet for a New Years party that would also be relatively quick and easy to make.  This recipe completely hit the mark.  It is pretty awesome because it has such simple ingredients, turns out pretty in a container, and everyone enjoyed it.  I think it would be great to give as a gift and would almost certainly ship well.

The original recipe was from Betty Crocker. I didn't really change much, except I used a few more sprinkles. (Because: OF COURSE I used more sprinkles!)  I also think nuts would be good on top, or swap the type of chocolate chips from milk to semi-sweet or dark.

Ingredients: 

  • 40 Ritz crackers (I used the Trader Joe's version because I had extras)
  • 1 cup butter 
  • 1 cup sugar
  • 1/2 teaspoon salt
  • 1 teaspoon vanilla
  • 1 bag (11.5 oz) milk chocolate chips (approximately 2 cups)
  • candy sprinkles 


Directions:
  1. Heat oven to 350°F. 
  2. Line 15x10 inch pan (with sides) with foil. Be sure that the foil is solid on the bottom.  I overlapped foil and it caused problems. 
  3. Spray foil with nonstick cooking spray. 
  4. Place crackers in single layer in pan.  I broke up some crackers to put some in the empty spots.
  5. In saucepan, cook and stir butter, sugar and salt over medium heat until butter is melted. Heat to boiling, stirring frequently.
      
  6. Boil 7 to 9 minutes longer, stirring frequently, until light brown color.
  7. Remove from heat. Add vanilla; stir until blended. Be careful, as mixture can spatter and foam up when vanilla is added. 
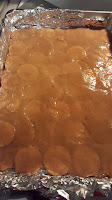
  8. Immediately pour mixture evenly over crackers in pan and spread to cover layer of crackers.
  9. Bake 13 to 15 minutes or until bubbly and brown in color.
  10. Sprinkle chocolate chips on top of cracker mixture. Let stand 4 to 5 minutes.
  11. Spread chocolate evenly over cracker mixture.
  12. Sprinkle with candy sprinkles.
  13. Cool completely, about 2 hours or until chocolate is set. (I put mine in the fridge as soon as the pan was cool enough to touch barehanded.)
  14. Break into pieces.
  15. Store covered in refrigerator up to 1 week